ADK Java 快速入门
本指南展示了如何开始使用 Java Agent Development Kit (ADK)。开始之前,请确保你已安装了以下软件:
- Java 17 或更高版本
- Maven 3.9 或更高版本
创建一个智能体项目
创建一个包含以下文件和目录结构的智能体项目:
my_agent/
    src/main/java/com/example/agent/
                        HelloTimeAgent.java # 主智能体代码
                        AgentCliRunner.java # 命令行界面
    pom.xml                                 # 项目配置
    .env                                    # API 密钥或项目 ID
使用命令行创建此项目结构
定义智能体代码
为基本智能体创建代码,包括一个名为 getCurrentTime() 的 ADK 函数工具的简单实现。
将以下代码添加到你的项目目录中的 HelloTimeAgent.java 文件:
package com.example.agent;

import com.google.adk.agents.BaseAgent;
import com.google.adk.agents.LlmAgent;
import com.google.adk.tools.Annotations.Schema;
import com.google.adk.tools.FunctionTool;

import java.util.Map;

public class HelloTimeAgent {

    public static BaseAgent ROOT_AGENT = initAgent();

    private static BaseAgent initAgent() {
        return LlmAgent.builder()
            .name("hello-time-agent")
            .description("报告指定城市的当前时间")
            .instruction("""
                你是一个有用的助手,可以报告城市的当前时间。
                为此使用 'getCurrentTime' 工具。
                """)
            .model("gemini-2.5-flash")
            .tools(FunctionTool.create(HelloTimeAgent.class, "getCurrentTime"))
            .build();
    }

    /** 模拟工具实现 */
    @Schema(description = "获取给定城市的当前时间")
    public static Map<String, String> getCurrentTime(
        @Schema(name = "city", description = "要获取时间的城市名称") String city) {
        return Map.of(
            "city", city,
            "forecast", "The time is 10:30am."
        );
    }
}
注意:Gemini 3 兼容性
ADK Java v0.3.0 及以下版本由于函数调用中的思维签名变更,不兼容
Gemini 3 Pro 预览 请使用 Gemini 2.5 或以下版本。
配置项目和依赖项
ADK 智能体项目需要在你的
pom.xml 项目文件中添加此依赖项:
<dependencies>
    <dependency>
        <groupId>com.google.adk</groupId>
        <artifactId>google-adk</artifactId>
        <version>0.5.0</version>
    </dependency>
</dependencies>
Update the pom.xml project file to include this dependency and
additional settings with the following configuration code:
项目的完整 pom.xml 配置
以下代码显示了此项目的完整 pom.xml 配置:
<?xml version="1.0" encoding="UTF-8"?>
<project xmlns="http://maven.apache.org/POM/4.0.0"
        xmlns:xsi="http://www.w3.org/2001/XMLSchema-instance"
        xsi:schemaLocation="http://maven.apache.org/POM/4.0.0 http://maven.apache.org/xsd/maven-4.0.0.xsd">
    <modelVersion>4.0.0</modelVersion>

    <groupId>com.example.agent</groupId>
    <artifactId>adk-agents</artifactId>
    <version>1.0-SNAPSHOT</version>

    <!-- 指定你将使用的 Java 版本 -->
    <properties>
        <maven.compiler.source>17</maven.compiler.source>
        <maven.compiler.target>17</maven.compiler.target>
        <project.build.sourceEncoding>UTF-8</project.build.sourceEncoding>
    </properties>

    <dependencies>
        <!-- ADK 核心依赖 -->
        <dependency>
            <groupId>com.google.adk</groupId>
            <artifactId>google-adk</artifactId>
            <version>0.3.0</version>
        </dependency>
        <!-- 用于调试智能体的 ADK 开发 Web UI -->
        <dependency>
            <groupId>com.google.adk</groupId>
            <artifactId>google-adk-dev</artifactId>
            <version>0.3.0</version>
        </dependency>
    </dependencies>

</project>
设置你的 API 密钥
此项目使用需要 API 密钥的 Gemini API。如果你还没有 Gemini API 密钥,请在 Google AI Studio 的 API 密钥 页面创建一个。
在终端窗口中,将你的 API 密钥写入项目的 .env 文件以设置环境变量:
使用 ADK 的其他 AI 模型
ADK 支持使用许多生成式 AI 模型。有关在 ADK 智能体中配置其他模型的更多信息,请参阅 模型与身份验证。
创建一个智能体命令行界面
创建一个 AgentCliRunner.java 类,以便你能够从命令行运行和与 HelloTimeAgent 交互。此代码展示了如何创建一个 RunConfig 对象来运行智能体和一个 Session 对象来与运行中的智能体交互。
package com.example.agent;

import com.google.adk.agents.RunConfig;
import com.google.adk.events.Event;
import com.google.adk.runner.InMemoryRunner;
import com.google.adk.sessions.Session;
import com.google.genai.types.Content;
import com.google.genai.types.Part;
import io.reactivex.rxjava3.core.Flowable;
import java.util.Scanner;

import static java.nio.charset.StandardCharsets.UTF_8;

public class AgentCliRunner {

    public static void main(String[] args) {
        RunConfig runConfig = RunConfig.builder().build();
        InMemoryRunner runner = new InMemoryRunner(HelloTimeAgent.ROOT_AGENT);

        Session session = runner
                .sessionService()
                .createSession(runner.appName(), "user1234")
                .blockingGet();

        try (Scanner scanner = new Scanner(System.in, UTF_8)) {
            while (true) {
                System.out.print("\nYou > ");
                String userInput = scanner.nextLine();
                if ("quit".equalsIgnoreCase(userInput)) {
                    break;
                }

                Content userMsg = Content.fromParts(Part.fromText(userInput));
                Flowable<Event> events = runner.runAsync(session.userId(), session.id(), userMsg, runConfig);

                System.out.print("\nAgent > ");
                events.blockingForEach(event -> {
                    if (event.finalResponse()) {
                        System.out.println(event.stringifyContent());
                    }
                });
            }
        }
    }
}
运行你的智能体
你可以使用你定义的交互式命令行界面 AgentCliRunner 类或 ADK 提供的 ADK Web 用户界面使用 AdkWebServer 类来运行你的 ADK 智能体。这两个选项都允许你测试和与你的智能体交互。
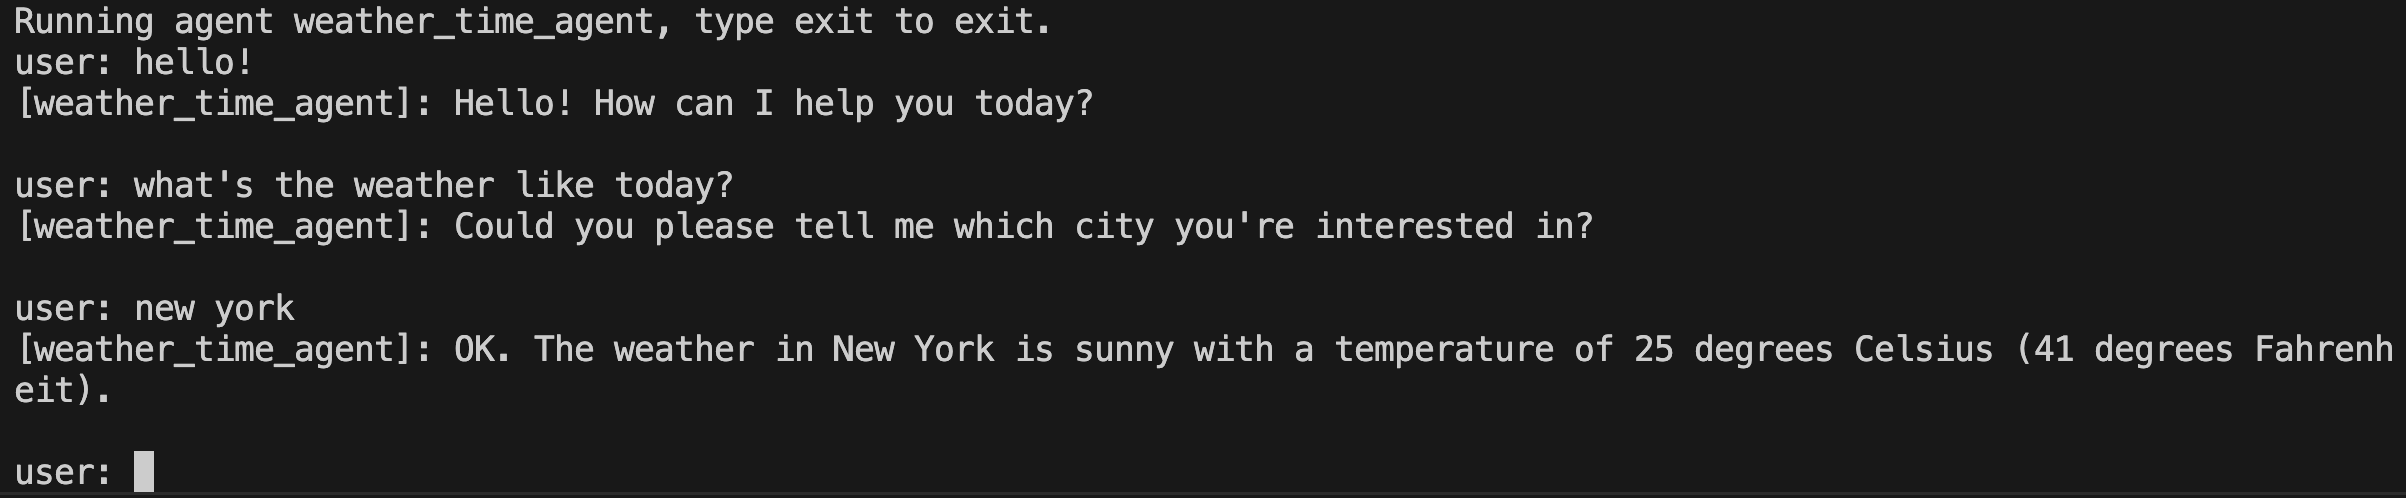
使用命令行界面运行
使用以下 Maven 命令通过命令行界面 AgentCliRunner 类运行你的智能体:
# 记得加载密钥和设置:source .env 或 env.bat
mvn compile exec:java -Dexec.mainClass="com.example.agent.AgentCliRunner"
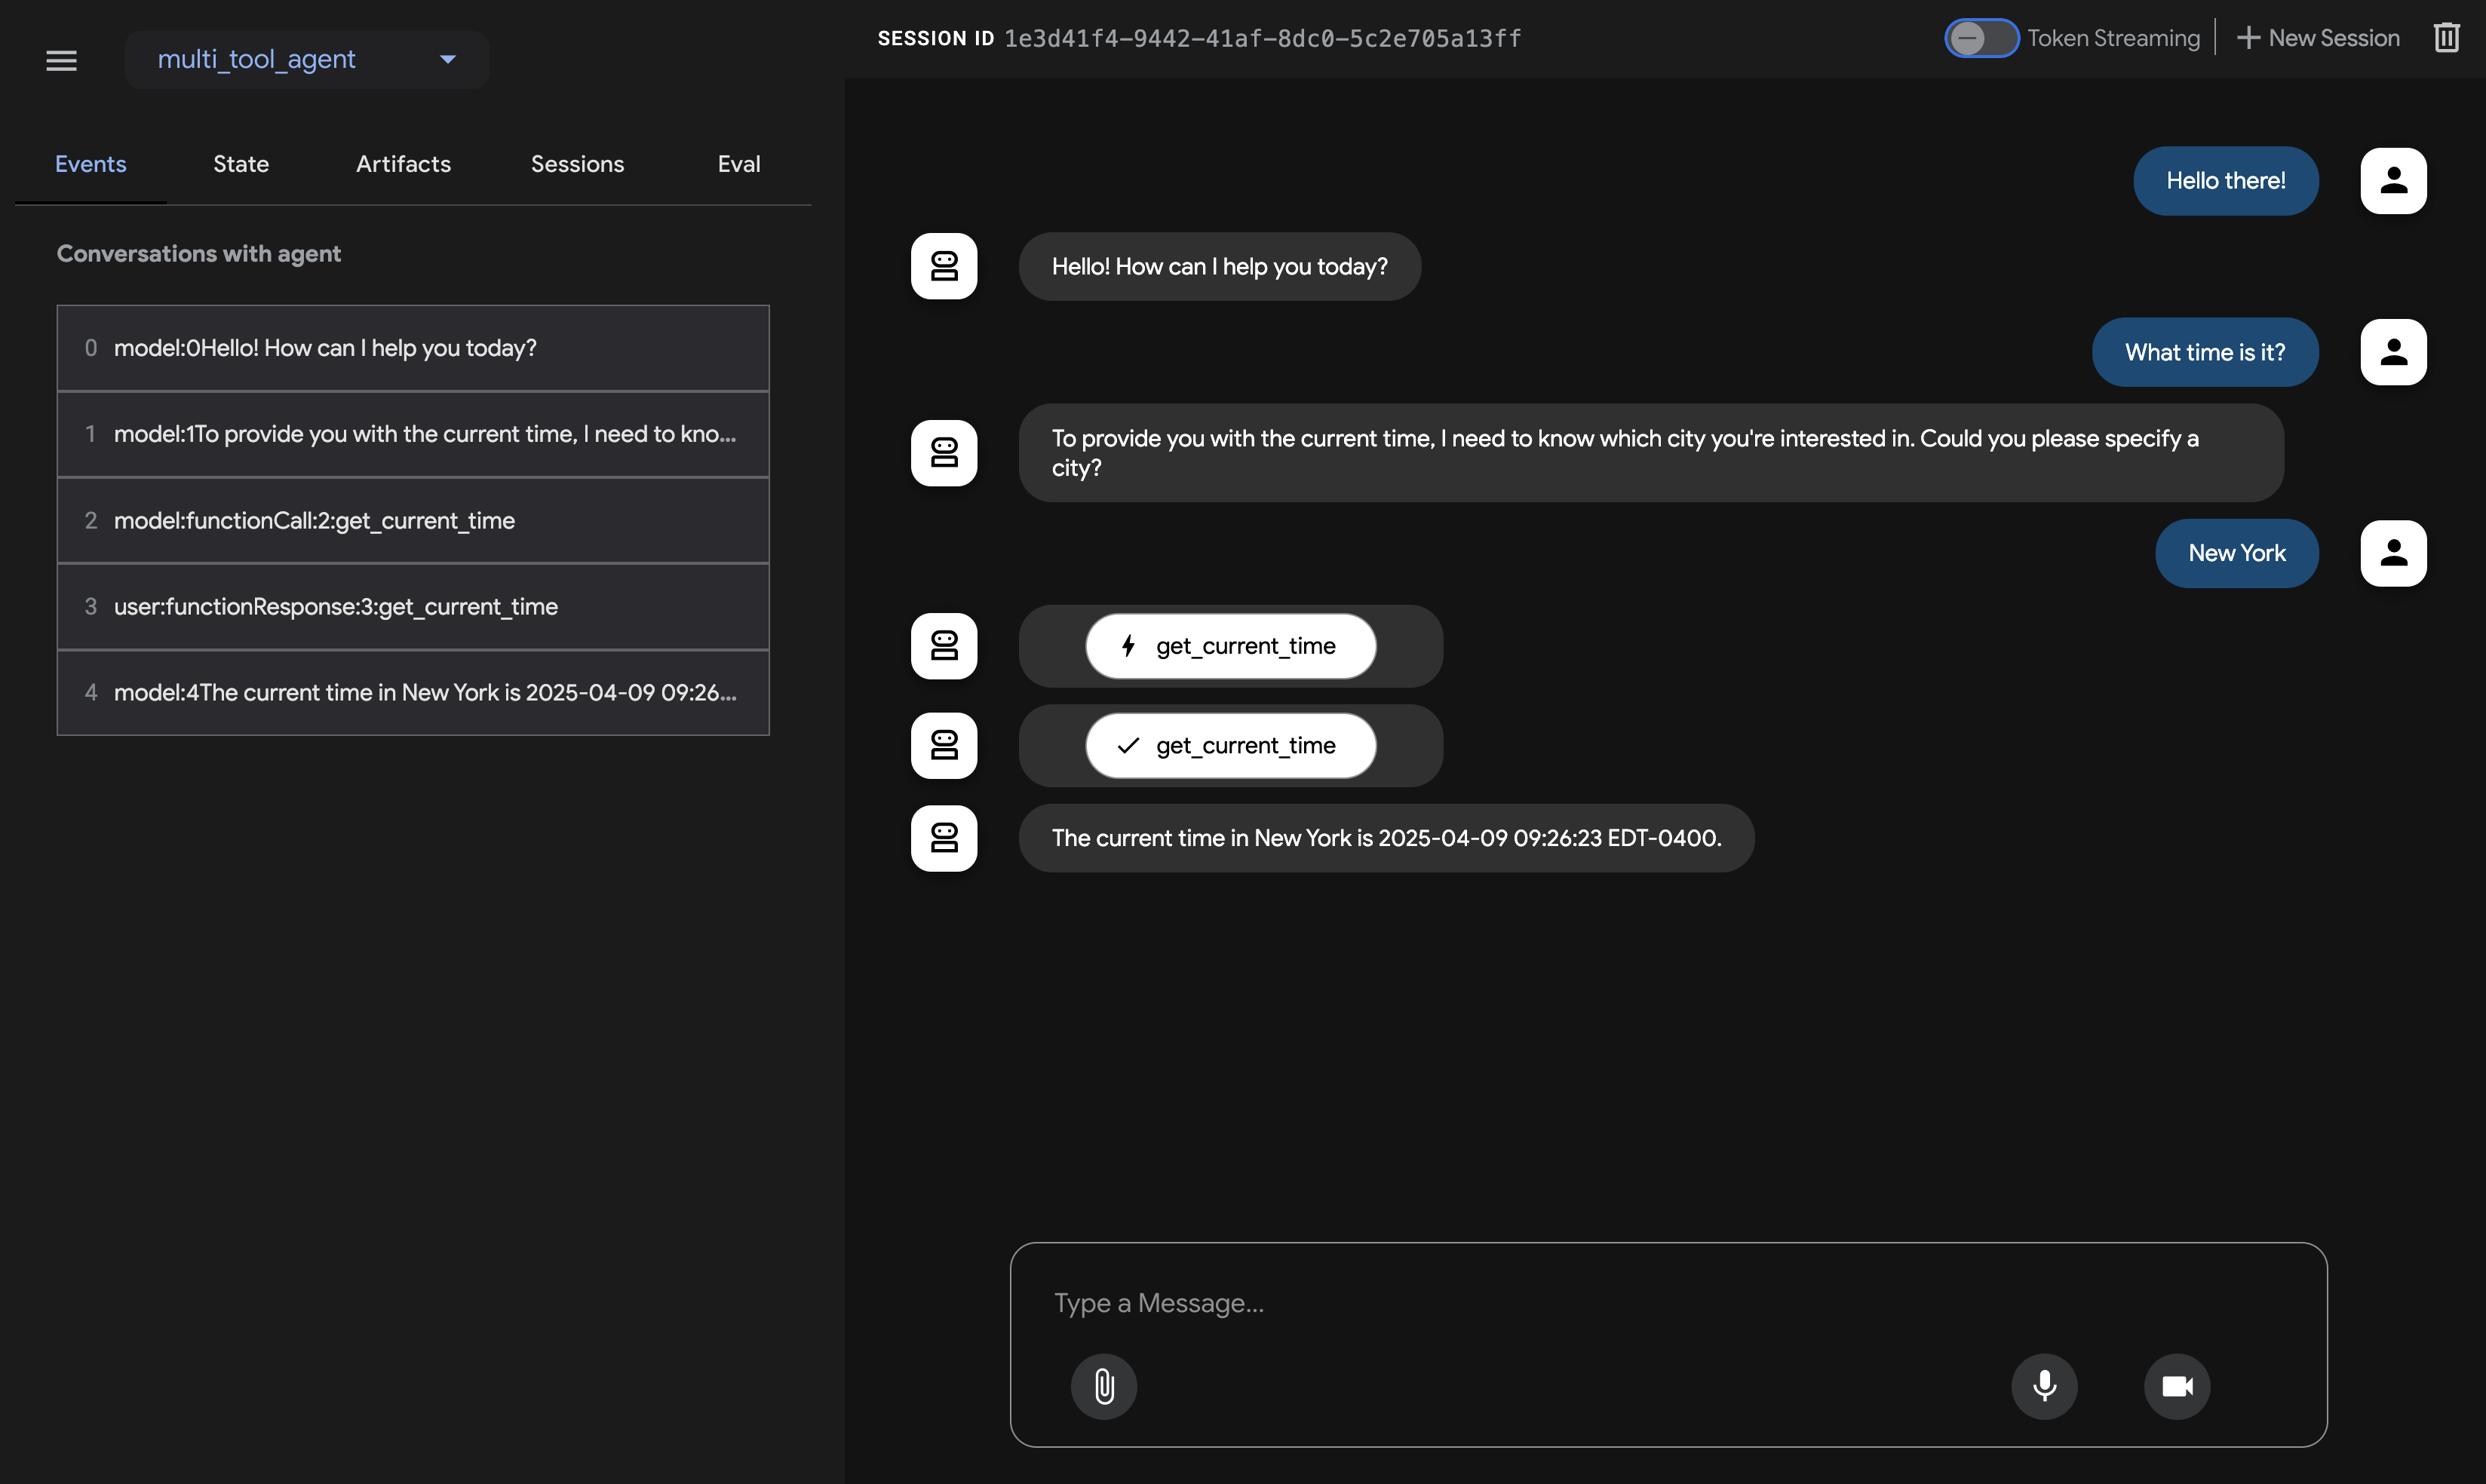
使用网页界面运行
使用以下 Maven 命令通过 ADK Web 界面运行你的智能体:
# 记得加载密钥和设置:source .env 或 env.bat
mvn compile exec:java \
    -Dexec.mainClass="com.google.adk.web.AdkWebServer" \
    -Dexec.args="--adk.agents.source-dir=target --server.port=8000"
此命令启动一个带有你的智能体聊天界面的网页服务器。你可以在 (http://localhost:8000) 访问网页界面。在左上角选择你的智能体并键入请求。
注意:ADK Web 仅限开发使用
ADK Web 不适用于生产部署。你应该仅将 ADK Web 用于开发和调试目的。
下一步:构建你的智能体
现在你已经安装了 ADK 并运行了你的第一个智能体,尝试使用我们的构建指南构建你自己的智能体: