会话 (Session):跟踪个别对话
在前述介绍之后,让我们深入了解 Session。回想一下“对话线程”的概念。就像你不会每次发短信都从头开始一样,智能体也需要了解当前交互的上下文。Session 是 ADK 专门设计用于跟踪和管理这些单独对话线程的对象。
Session 对象
当用户开始与你的智能体交互时,SessionService 会创建一个 Session 对象 (google.adk.sessions.Session)。该对象作为与单个对话线程相关的所有内容的容器。其主要属性如下:
- 标识 (
id,appName,userId): 对话的唯一标签。id: 此特定对话线程的唯一标识符,对于以后检索至关重要。一个SessionService对象可以处理多个Session。此字段标识我们引用的是哪个特定的会话对象。例如,“test_id_modification”。app_name: 标识此对话属于哪个智能体应用程序。例如,“id_modifier_workflow”。userId: 将对话链接到特定用户。
- 历史 (
events): 在此特定线程中发生的所有交互(Event对象——用户消息、智能体响应、工具操作)的时间顺序序列。 - 会话状态 (
state): 一个仅存储与此特定、正在进行的对话相关的临时数据的地方。这在交互期间充当智能体的草稿板。我们将在下一节中详细介绍如何使用和管理state。 - 活动跟踪 (
lastUpdateTime): 一个时间戳,指示此对话线程中最后一次发生事件的时间。
示例:检查 Session 属性
```python from google.adk.sessions import InMemorySessionService, Session
创建一个简单的会话以检查其属性
temp_service = InMemorySessionService() example_session = await temp_service.create_session( app_name="my_app", user_id="example_user", state={"initial_key": "initial_value"} # 可以初始化 state )
print(f"--- 检查 Session 属性 ---")
print(f"ID (id): {example_session.id}")
print(f"应用名 (app_name): {example_session.app_name}")
print(f"用户 ID (user_id): {example_session.user_id}")
print(f"状态 (state): {example_session.state}") # 这里只显示初始状态
print(f"事件 (events): {example_session.events}") # 初始为空
print(f"最后更新时间 (last_update_time): {example_session.last_update_time:.2f}")
print(f"---------------------------------")
# 清理(本例可选)
await temp_service.delete_session(app_name=example_session.app_name,
                            user_id=example_session.user_id, session_id=example_session.id)
print("temp_service 的最终状态 - ", temp_service)
import { InMemorySessionService } from "@google/adk";

// 创建一个简单会话以检查其属性
const tempService = new InMemorySessionService();
const exampleSession = await tempService.createSession({
    appName: "my_app",
    userId: "example_user",
    state: {"initial_key": "initial_value"} // 可以初始化状态
});

console.log("--- 检查 Session 属性 ---");
console.log(`ID ('id'):                ${exampleSession.id}`);
console.log(`应用名 ('appName'): ${exampleSession.appName}`);
console.log(`用户 ID ('userId'):         ${exampleSession.userId}`);
console.log(`状态 ('state'):           ${JSON.stringify(exampleSession.state)}`); // 注意:这里只显示初始状态
console.log(`事件 ('events'):         ${JSON.stringify(exampleSession.events)}`); // 初始为空
console.log(`最后更新 ('lastUpdateTime'): ${exampleSession.lastUpdateTime}`);
console.log("---------------------------------");

// 清理(本例可选)
const finalStatus = await tempService.deleteSession({
    appName: exampleSession.appName,
    userId: exampleSession.userId,
    sessionId: exampleSession.id
});
console.log("temp_service 的最终状态 - ", finalStatus);
appName := "my_go_app"
userID := "example_go_user"
initialState := map[string]any{"initial_key": "initial_value"}

// Create a session to examine its properties.
createResp, err := inMemoryService.Create(ctx, &session.CreateRequest{
    AppName: appName,
    UserID:  userID,
    State:   initialState,
})
if err != nil {
    log.Fatalf("Failed to create session: %v", err)
}
exampleSession := createResp.Session

fmt.Println("\n--- Examining Session Properties ---")
fmt.Printf("ID (`ID()`): %s\n", exampleSession.ID())
fmt.Printf("Application Name (`AppName()`): %s\n", exampleSession.AppName())
// To access state, you call Get().
val, _ := exampleSession.State().Get("initial_key")
fmt.Printf("State (`State().Get()`):    initial_key = %v\n", val)

// Events are initially empty.
fmt.Printf("Events (`Events().Len()`):  %d\n", exampleSession.Events().Len())
fmt.Printf("Last Update (`LastUpdateTime()`): %s\n", exampleSession.LastUpdateTime().Format("2006-01-02 15:04:05"))
fmt.Println("---------------------------------")

// Clean up the session.
err = inMemoryService.Delete(ctx, &session.DeleteRequest{
    AppName:   exampleSession.AppName(),
    UserID:    exampleSession.UserID(),
    SessionID: exampleSession.ID(),
})
if err != nil {
    log.Fatalf("Failed to delete session: %v", err)
}
fmt.Println("Session deleted successfully.")
import com.google.adk.sessions.InMemorySessionService;
import com.google.adk.sessions.Session;
import java.util.concurrent.ConcurrentMap;
import java.util.concurrent.ConcurrentHashMap;

String sessionId = "123";
String appName = "example-app"; // 示例 app 名称
String userId = "example-user"; // 示例用户 id
ConcurrentMap<String, Object> initialState = new ConcurrentHashMap<>(Map.of("newKey", "newValue"));
InMemorySessionService exampleSessionService = new InMemorySessionService();

// 创建会话
Session exampleSession = exampleSessionService.createSession(
    appName, userId, initialState, Optional.of(sessionId)).blockingGet();
System.out.println("会话创建成功。");

System.out.println("--- 检查 Session 属性 ---");
System.out.printf("ID (`id`): %s%n", exampleSession.id());
System.out.printf("应用名 (`appName`): %s%n", exampleSession.appName());
System.out.printf("用户 ID (`userId`): %s%n", exampleSession.userId());
System.out.printf("状态 (`state`): %s%n", exampleSession.state());
System.out.println("------------------------------------");

// 清理(本例可选)
var unused = exampleSessionService.deleteSession(appName, userId, sessionId);
(注意:上面显示的状态只是初始状态。状态更新通过事件发生,如状态部分所述。)
 import com.google.adk.kt.sessions.InMemorySessionService
 import com.google.adk.kt.sessions.SessionKey

 val sessionId = "123"
 val appName = "example-app"
 val userId = "example-user"
 val initialState = mapOf("newKey" to "newValue")
 val sessionService = InMemorySessionService()

 // Create Session
 val exampleSession = sessionService.createSession(
     key = SessionKey(appName, userId, sessionId),
     state = initialState
 )
 println("Session created successfully.")

 println("--- Examining Session Properties ---")
 println("ID (`id`):                ${exampleSession.key.id}")
 println("Application Name (`appName`): ${exampleSession.key.appName}")
 println("User ID (`userId`):         ${exampleSession.key.userId}")
 println("State (`state`):           ${exampleSession.state}")
 println("------------------------------------")

 // Clean up (optional for this example)
 sessionService.deleteSession(exampleSession.key)
(注意: 上面显示的状态仅为初始状态。状态的更新通过事件进行,如状态章节所述。)
使用 SessionService 管理会话
如上所示,你通常不会直接创建或管理 Session 对象,而是通过 SessionService。该服务作为会话生命周期的中央管理者。
其核心职责包括:
- 开启新对话:当用户开始交互时,创建新的
Session对象。 - 恢复已有对话:通过 ID 检索特定
Session,让智能体可以从上次中断处继续。 - 保存进度:将新的交互(
Event对象)追加到会话历史。这也是会话state更新的机制(详见State章节)。 - 列出对话:查找特定用户和应用的活跃会话线程。
- 清理:当对话结束或不再需要时,删除
Session及其相关数据。
SessionService 实现
ADK 提供了多种 SessionService 实现,你可以选择最适合需求的存储后端:
InMemorySessionService
- 工作原理:将所有会话数据直接存储在应用程序的内存中。
- 持久性:无。如果应用程序重启,所有对话数据都将丢失。
- 需求:无需额外设置。
- 适用于:快速开发、本地测试、示例以及不需要长期持久性的场景。
VertexAiSessionService
- 工作原理: 通过 API 调用使用 Google Cloud Agent Platform 基础设施进行会话管理。
- 持久性: 是。数据通过 Agent Runtime 进行可靠且可扩展的管理。
- 需求:
- 一个 Google Cloud 项目(
pip install vertexai) - 一个 Google Cloud 存储桶,可通过此步骤进行配置。
- 一个 Agent Runtime 资源名称/ID,可按照此教程进行设置。
- 如果你没有 Google Cloud 项目但想尝试 VertexAiSessionService,请参阅 Agent Platform Express Mode。
- 一个 Google Cloud 项目(
- 适用于: 部署在 Google Cloud 上的可扩展生产应用程序,尤其是在与其他 Agent Platform 功能集成时。
# 需要:pip install google-adk[vertexai]
# 加上 GCP 设置和身份验证
from google.adk.sessions import VertexAiSessionService

PROJECT_ID = "你的-gcp-项目-id"
LOCATION = "us-central1"
# 此服务使用的 app_name 应为 Reasoning Engine 的 ID 或名称
REASONING_ENGINE_APP_NAME = "projects/你的-gcp-项目-id/locations/us-central1/reasoningEngines/你的-engine-id"

session_service = VertexAiSessionService(project=PROJECT_ID, location=LOCATION)
# 调用服务方法时使用 REASONING_ENGINE_APP_NAME,例如:
# session_service = await session_service.create_session(app_name=REASONING_ENGINE_APP_NAME, ...)
import "google.golang.org/adk/session"

// 2. VertexAiSessionService
// 在运行前,确保你的环境已通过身份验证:
// gcloud auth application-default login
// export GOOGLE_CLOUD_PROJECT="你的-gcp-项目-id"
// export GOOGLE_CLOUD_LOCATION="你的-gcp-地区"

modelName := "gemini-flash-latest" // 替换为你需要的模型
vertexService, err := session.VertexAIService(ctx, modelName)
if err != nil {
  log.Printf("无法初始化 VertexAIService(如果未设置 gcloud 项目,这是预料之中的):%v", err)
} else {
  fmt.Println("成功初始化 VertexAIService。")
}
// 请查看上面的要求说明,并随后在你的 bashrc 文件中导出以下内容:
// export GOOGLE_CLOUD_PROJECT=我的_gcp_项目
// export GOOGLE_CLOUD_LOCATION=us-central1
// export GOOGLE_API_KEY=我的_api_密钥

import com.google.adk.sessions.VertexAiSessionService;
import java.util.UUID;

String sessionId = UUID.randomUUID().toString();
String reasoningEngineAppName = "123456789";
String userId = "u_123"; // 示例用户 id
ConcurrentMap<String, Object> initialState = new
    ConcurrentHashMap<>(); // 本示例不需要初始状态

VertexAiSessionService sessionService = new VertexAiSessionService();
Session mySession =
    sessionService
        .createSession(reasoningEngineAppName, userId, initialState, Optional.of(sessionId))
        .blockingGet();
DatabaseSessionService
- 工作原理: 连接到关系型数据库(例如 PostgreSQL、MySQL、SQLite)以将会话数据持久地存储在表中。
- 持久性: 是。数据在应用程序重启后仍然存在。
- 需求: 一个已配置的数据库。
- 适用于: 需要可靠、持久存储且由你自己管理的应用程序。
from google.adk.sessions import DatabaseSessionService
# 示例:使用本地 SQLite 文件:
# 注意:该实现需要异步数据库驱动程序。
# 对于 SQLite,请使用 'sqlite+aiosqlite' 而不是 'sqlite' 以确保异步兼容性。
db_url = "sqlite+aiosqlite:///./my_agent_data.db"
session_service = DatabaseSessionService(db_url=db_url)
并发与锁定
DatabaseSessionService 通过双层锁定架构确保并发操作期间的数据完整性:
- 进程内锁定: 该服务使用内部进程内锁来序列化同一会话的
append_event调用。这可以防止在同一进程内多个请求同时尝试更新同一会话时出现竞态条件。 - 行级锁定: 对于 PostgreSQL、MySQL 和 MariaDB,该服务使用行级锁定(通过
SELECT ... FOR UPDATE)来防止多个进程或副本同时尝试更新同一会话时出现竞态条件。
异步驱动程序要求
DatabaseSessionService 需要异步数据库驱动程序。对于 SQLite,请使用 sqlite+aiosqlite 方案。对于 PostgreSQL,建议使用 asyncpg。
ADK Python v1.22.0 中的会话数据库架构更改
ADK Python v1.22.0 中会话数据库的架构发生了变化,需要对会话数据库进行迁移。有关更多信息,请参阅 会话数据库架构迁移 (Session database schema migration)。
Session 生命周期
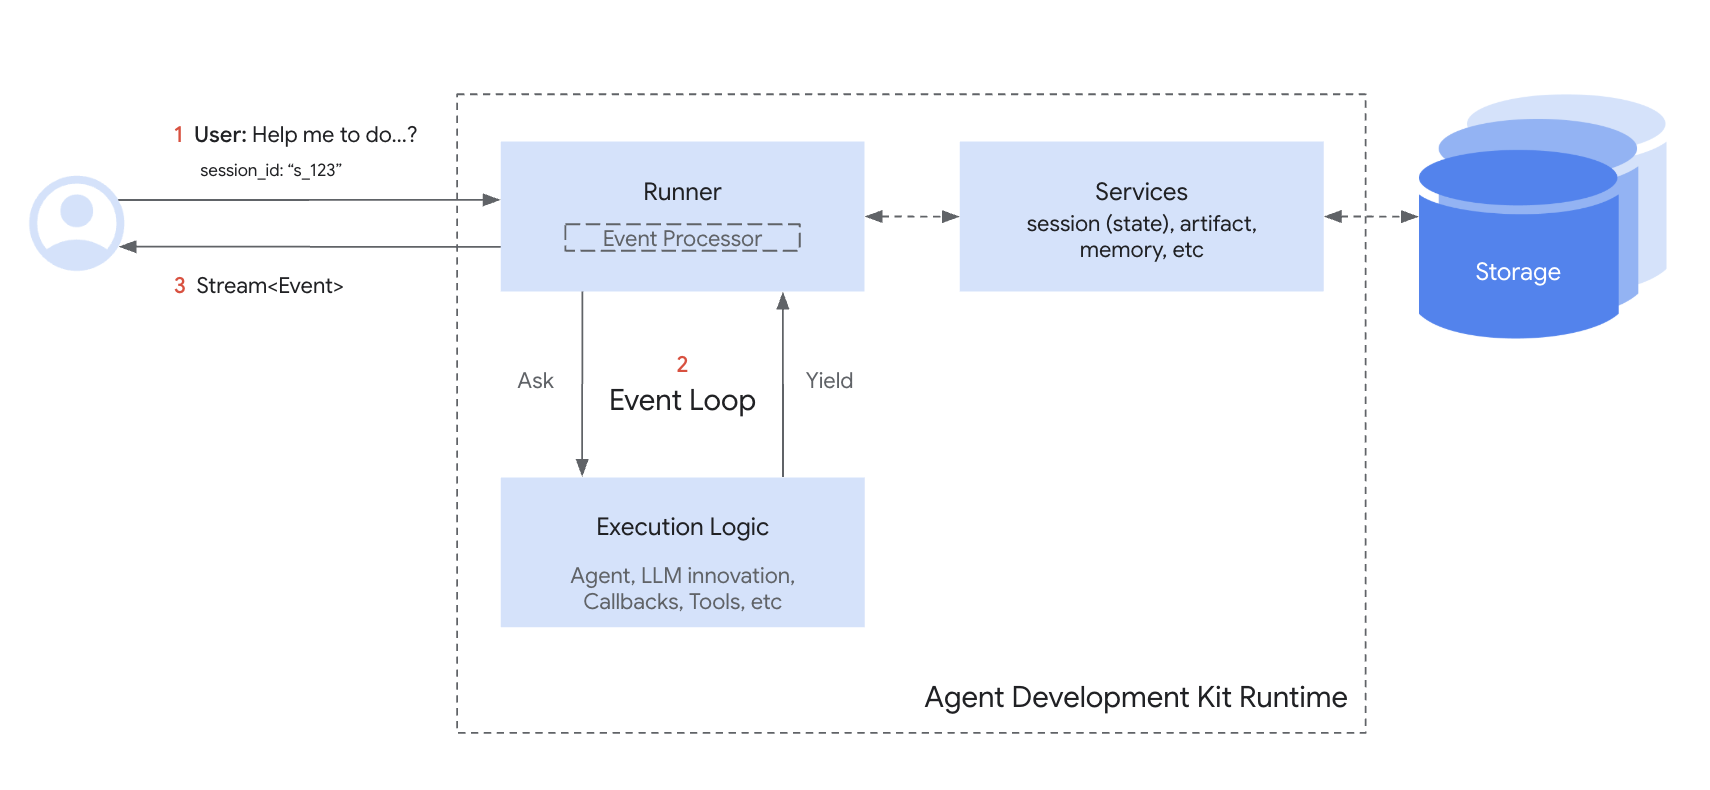
- 开始或恢复:你的应用程序需要使用
SessionService要么create_session(用于新聊天),要么使用现有的会话 ID。 - 提供上下文:
Runner从适当的服务方法获取相应的Session对象,为智能体提供对相应会话的state和events的访问权限。 - 智能体处理:用户通过查询提示智能体。智能体分析查询以及可能的会话
state和events历史来确定响应。 - 响应和状态更新:智能体生成响应(并可能标记要在
state中更新的数据)。Runner将其打包为Event。 - 保存交互:
Runner调用sessionService.append_event(session, event),将session和新的event作为参数。服务将Event添加到历史记录中,并根据事件中的信息更新存储中的会话state。会话的last_update_time也会得到更新。 - 准备下一次:智能体的响应发送给用户。更新后的
Session现在由SessionService存储,准备进行下一轮(这通常会在当前会话中继续对话,从步骤 1 重新开始循环)。 - 结束对话:当对话结束时,你的应用程序调用
sessionService.delete_session(...)来清理存储的会话数据(如果不再需要的话)。
这个循环强调了 SessionService 如何通过管理与每个 Session 对象关联的历史记录和状态来确保对话的连续性。