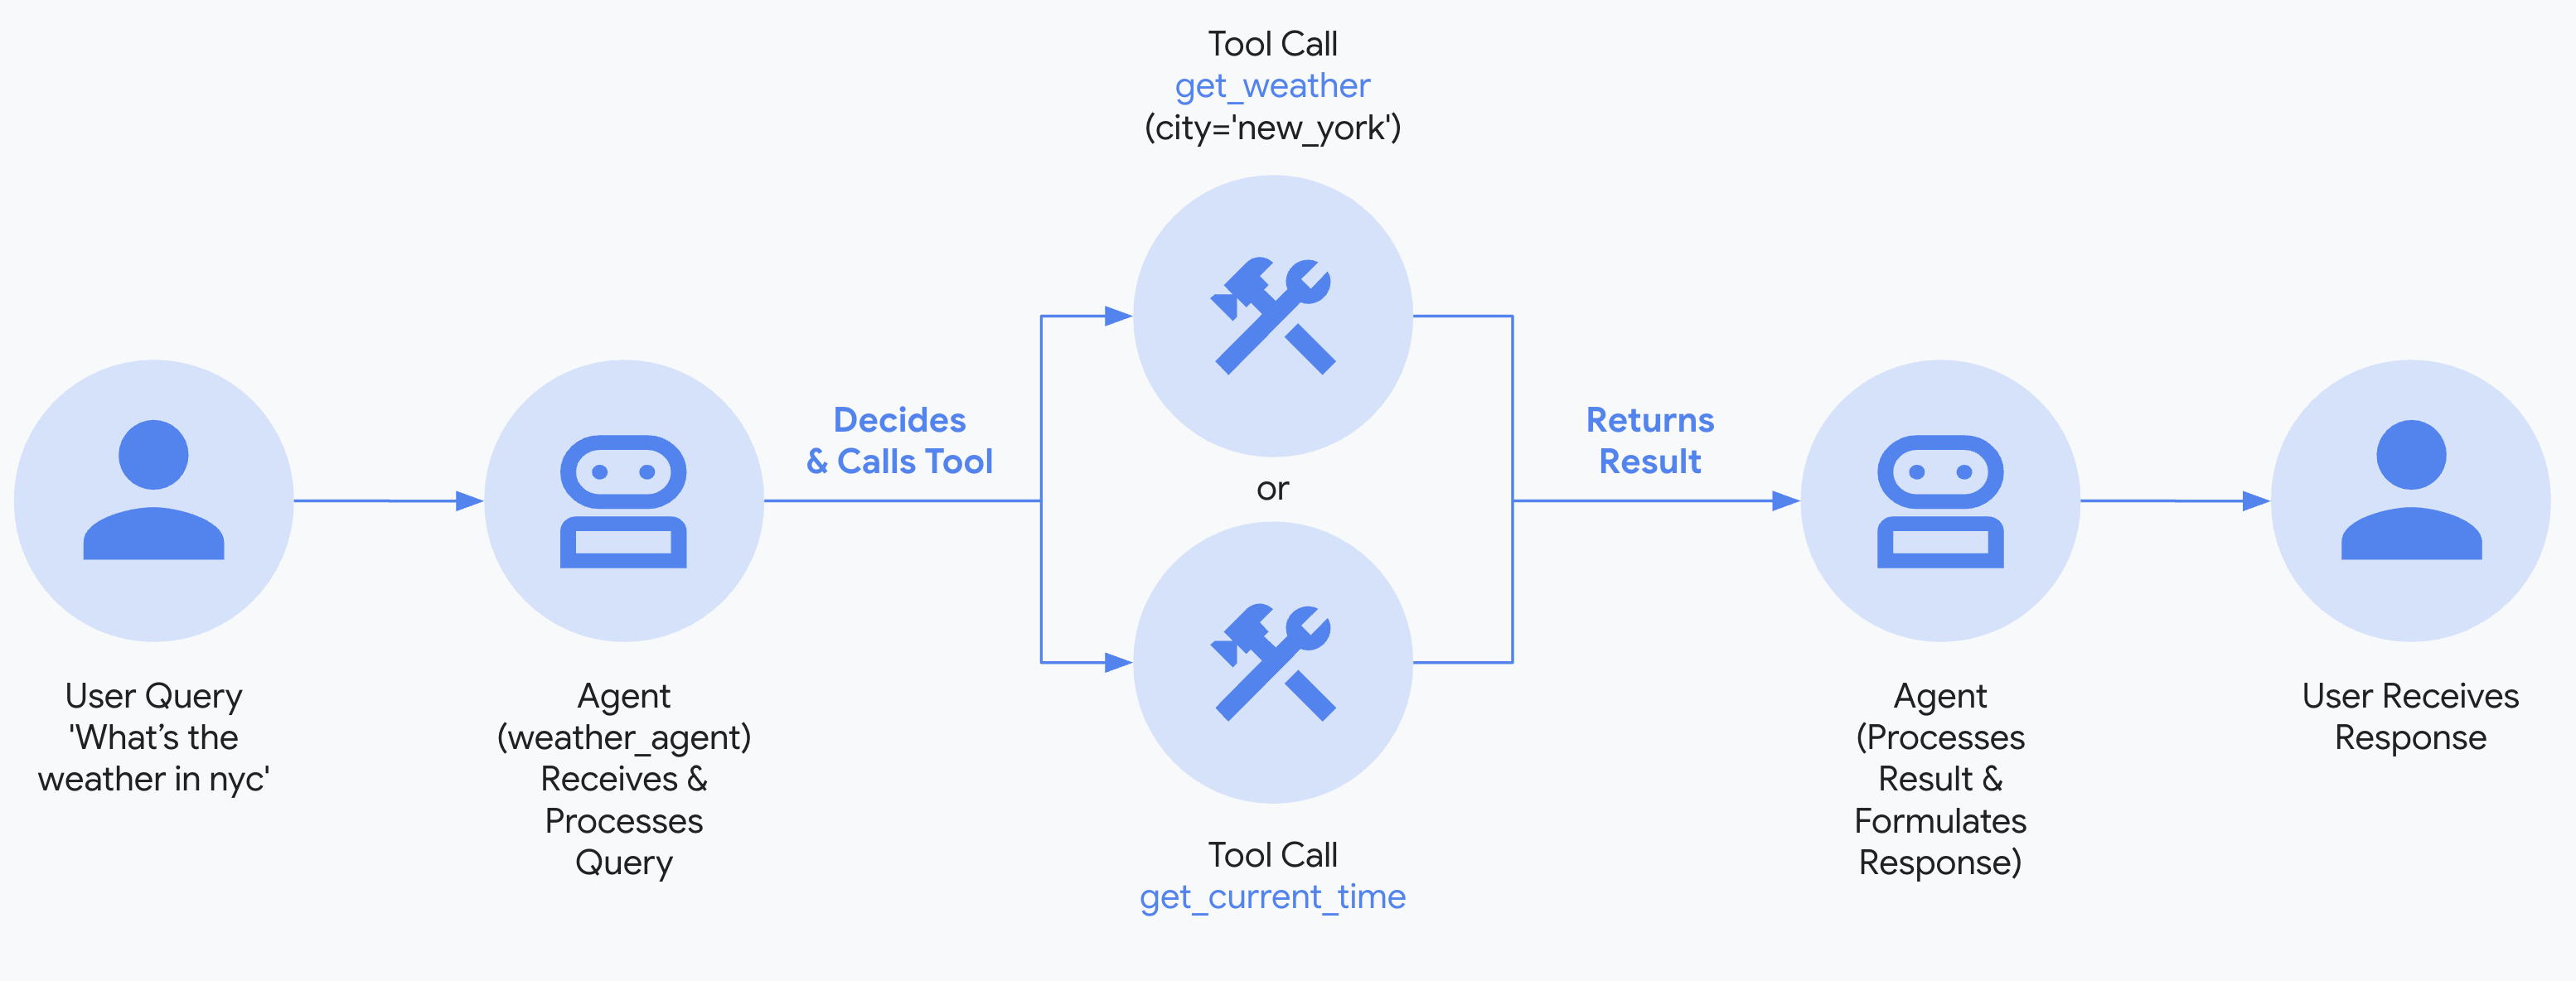
多工具智能体
本快速入门指南将引导你安装 Agent Development Kit (ADK)、设置一个包含多个工具的基础智能体,并在本地终端或基于浏览器的交互式开发 UI 中运行它。
本快速入门假定你拥有本地 IDE(VS Code、PyCharm、IntelliJ IDEA 等)、Python 3.10+ 或 Java 17+ 以及终端访问权限。此方法完全在你的机器上运行应用程序,推荐用于内部开发。
1. 设置环境并安装 ADK
创建并激活虚拟环境(推荐):
# Create
python3 -m venv .venv
# Activate (each new terminal)
# macOS/Linux: source .venv/bin/activate
# Windows CMD: .venv\Scripts\activate.bat
# Windows PowerShell: .venv\Scripts\Activate.ps1
安装 ADK:
创建一个新的项目目录,初始化它,并安装依赖项:
mkdir my-adk-agent
cd my-adk-agent
npm init -y
npm install @google/adk @google/adk-devtools
npm install -D typescript
创建一个包含以下内容的 tsconfig.json 文件。此配置确保你的项目正确处理现代 Node.js 模块。
创建一个新的 Go 模块
如果你是开始一个新项目,可以创建一个新的 Go 模块:
安装 ADK
要将 ADK 添加到你的项目,请运行以下命令:
这将把 ADK 作为依赖项添加到你的 go.mod 文件中。
如需安装 ADK Java 并设置环境,请参阅 Java 快速入门。
如需安装 ADK Kotlin 并设置环境,请参阅 Kotlin 快速入门。
2. 创建智能体项目
项目结构
你需要创建以下项目结构:
创建文件夹 multi_tool_agent:
Windows 用户注意事项
在接下来的几个步骤中在 Windows 上使用 ADK 时,我们建议使用文件资源管理器或 IDE 创建 Python 文件,因为以下命令(mkdir、echo)通常会生成包含空字节和/或错误编码的文件。
__init__.py
现在在文件夹中创建一个 __init__.py 文件:
你的 __init__.py 现在应该如下所示:
agent.py
在同一文件夹中创建一个 agent.py 文件:
将以下代码复制并粘贴到 agent.py 中:
# Copyright 2026 Google LLC
#
# Licensed under the Apache License, Version 2.0 (the "License");
# you may not use this file except in compliance with the License.
# You may obtain a copy of the License at
#
#     http://www.apache.org/licenses/LICENSE-2.0
#
# Unless required by applicable law or agreed to in writing, software
# distributed under the License is distributed on an "AS IS" BASIS,
# WITHOUT WARRANTIES OR CONDITIONS OF ANY KIND, either express or implied.
# See the License for the specific language governing permissions and
# limitations under the License.

import datetime
from zoneinfo import ZoneInfo
from google.adk.agents import Agent

def get_weather(city: str) -> dict:
    """Retrieves the current weather report for a specified city.

    Args:
        city (str): The name of the city for which to retrieve the weather report.

    Returns:
        dict: status and result or error msg.
    """
    if city.lower() == "new york":
        return {
            "status": "success",
            "report": (
                "The weather in New York is sunny with a temperature of 25 degrees"
                " Celsius (77 degrees Fahrenheit)."
            ),
        }
    else:
        return {
            "status": "error",
            "error_message": f"Weather information for '{city}' is not available.",
        }


def get_current_time(city: str) -> dict:
    """Returns the current time in a specified city.

    Args:
        city (str): The name of the city for which to retrieve the current time.

    Returns:
        dict: status and result or error msg.
    """

    if city.lower() == "new york":
        tz_identifier = "America/New_York"
    else:
        return {
            "status": "error",
            "error_message": (
                f"Sorry, I don't have timezone information for {city}."
            ),
        }

    tz = ZoneInfo(tz_identifier)
    now = datetime.datetime.now(tz)
    report = (
        f'The current time in {city} is {now.strftime("%Y-%m-%d %H:%M:%S %Z%z")}'
    )
    return {"status": "success", "report": report}


root_agent = Agent(
    name="weather_time_agent",
    model="gemini-2.5-flash",
    description=(
        "Agent to answer questions about the time and weather in a city."
    ),
    instruction=(
        "You are a helpful agent who can answer user questions about the time and weather in a city."
    ),
    tools=[get_weather, get_current_time],
)
.env
在同一文件夹中创建一个 .env 文件:
有关此文件的更多说明,请参见下一节设置模型。
你需要在你的 my-adk-agent 目录中创建以下项目结构:
agent.ts
在项目文件夹中创建一个 agent.ts 文件:
将以下代码复制并粘贴到 agent.ts 中:
import 'dotenv/config';
import { FunctionTool, LlmAgent } from '@google/adk';
import { z } from 'zod';

const getWeather = new FunctionTool({
  name: 'get_weather',
  description: 'Retrieves the current weather report for a specified city.',
  parameters: z.object({
    city: z.string().describe('The name of the city for which to retrieve the weather report.'),
  }),
  execute: ({ city }) => {
    if (city.toLowerCase() === 'new york') {
      return {
        status: 'success',
        report:
          'The weather in New York is sunny with a temperature of 25 degrees Celsius (77 degrees Fahrenheit).',
      };
    } else {
      return {
        status: 'error',
        error_message: `Weather information for '${city}' is not available.`,
      };
    }
  },
});

const getCurrentTime = new FunctionTool({
  name: 'get_current_time',
  description: 'Returns the current time in a specified city.',
  parameters: z.object({
    city: z.string().describe("The name of the city for which to retrieve the current time."),
  }),
  execute: ({ city }) => {
    let tz_identifier: string;
    if (city.toLowerCase() === 'new york') {
      tz_identifier = 'America/New_York';
    } else {
      return {
        status: 'error',
        error_message: `Sorry, I don't have timezone information for ${city}.`,
      };
    }

    const now = new Date();
    const report = `The current time in ${city} is ${now.toLocaleString('en-US', { timeZone: tz_identifier })}`;

    return { status: 'success', report: report };
  },
});

export const rootAgent = new LlmAgent({
  name: 'weather_time_agent',
  model: 'gemini-2.5-flash',
  description: 'Agent to answer questions about the time and weather in a city.',
  instruction: 'You are a helpful agent who can answer user questions about the time and weather in a city.',
  tools: [getWeather, getCurrentTime],
});
.env
在同一文件夹中创建一个 .env 文件:
有关此文件的更多说明,请参见下一节设置模型。
你需要创建以下项目结构:
agent.go
在你的项目文件夹中创建一个 agent.go 文件:
将以下代码复制并粘贴到 agent.go 中:
package main

import (
    "context"
    "log"
    "os"

    "google.golang.org/genai"

    "google.golang.org/adk/agent"
    "google.golang.org/adk/agent/llmagent"
    "google.golang.org/adk/cmd/launcher"
    "google.golang.org/adk/cmd/launcher/full"
    "google.golang.org/adk/model/gemini"
    "google.golang.org/adk/tool"
    "google.golang.org/adk/tool/geminitool"
)

func main() {
    ctx := context.Background()

    // 1. Setup the model.
    // Note: Authentication is handled via GOOGLE_API_KEY environment variable.
    model, err := gemini.NewModel(ctx, "gemini-2.5-flash", &genai.ClientConfig{
        APIKey: os.Getenv("GOOGLE_API_KEY"),
    })
    if err != nil {
        log.Fatalf("Failed to create model: %v", err)
    }

    // 2. Define the agent.
    a, err := llmagent.New(llmagent.Config{
        Name:        "multi_tool_agent",
        Model:       model,
        Description: "An agent that can answer questions using Google Search.",
        Instruction: "You are a helpful assistant. Use the available tools to answer questions.",
        Tools: []tool.Tool{
            geminitool.GoogleSearch{},
        },
    })
    if err != nil {
        log.Fatalf("Failed to create agent: %v", err)
    }

    // 3. Configure the launcher and run.
    config := &launcher.Config{
        AgentLoader: agent.NewSingleLoader(a),
    }

    l := full.NewLauncher()
    if err = l.Execute(ctx, config, os.Args[1:]); err != nil {
        log.Fatalf("Run failed: %v\n\n%s", err, l.CommandLineSyntax())
    }
}
.env
在同一文件夹中创建一个 .env 文件:
Java 项目的常见项目结构如下:
project_folder/
├── pom.xml (或 build.gradle)
├── src/
├── └── main/
│       └── java/
│           └── agents/
│               └── multitool/
└── test/
创建 MultiToolAgent.java
在 src/main/java/agents/multitool/ 目录下的 agents.multitool 包中创建一个 MultiToolAgent.java 源文件。
将以下代码复制并粘贴到 MultiToolAgent.java 中:
package agents.multitool;

import com.google.adk.agents.BaseAgent;
import com.google.adk.agents.LlmAgent;
import com.google.adk.events.Event;
import com.google.adk.runner.InMemoryRunner;
import com.google.adk.sessions.Session;
import com.google.adk.tools.Annotations.Schema;
import com.google.adk.tools.FunctionTool;
import com.google.genai.types.Content;
import com.google.genai.types.Part;
import io.reactivex.rxjava3.core.Flowable;
import java.nio.charset.StandardCharsets;
import java.text.Normalizer;
import java.time.ZoneId;
import java.time.ZonedDateTime;
import java.time.format.DateTimeFormatter;
import java.util.Map;
import java.util.Scanner;

public class MultiToolAgent {

    private static String USER_ID = "student";
    private static String NAME = "multi_tool_agent";

    // The run your agent with Dev UI, the ROOT_AGENT should be a global public static final variable.
    public static final BaseAgent ROOT_AGENT = initAgent();

    public static BaseAgent initAgent() {
        return LlmAgent.builder()
            .name(NAME)
            .model("gemini-2.0-flash")
            .description("Agent to answer questions about the time and weather in a city.")
            .instruction(
                "You are a helpful agent who can answer user questions about the time and weather"
                    + " in a city.")
            .tools(
                FunctionTool.create(MultiToolAgent.class, "getCurrentTime"),
                FunctionTool.create(MultiToolAgent.class, "getWeather"))
            .build();
    }

    public static Map<String, String> getCurrentTime(
        @Schema(name = "city",
                description = "The name of the city for which to retrieve the current time")
        String city) {
        String normalizedCity =
            Normalizer.normalize(city, Normalizer.Form.NFD)
                .trim()
                .toLowerCase()
                .replaceAll("(\\p{IsM}+|\\p{IsP}+)", "")
                .replaceAll("\\s+", "_");

        return ZoneId.getAvailableZoneIds().stream()
            .filter(zid -> zid.toLowerCase().endsWith("/" + normalizedCity))
            .findFirst()
            .map(
                zid ->
                    Map.of(
                        "status",
                        "success",
                        "report",
                        "The current time in "
                            + city
                            + " is "
                            + ZonedDateTime.now(ZoneId.of(zid))
                            .format(DateTimeFormatter.ofPattern("HH:mm"))
                            + "."))
            .orElse(
                Map.of(
                    "status",
                    "error",
                    "report",
                    "Sorry, I don't have timezone information for " + city + "."));
    }

    public static Map<String, String> getWeather(
        @Schema(name = "city",
                description = "The name of the city for which to retrieve the weather report")
        String city) {
        if (city.toLowerCase().equals("new york")) {
            return Map.of(
                "status",
                "success",
                "report",
                "The weather in New York is sunny with a temperature of 25 degrees Celsius (77 degrees"
                    + " Fahrenheit).");

        } else {
            return Map.of(
                "status", "error", "report", "Weather information for " + city + " is not available.");
        }
    }

    public static void main(String[] args) throws Exception {
        InMemoryRunner runner = new InMemoryRunner(ROOT_AGENT);

        Session session =
            runner
                .sessionService()
                .createSession(NAME, USER_ID)
                .blockingGet();

        try (Scanner scanner = new Scanner(System.in, StandardCharsets.UTF_8)) {
            while (true) {
                System.out.print("\nYou > ");
                String userInput = scanner.nextLine();

                if ("quit".equalsIgnoreCase(userInput)) {
                    break;
                }

                Content userMsg = Content.fromParts(Part.fromText(userInput));
                Flowable<Event> events = runner.runAsync(USER_ID, session.id(), userMsg);

                System.out.print("\nAgent > ");
                events.blockingForEach(event -> System.out.println(event.stringifyContent()));
            }
        }
    }
}
Kotlin 项目的常见项目结构如下:
project_folder/
├── build.gradle.kts
├── src/
├── └── main/
│       └── kotlin/
│           └── agents/
│               └── multitool/
创建 MultiToolAgent.kt
在 src/main/kotlin/agents/multitool/ 目录下创建一个 MultiToolAgent.kt 源文件。
将以下代码复制并粘贴到 MultiToolAgent.kt 中:
package agents.multitool

import com.google.adk.kt.agents.Instruction
import com.google.adk.kt.agents.LlmAgent
import com.google.adk.kt.annotations.Param
import com.google.adk.kt.annotations.Tool
import com.google.adk.kt.models.Gemini
import com.google.adk.kt.runners.InMemoryRunner
import com.google.adk.kt.sessions.InMemorySessionService
import com.google.adk.kt.sessions.SessionKey
import com.google.adk.kt.types.Content
import com.google.adk.kt.types.Part
import com.google.adk.kt.types.Role
import kotlinx.coroutines.flow.toList
import kotlinx.coroutines.runBlocking
import java.text.Normalizer
import java.time.ZoneId
import java.time.ZonedDateTime
import java.time.format.DateTimeFormatter
import java.util.Scanner

class MultiToolService {
    @Tool
    fun getCurrentTime(
        @Param("The name of the city for which to retrieve the current time") city: String,
    ): Map<String, String> {
        val normalizedCity =
            Normalizer.normalize(city, Normalizer.Form.NFD)
                .trim()
                .lowercase()
                .replace(Regex("(\\p{IsM}+|\\p{IsP}+)"), "")
                .replace(Regex("\\s+"), "_")

        val zoneId =
            ZoneId.getAvailableZoneIds()
                .firstOrNull { it.lowercase().endsWith("/$normalizedCity") }

        return if (zoneId != null) {
            val time =
                ZonedDateTime.now(ZoneId.of(zoneId))
                    .format(DateTimeFormatter.ofPattern("HH:mm"))
            mapOf(
                "status" to "success",
                "report" to "The current time in $city is $time.",
            )
        } else {
            mapOf(
                "status" to "error",
                "report" to "Sorry, I don't have timezone information for $city.",
            )
        }
    }

    @Tool
    fun getWeather(
        @Param("The name of the city for which to retrieve the weather report") city: String,
    ): Map<String, String> {
        return if (city.lowercase() == "new york") {
            mapOf(
                "status" to "success",
                "report" to "The weather in New York is sunny with a temperature of " +
                    "25 degrees Celsius (77 degrees Fahrenheit).",
            )
        } else {
            mapOf(
                "status" to "error",
                "report" to "Weather information for $city is not available.",
            )
        }
    }
}

fun main() =
    runBlocking {
        val model = Gemini(name = "gemini-flash-latest")

        val agent =
            LlmAgent(
                name = "multi_tool_agent",
                model = model,
                description = "Agent to answer questions about the time and weather in a city.",
                instruction =
                    Instruction(
                        "You are a helpful agent who can answer user questions about the " +
                            "time and weather in a city.",
                    ),
                tools = MultiToolService().generatedTools(),
            )

        val sessionService = InMemorySessionService()
        val runner =
            InMemoryRunner(
                agent = agent,
                appName = "multi_tool_app",
                sessionService = sessionService,
            )

        val userId = "student"
        val sessionId = "session_1"

        sessionService.createSession(SessionKey("multi_tool_app", userId, sessionId))

        val scanner = Scanner(System.`in`)
        while (true) {
            print("\nYou > ")
            val userInput = scanner.nextLine()
            if (userInput.lowercase() == "quit") break

            val userContent = Content(role = Role.USER, parts = listOf(Part(text = userInput)))
            val events =
                runner.runAsync(
                    userId = userId,
                    sessionId = sessionId,
                    newMessage = userContent,
                ).toList()

            print("\nAgent > ")
            for (event in events) {
                event.content?.parts?.forEach { part ->
                    part.text?.let { print(it) }
                }
            }
            println()
        }
    }
3. 设置模型
你的智能体理解用户请求并生成响应的能力由生成式 AI 模型或大语言模型 (LLM) 提供支持。本指南使用 Gemini 模型作为示例,但 ADK 兼容来自 Google 和其他提供者的多种 AI 模型。有关可用模型及如何配置它们的更多信息,请参阅 ADK 智能体的 AI 模型。
模型连接和身份验证
当通过服务使用 AI 模型时,例如 Gemini API 或 Google Cloud 上的 Gemini Enterprise Agent Platform,你必须提供 API 密钥或向服务进行身份验证。提供此信息的最直接方式是使用环境变量或 .env 文件。以下示例展示了配置智能体以使用 Gemini API 或 Gemini Enterprise Agent Platform 的最常见方式。
有关将 ADK 智能体连接到 Google Cloud 托管模型和服务(包括 Gemini Enterprise Agent Platform)的更多详情,请参阅连接 Google Cloud 和 Agent Platform指南。
4. 运行你的智能体
在终端中,切换到你的智能体项目的父目录(例如使用 cd ..):
有多种方式与你的智能体交互:
Agent Platform 用户的身份验证设置
如果你在上一步选择了 "Gemini - Google Cloud Agent Platform" ,则必须在启动开发 UI 之前向 Google Cloud 进行身份验证。
运行此命令并按照提示操作:
注意: 如果你使用的是 "Gemini - Google AI Studio",可跳过此步骤。
运行以下命令以启动 dev UI。
注意:ADK Web 仅限开发使用
ADK Web 不适用于生产部署。你应该仅将 ADK Web 用于开发和调试目的。
Windows 用户注意事项
当遇到 _make_subprocess_transport NotImplementedError 错误时,请考虑使用 adk web --no-reload 替代。
步骤 1: 在浏览器中直接打开提供的 URL(通常是 http://localhost:8000 或 http://127.0.0.1:8000)。
步骤 2: 在 UI 的左上角,你可以在下拉菜单中选择你的智能体。选择 "multi_tool_agent"。
故障排除
如果你在下拉菜单中没有看到 "multi_tool_agent",请确保你在智能体文件夹的父文件夹中运行 adk web(即 multi_tool_agent 的父文件夹)。
步骤 3: 现在你可以使用文本框与你的智能体聊天:
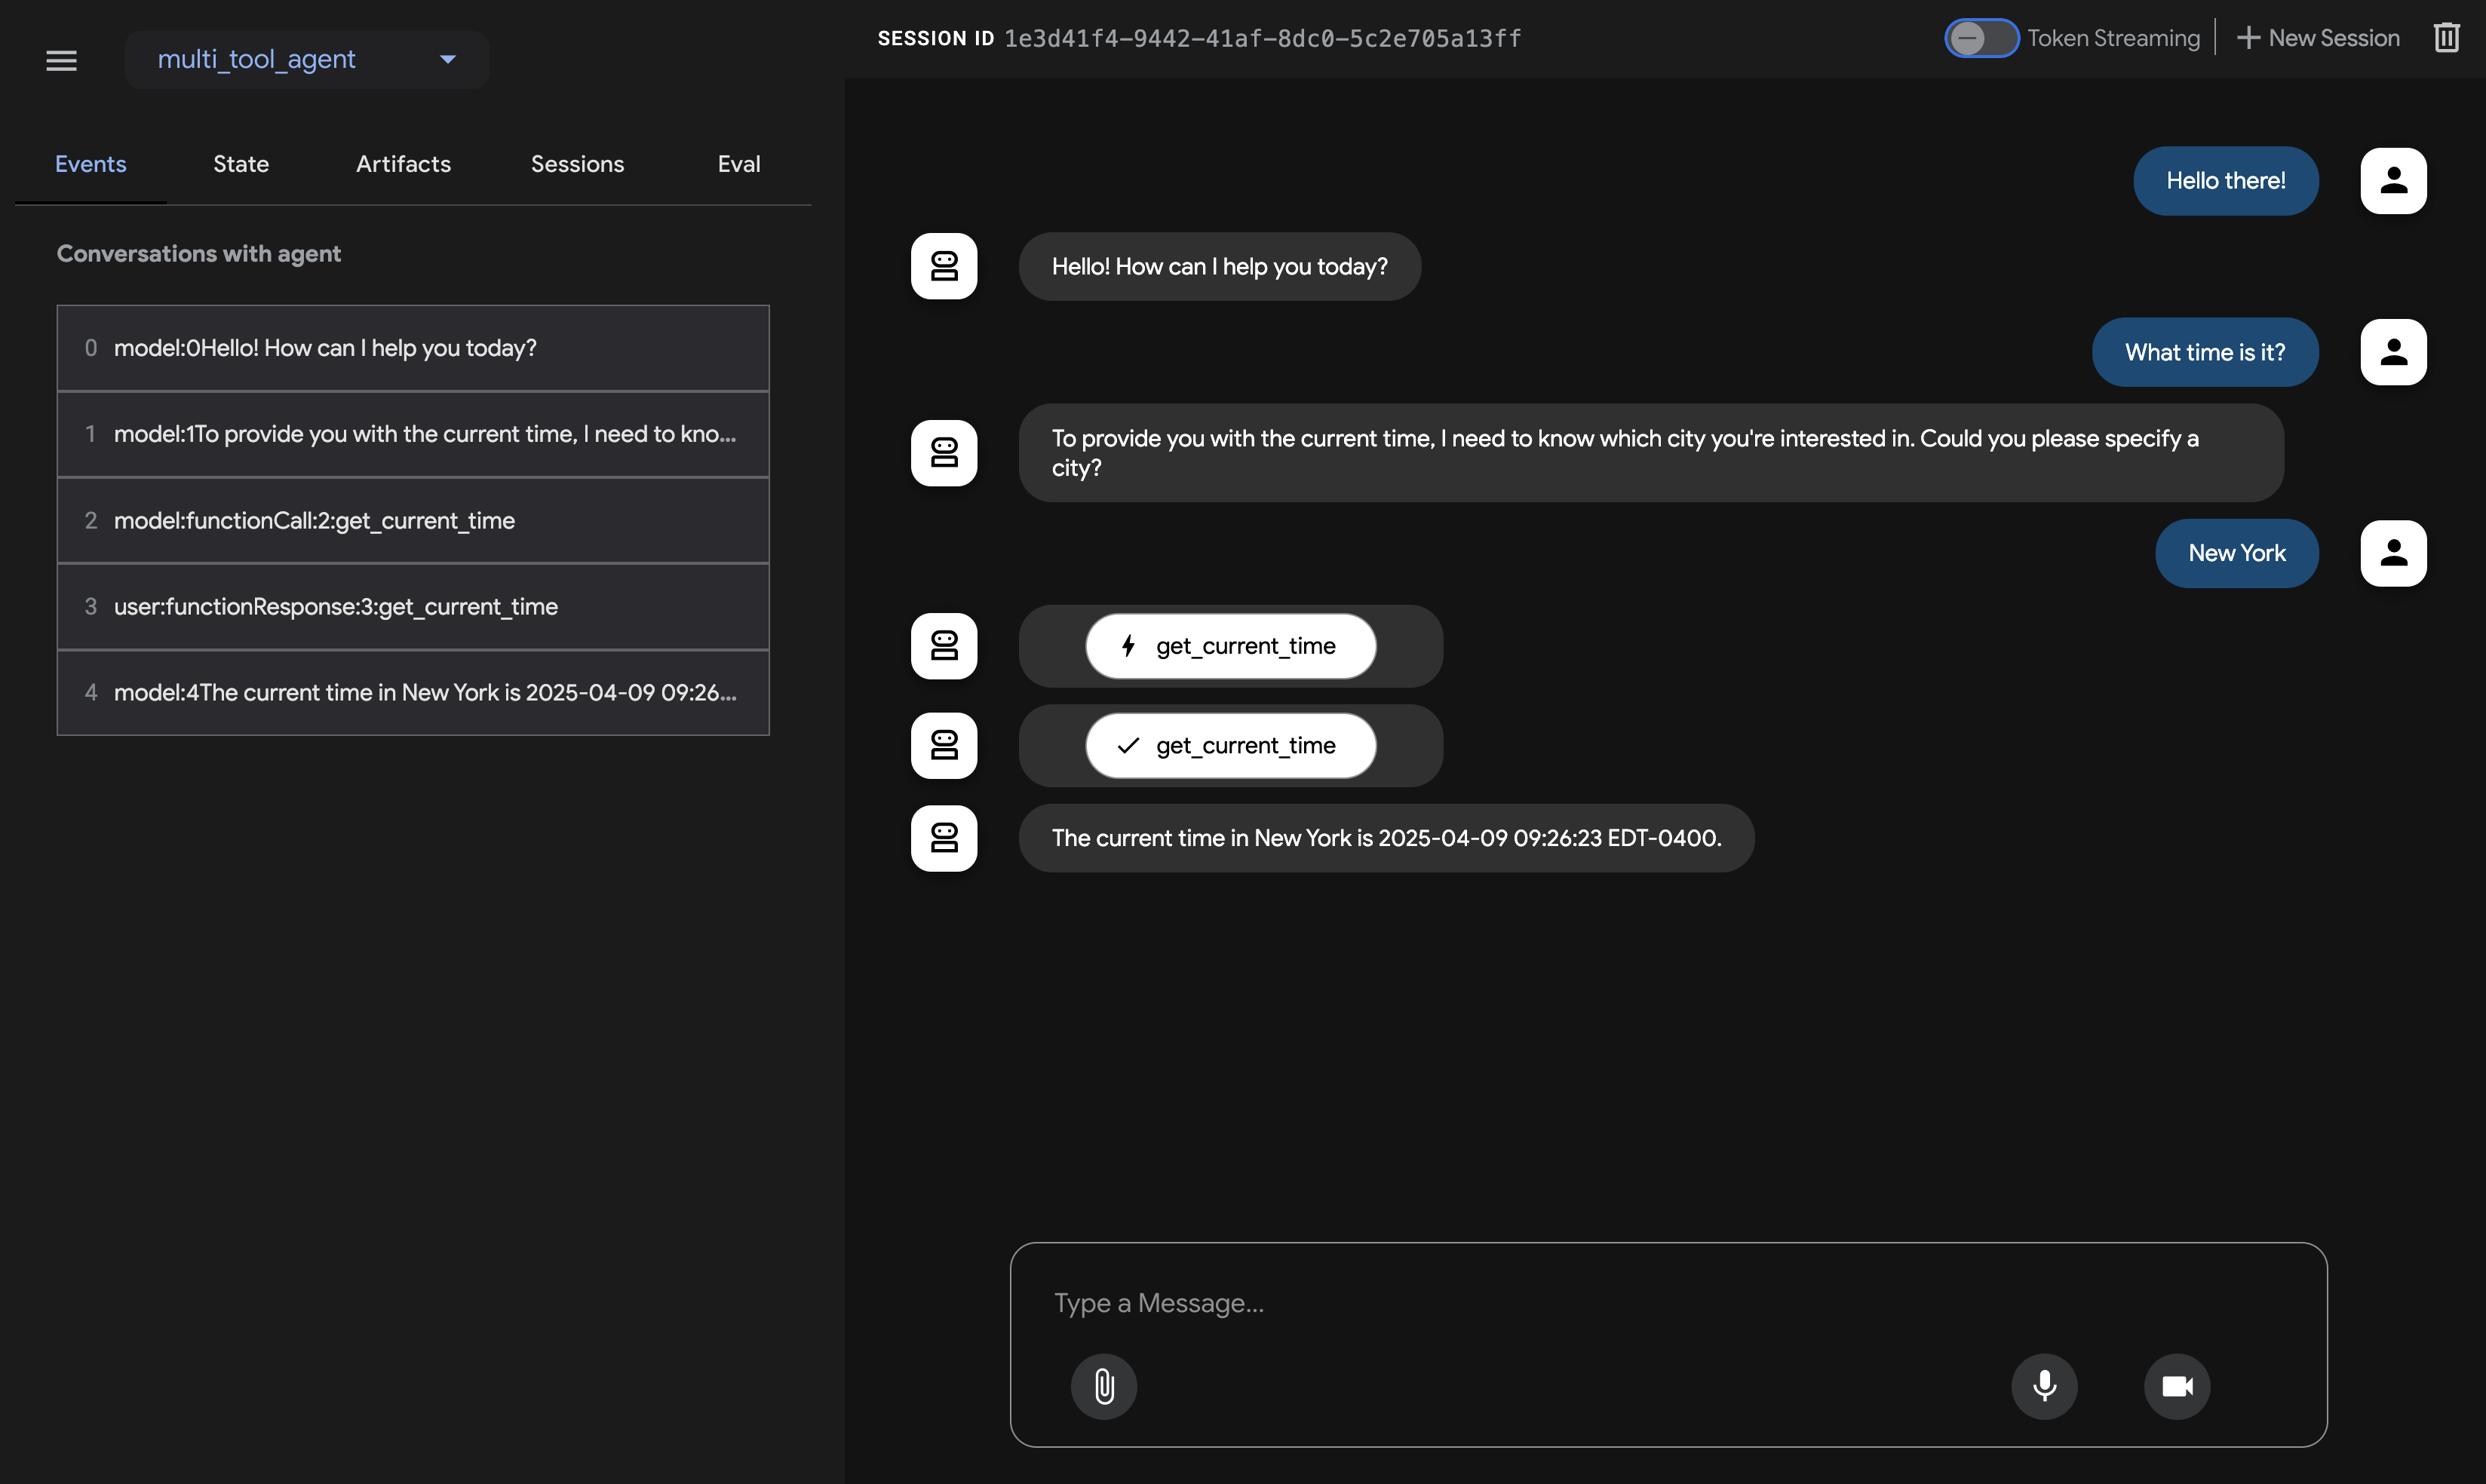
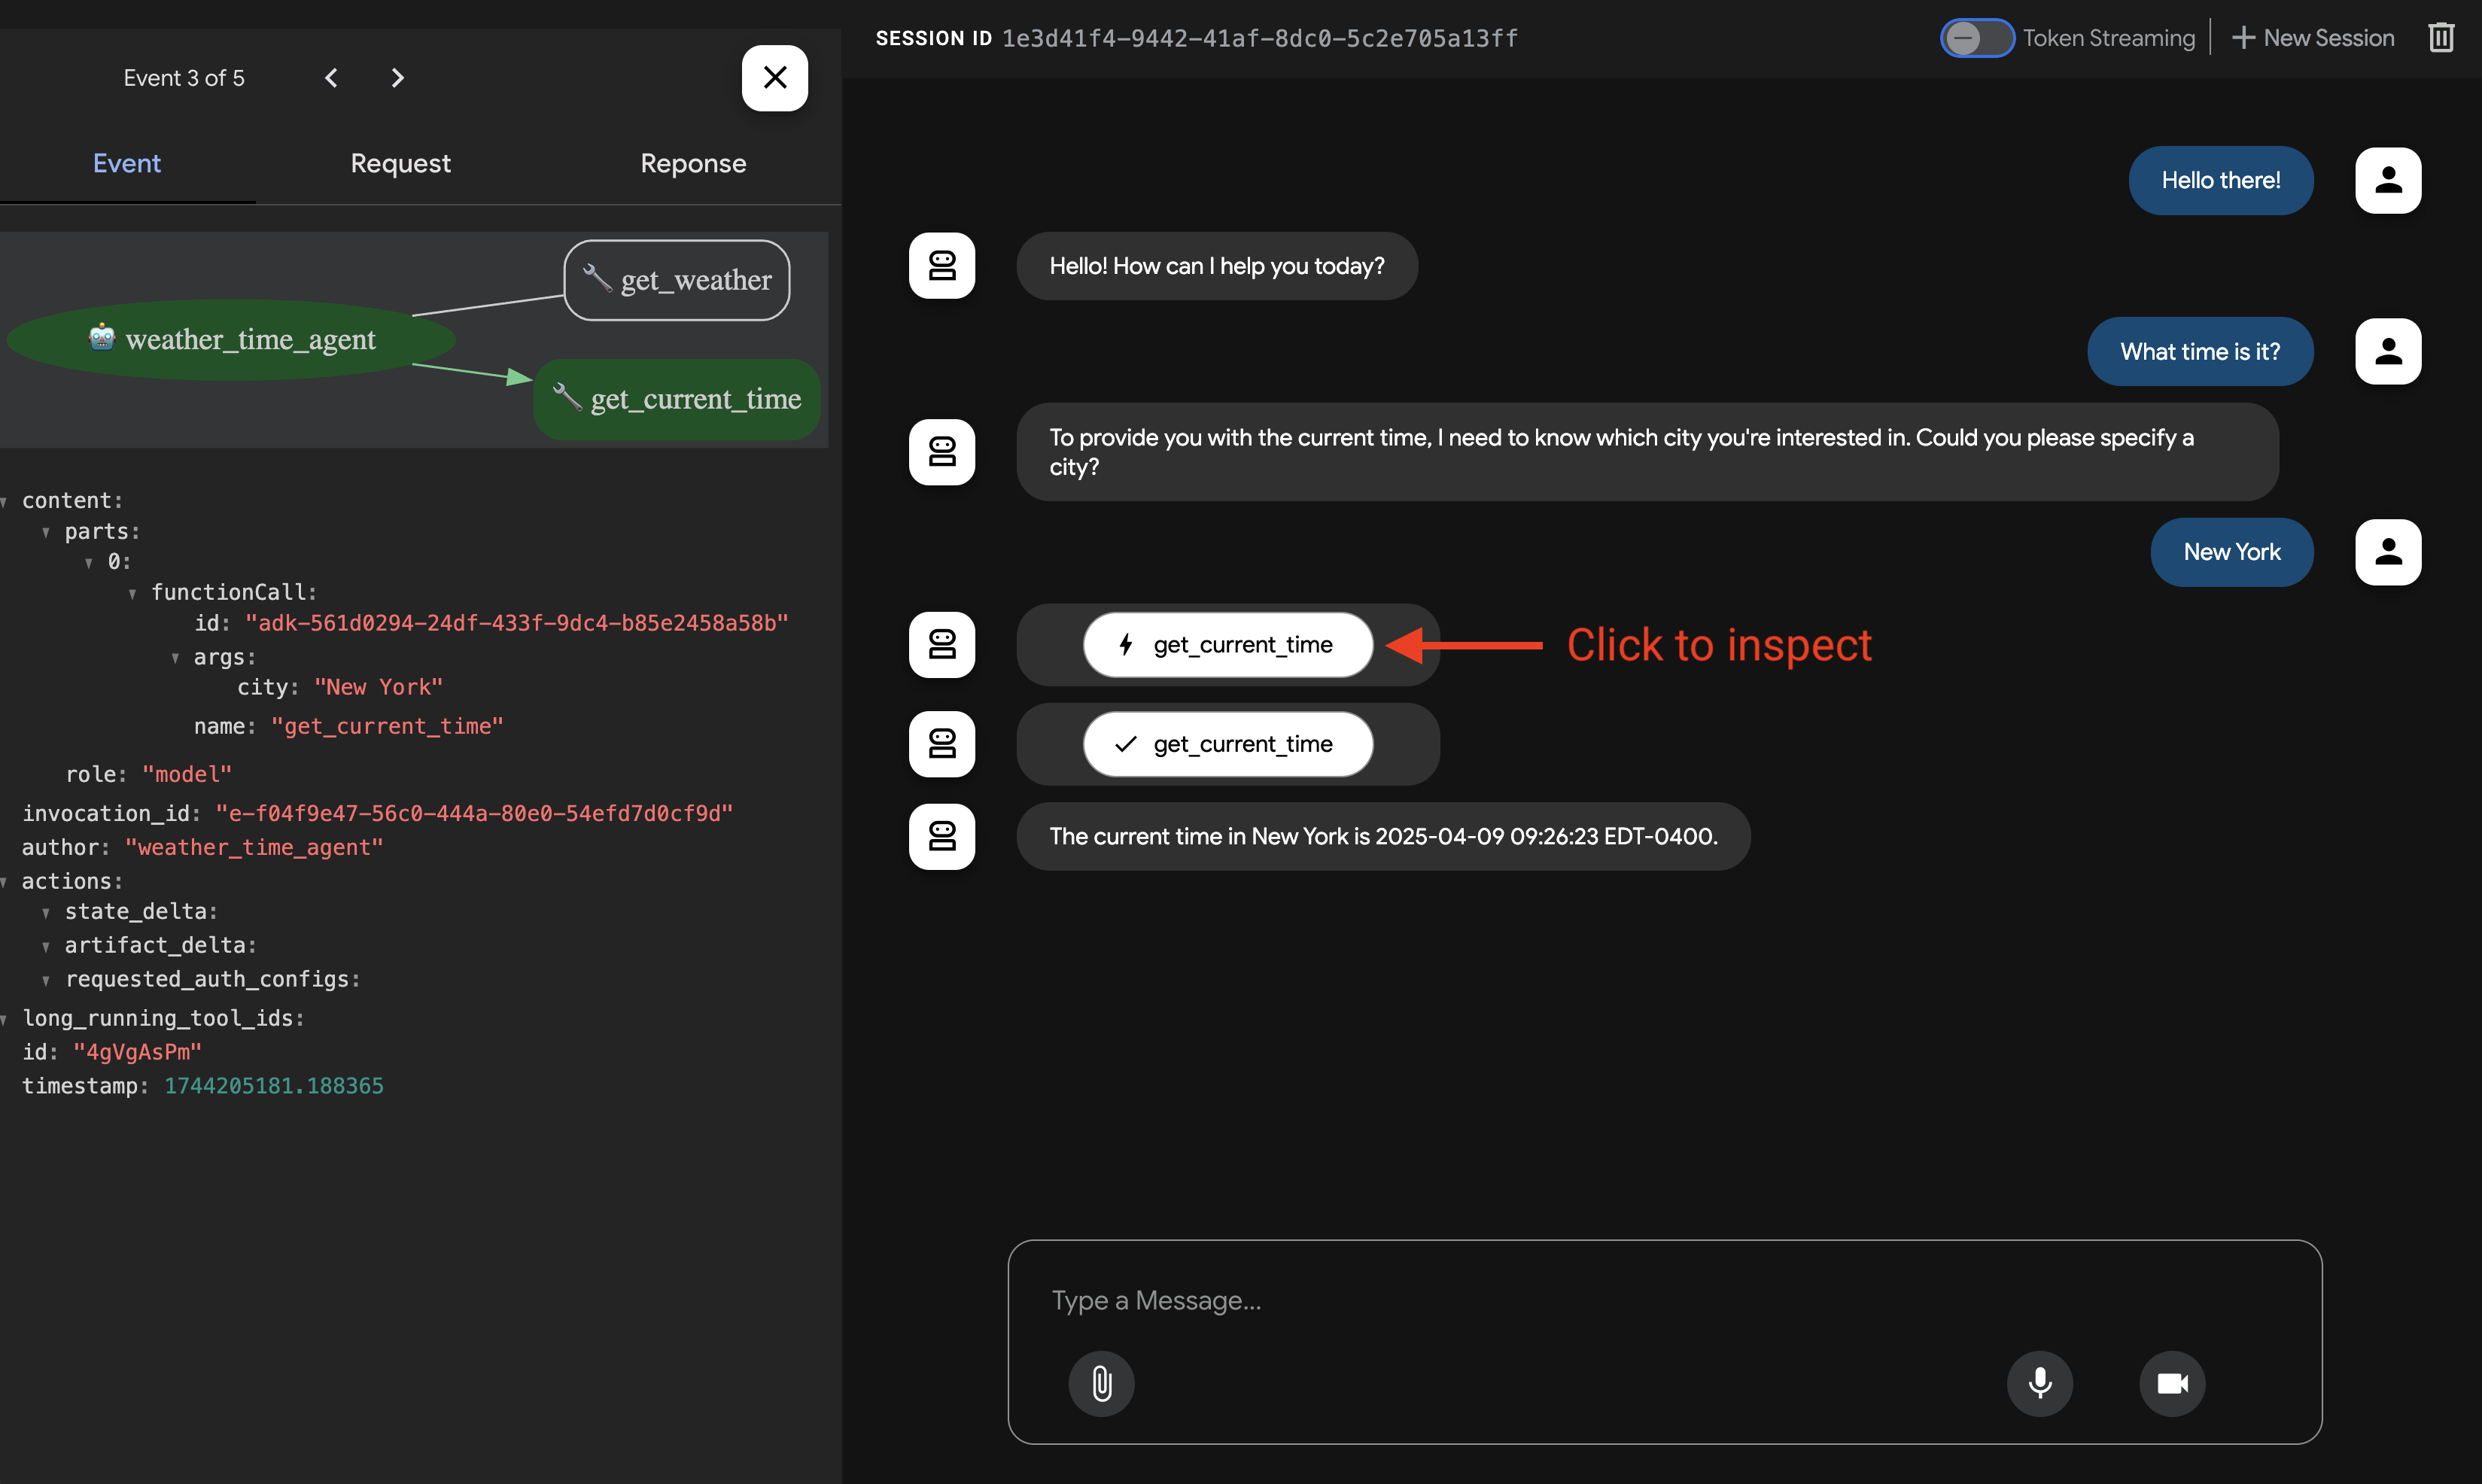
步骤 4: 通过使用左侧的 Events 选项卡,你可以通过点击操作来检查单个函数调用、响应和模型响应:
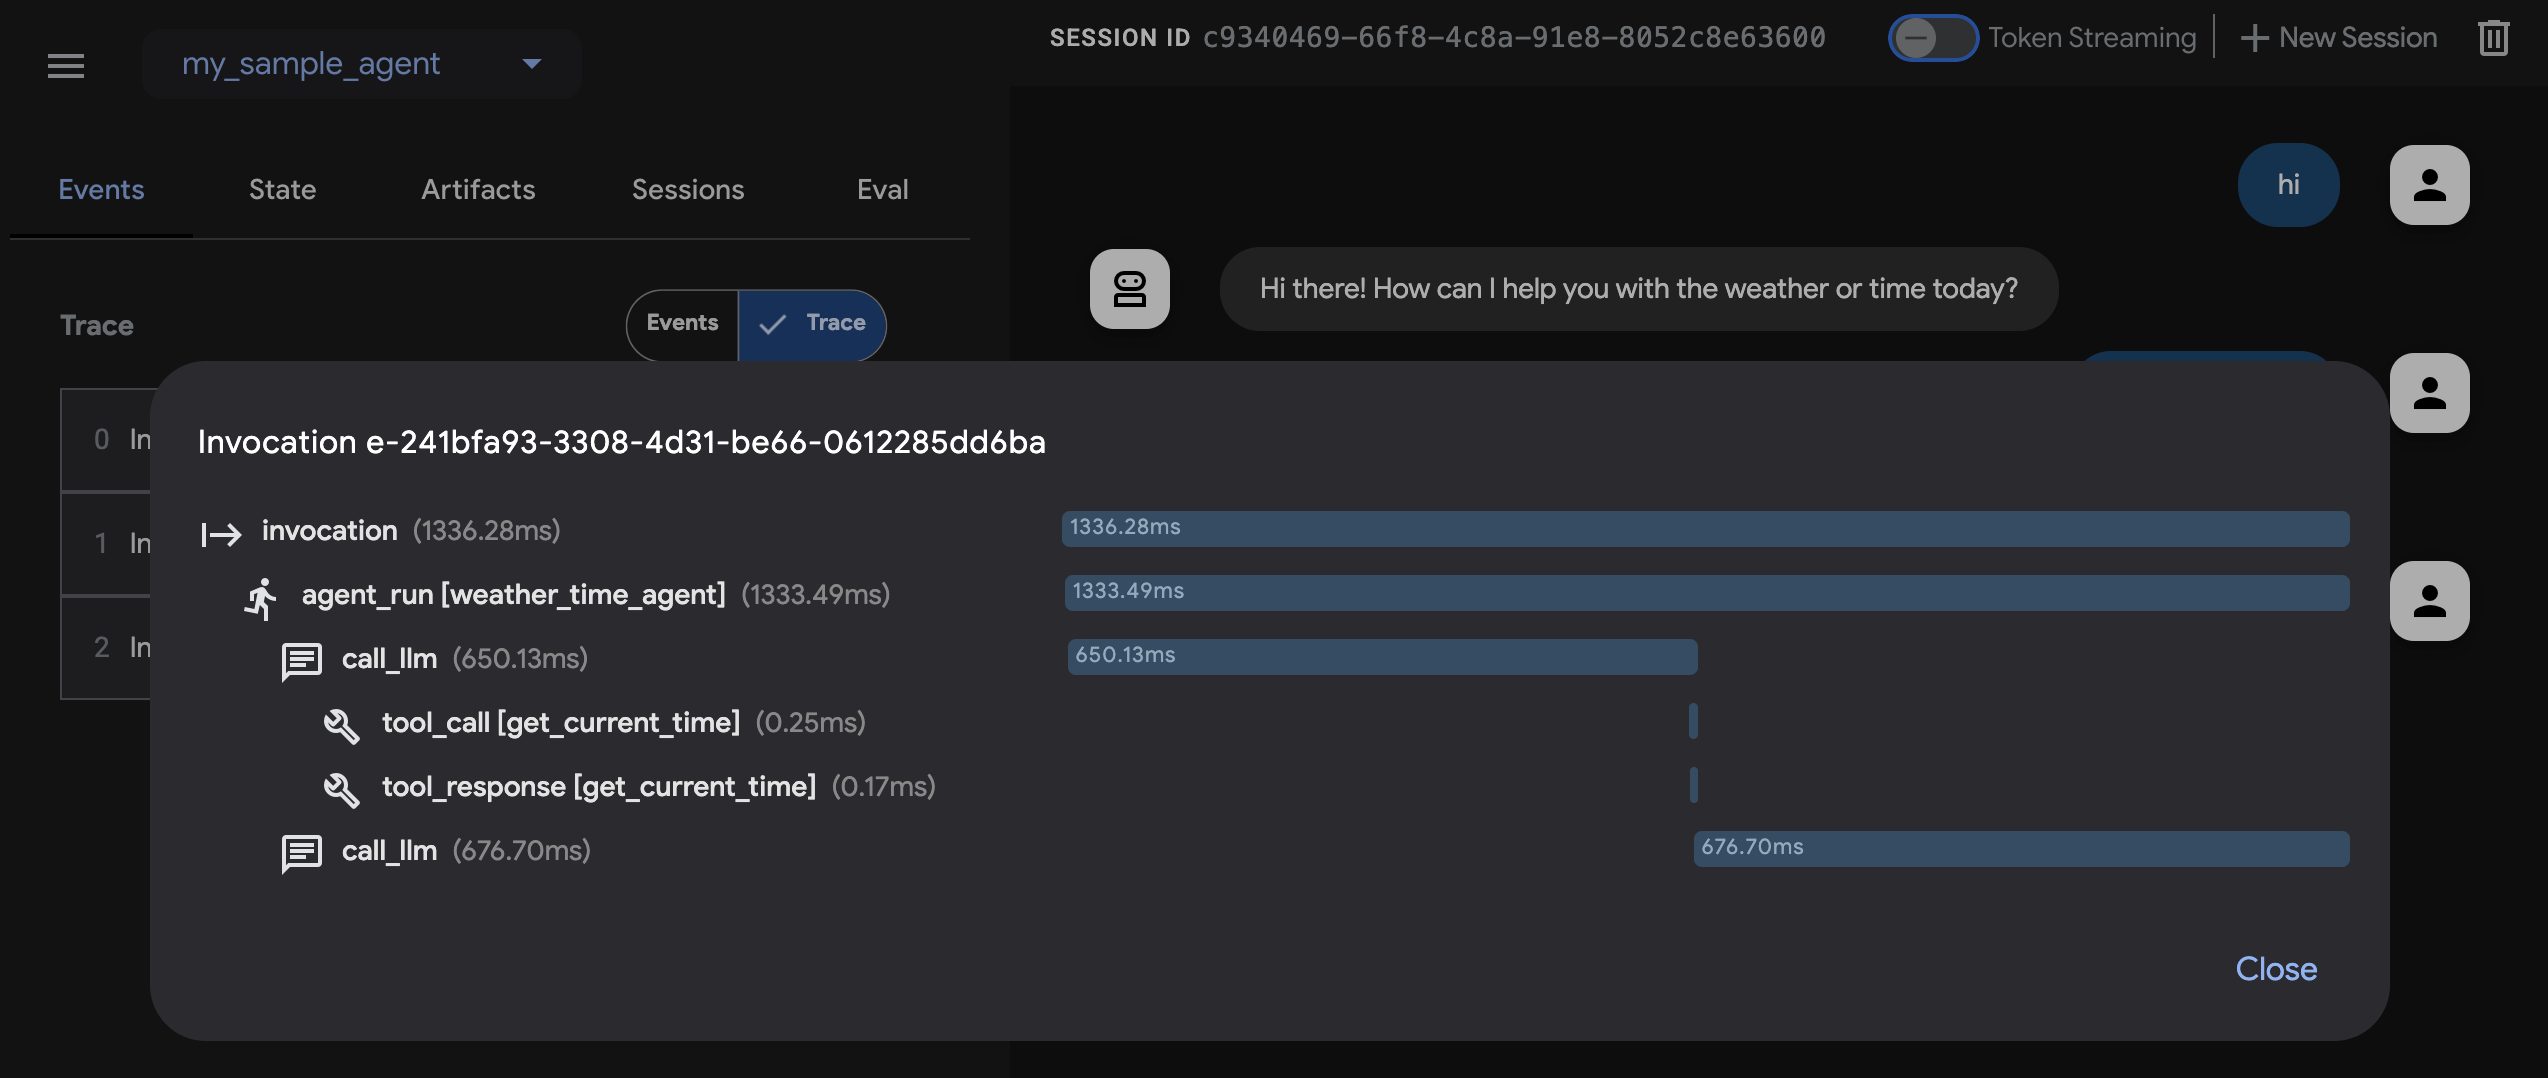
在 Events 选项卡上,你还可以点击 Trace 按钮查看每个事件的跟踪日志,显示每个函数调用的延迟:
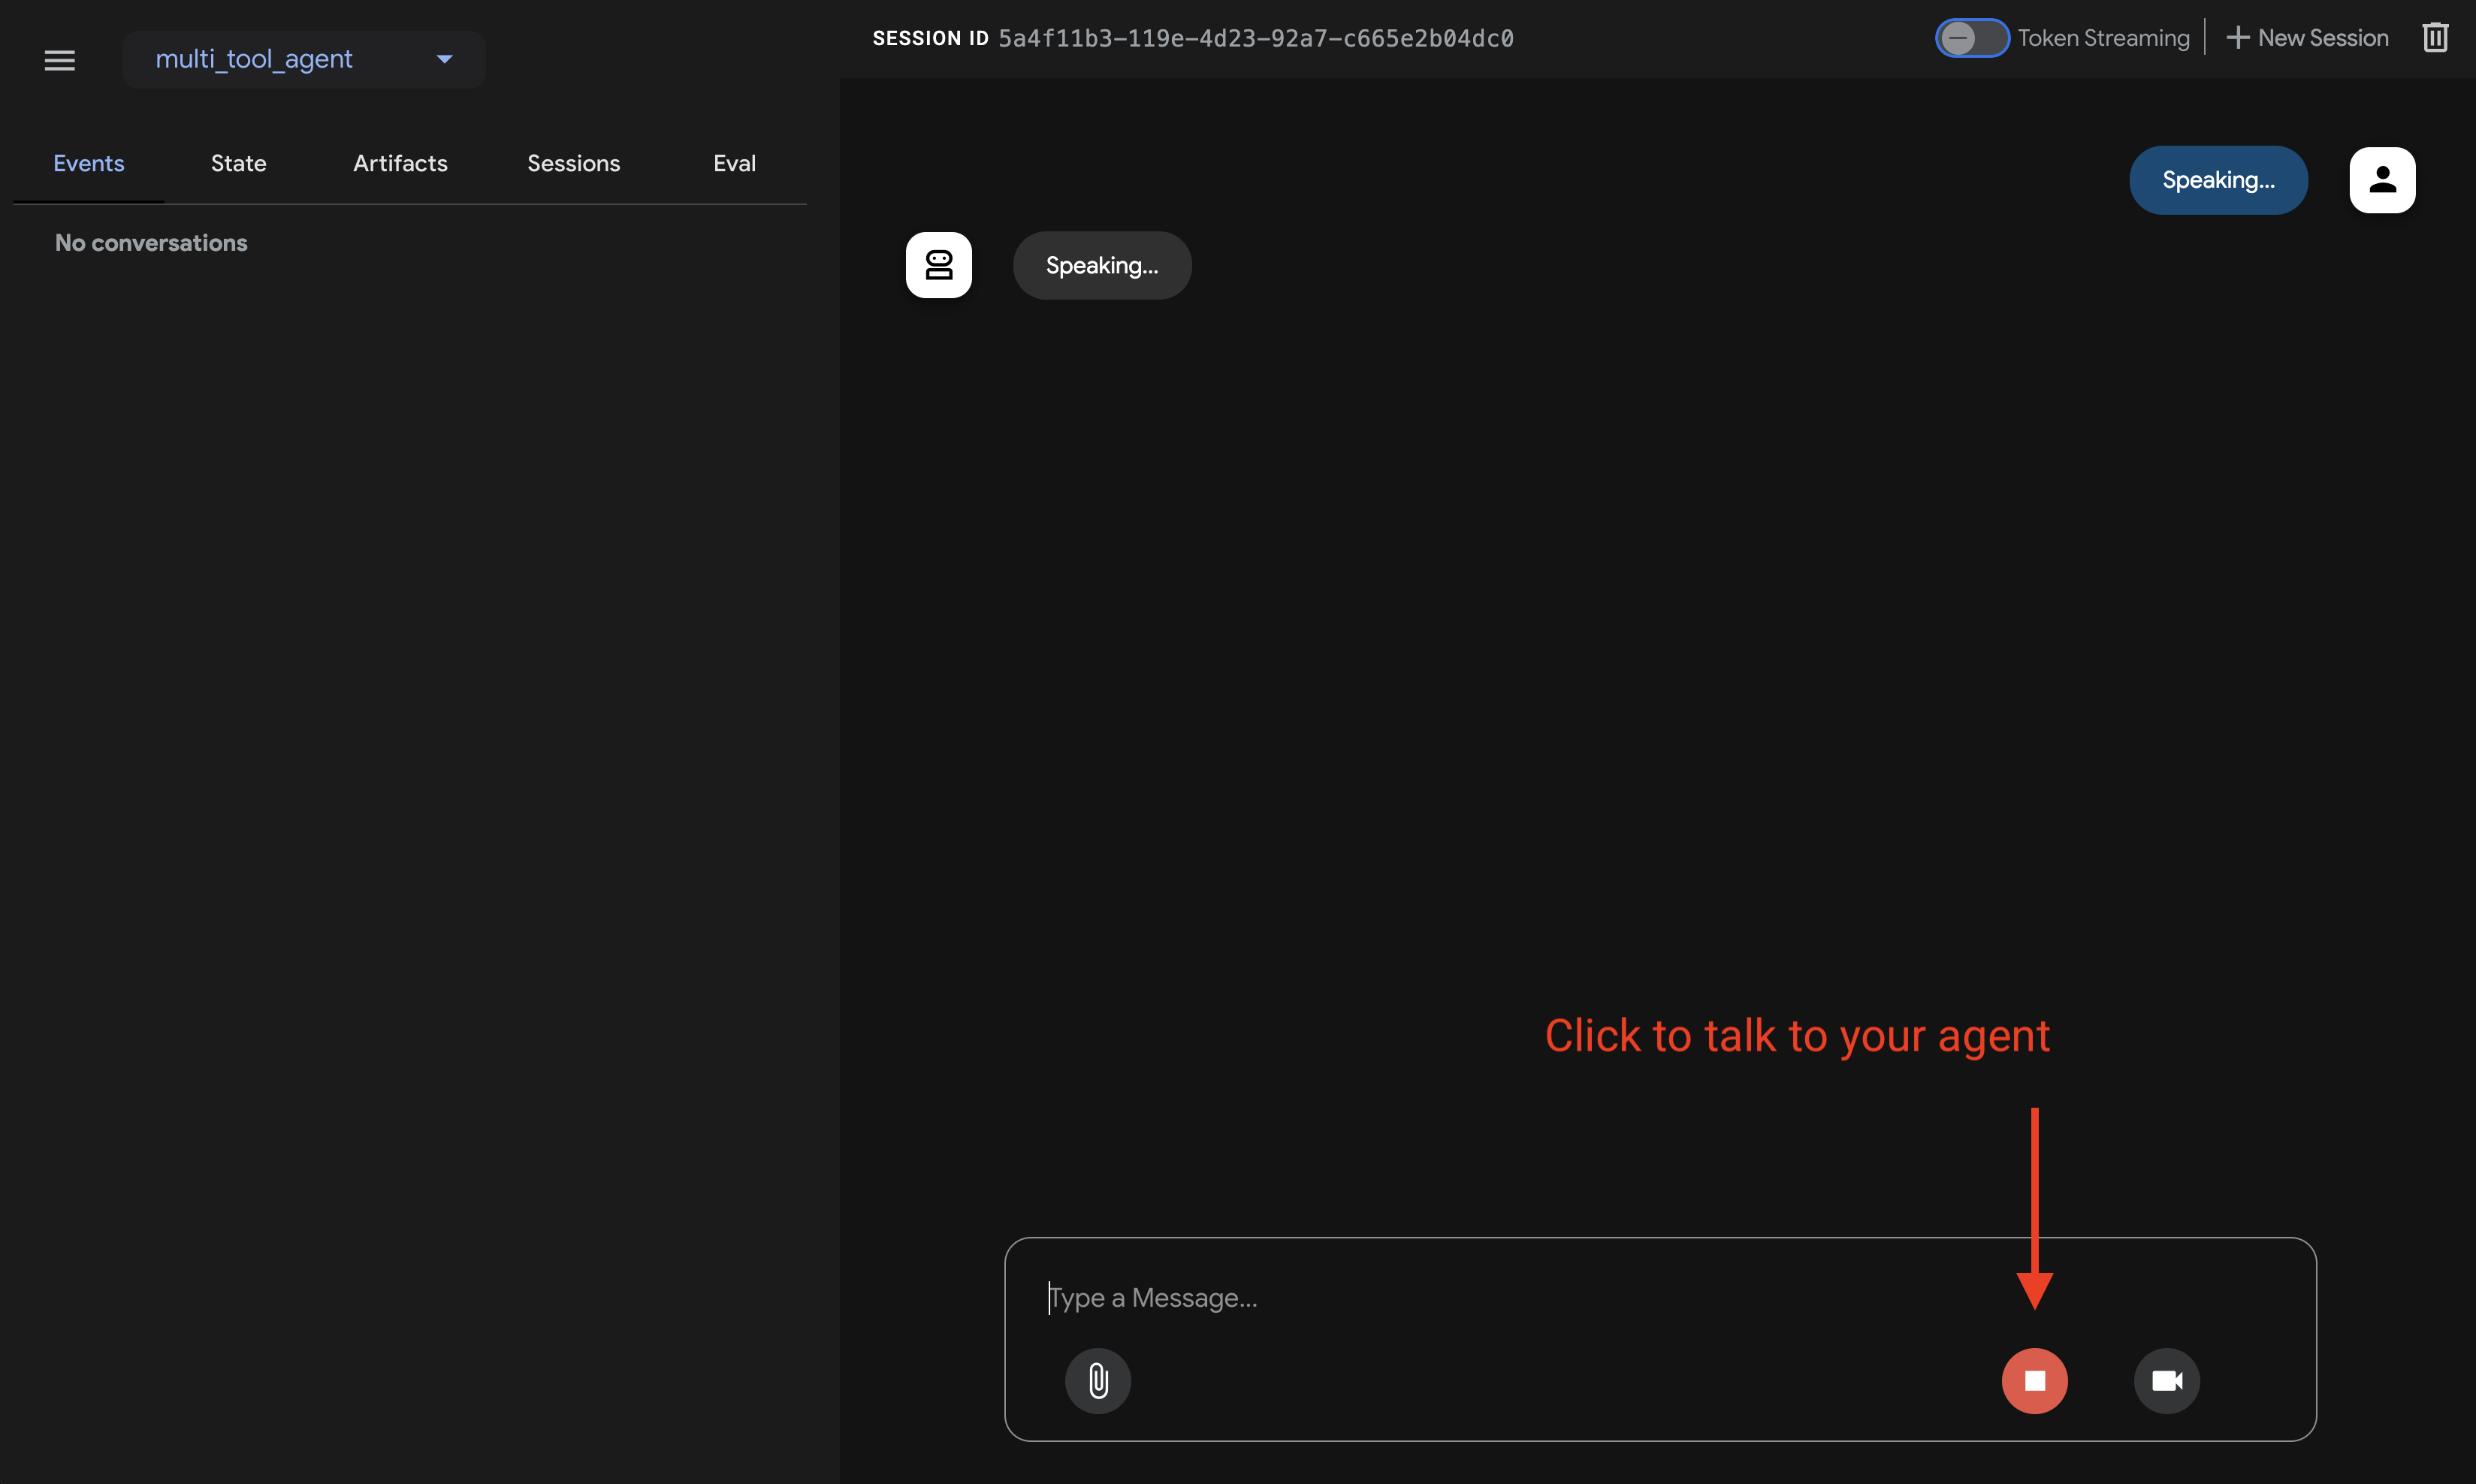
步骤 5: 你还可以启用麦克风并与你的智能体对话:
语音/视频流的模型支持
为了在 ADK 中使用语音/视频流,你需要使用支持 Live API 的 Gemini 模型。你可以在文档中找到支持 Gemini Live API 的模型 ID:
然后你可以替换之前创建的 agent.py 文件中 root_agent 中的 model 字符串(跳转到章节)。你的代码应该类似于:
Tip
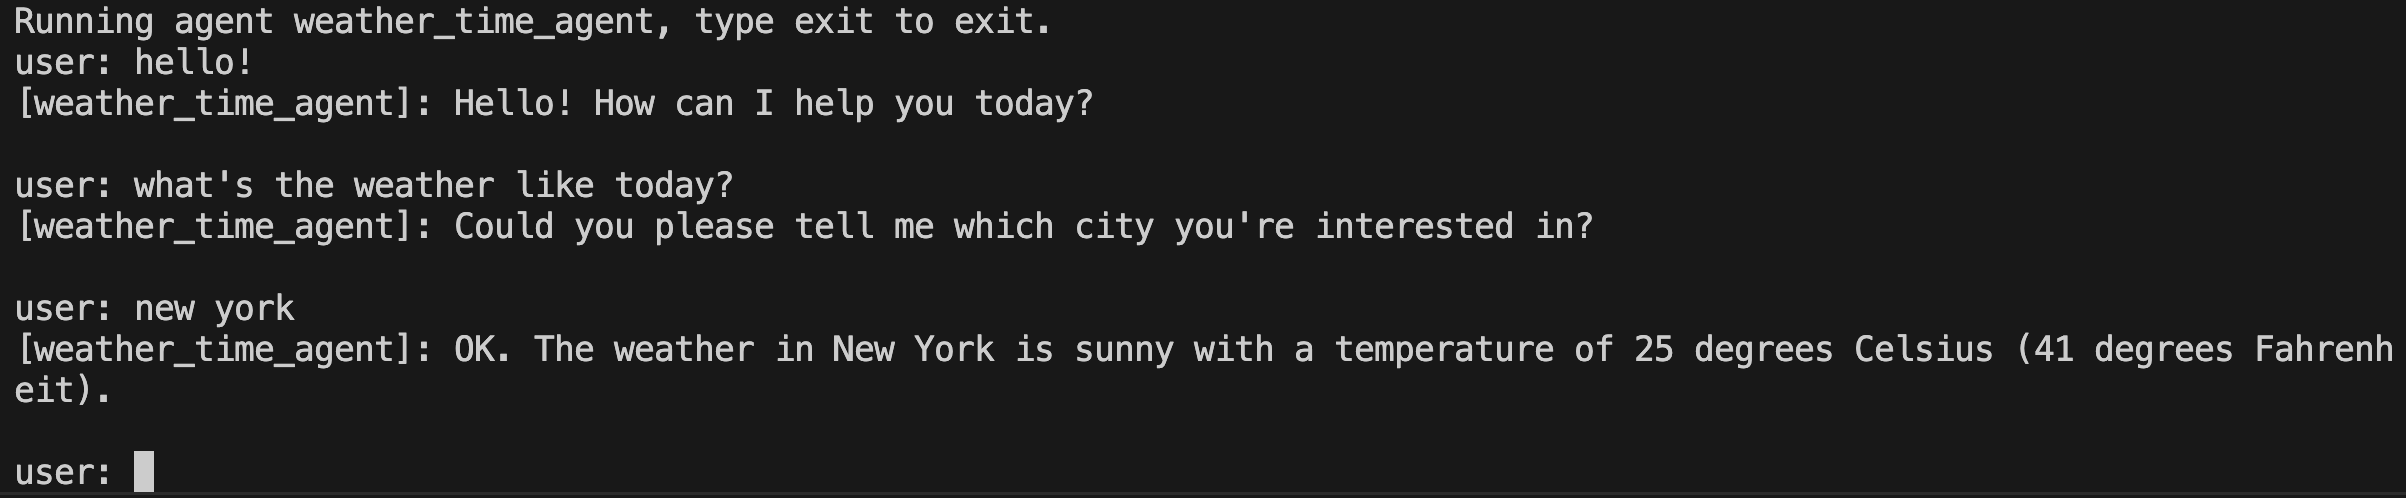
使用 adk run 时,你可以通过管道将文本传递给命令来向智能体注入提示,如下所示:
运行以下命令与你的天气智能体聊天。
要退出,请使用 Cmd/Ctrl+C。
adk api_server 使你能够通过单个命令创建本地 FastAPI 服务器,让你在部署智能体之前测试本地 cURL 请求。

要了解如何使用 adk api_server 进行测试,请参阅使用 API 服务器的文档。
使用终端导航到你的智能体项目目录:
有多种方式可以与你的智能体交互:
运行以下命令以启动 dev UI。
步骤 1: 直接在你的浏览器中打开终端提供的 URL(通常是 http://localhost:8000 或 http://127.0.0.1:8000)。
步骤 2: 在 UI 的左上角,从下拉菜单中选择你的智能体。智能体按文件名列出,所以你应该选择 "agent"。
故障排除
如果你在下拉菜单中没有看到 "agent",请确保你在智能体文件夹的父文件夹中运行 npx adk web(即 agent.ts 的父文件夹)。
步骤 3: 现在你可以通过文本框与你的智能体聊天:
步骤 4: 通过使用左侧的 Events 选项卡,你可以通过点击操作来检查单个函数调用、响应和模型响应:
在 Events 选项卡上,你还可以点击 Trace 按钮查看每个事件的跟踪日志,显示每个函数调用的延迟:
npx adk api_server 允许你通过一条命令创建一个本地的 Express.js 服务器,让你在部署智能体之前能够测试本地的 cURL 请求。
要了解如何使用 api_server 进行测试,请参阅测试文档。
使用终端,导航到你的智能体项目目录:
有多种方式可以与你的智能体交互:
运行以下命令以启动 dev UI。你必须指定要激活的子启动器(例如 webui、api)。
步骤 1: 直接在浏览器中打开提供的 URL(通常是 http://localhost:8080)。
步骤 2: 在 UI 的左上角,从下拉菜单中选择你的智能体。它应该是 "weather_time_agent"。
步骤 3: 现在你可以使用文本框与你的智能体聊天。
使用终端,导航到你的智能体项目的父目录(例如使用 cd ..):
project_folder/                <-- 切换到此目录
├── pom.xml (或 build.gradle)
├── src/
├── └── main/
│       └── java/
│           └── agents/
│               └── multitool/
│                   └── MultiToolAgent.java
└── test/
在终端中运行以下命令以启动 Dev UI。不要更改 Dev UI 服务器的主类名。
mvn exec:java \
    -Dexec.mainClass="com.google.adk.web.AdkWebServer" \
    -Dexec.args="--adk.agents.source-dir=src/main/java" \
    -Dexec.classpathScope="compile"
步骤 1: 在浏览器中直接打开提供的 URL(通常是 http://localhost:8080 或 http://127.0.0.1:8080)。
步骤 2: 在 UI 的左上角,你可以在下拉菜单中选择你的智能体。选择 "multi_tool_agent"。
故障排除
如果你在下拉菜单中没有看到 "multi_tool_agent",请确保你在 Java 源代码所在的位置运行 mvn 命令(通常是 src/main/java)。
步骤 3: 现在你可以使用文本框与你的智能体聊天:
步骤 4: 你还可以通过点击操作来检查单个函数调用、响应和模型响应:
注意:ADK Web 仅限开发使用
ADK Web 不适用于生产部署。你应该仅将 ADK Web 用于开发和调试目的。
使用 Maven,通过以下命令运行你的 Java 类的 main() 方法:
使用终端,导航到你的智能体项目目录:
project_folder/                <-- 导航到此目录
├── build.gradle.kts
├── src/
├── └── main/
│       └── kotlin/
│           └── agents/
│               └── multitool/
│                   └── MultiToolAgent.kt
运行你的智能体
你可以使用 Gradle 运行 Kotlin 类的 main() 方法:
如果你使用的是 IntelliJ IDEA,只需点击 main() 函数旁边的绿色运行箭头即可。
📝 示例提示词
- 纽约的天气如何?
- 纽约现在几点了?
- 巴黎的天气如何?
- 巴黎现在几点了?
🎉 恭喜你!{: #congratulations }
你已经成功创建并与你的第一个使用 ADK 的智能体进行了交互!