快速入门
本快速入门指南将引导你完成 Agent Development Kit (ADK) 的安装、设置带有多个工具的基本智能体,并在终端或交互式的基于浏览器的开发 UI 中本地运行它。
本快速入门假设你有本地 IDE(VS Code、PyCharm、IntelliJ IDEA 等),支持 Python 3.9+ 或 Java 17+ 并可访问终端。此方法完全在你的机器上运行应用程序,推荐用于内部开发。
1. 设置环境并安装 ADK
2. 创建智能体项目
项目结构
你需要创建以下项目结构:
创建文件夹 multi_tool_agent:
Windows 用户注意事项
在接下来的几个步骤中在 Windows 上使用 ADK 时,我们建议使用文件资源管理器或 IDE 创建 Python 文件,因为以下命令(mkdir、echo)通常会生成包含空字节和/或错误编码的文件。
__init__.py
现在在文件夹中创建一个 __init__.py 文件:
你的 __init__.py 现在应该如下所示:
agent.py
在同一文件夹中创建一个 agent.py 文件:
将以下代码复制并粘贴到 agent.py 中:
import datetime
from zoneinfo import ZoneInfo
from google.adk.agents import Agent

def get_weather(city: str) -> dict:
    """Retrieves the current weather report for a specified city.

    Args:
        city (str): The name of the city for which to retrieve the weather report.

    Returns:
        dict: status and result or error msg.
    """
    if city.lower() == "new york":
        return {
            "status": "success",
            "report": (
                "The weather in New York is sunny with a temperature of 25 degrees"
                " Celsius (77 degrees Fahrenheit)."
            ),
        }
    else:
        return {
            "status": "error",
            "error_message": f"Weather information for '{city}' is not available.",
        }


def get_current_time(city: str) -> dict:
    """Returns the current time in a specified city.

    Args:
        city (str): The name of the city for which to retrieve the current time.

    Returns:
        dict: status and result or error msg.
    """

    if city.lower() == "new york":
        tz_identifier = "America/New_York"
    else:
        return {
            "status": "error",
            "error_message": (
                f"Sorry, I don't have timezone information for {city}."
            ),
        }

    tz = ZoneInfo(tz_identifier)
    now = datetime.datetime.now(tz)
    report = (
        f'The current time in {city} is {now.strftime("%Y-%m-%d %H:%M:%S %Z%z")}'
    )
    return {"status": "success", "report": report}


root_agent = Agent(
    name="weather_time_agent",
    model="gemini-2.0-flash",
    description=(
        "Agent to answer questions about the time and weather in a city."
    ),
    instruction=(
        "You are a helpful agent who can answer user questions about the time and weather in a city."
    ),
    tools=[get_weather, get_current_time],
)
.env
在同一文件夹中创建一个 .env 文件:
有关此文件的更多说明,请参见下一节设置模型。
Java 项目通常具有如下项目结构:
project_folder/
├── pom.xml (或 build.gradle)
├── src/
├── └── main/
│       └── java/
│           └── agents/
│               └── multitool/
└── test/
创建 MultiToolAgent.java
在 src/main/java/agents/multitool/ 目录中的 agents.multitool 包中创建一个 MultiToolAgent.java 源文件。
将以下代码复制并粘贴到 MultiToolAgent.java 中:
package agents.multitool;

import com.google.adk.agents.BaseAgent;
import com.google.adk.agents.LlmAgent;
import com.google.adk.events.Event;
import com.google.adk.runner.InMemoryRunner;
import com.google.adk.sessions.Session;
import com.google.adk.tools.Annotations.Schema;
import com.google.adk.tools.FunctionTool;
import com.google.genai.types.Content;
import com.google.genai.types.Part;
import io.reactivex.rxjava3.core.Flowable;
import java.nio.charset.StandardCharsets;
import java.text.Normalizer;
import java.time.ZoneId;
import java.time.ZonedDateTime;
import java.time.format.DateTimeFormatter;
import java.util.Map;
import java.util.Scanner;

public class MultiToolAgent {

    private static String USER_ID = "student";
    private static String NAME = "multi_tool_agent";

    // The run your agent with Dev UI, the ROOT_AGENT should be a global public static variable.
    public static BaseAgent ROOT_AGENT = initAgent();

    public static BaseAgent initAgent() {
        return LlmAgent.builder()
            .name(NAME)
            .model("gemini-2.0-flash")
            .description("Agent to answer questions about the time and weather in a city.")
            .instruction(
                "You are a helpful agent who can answer user questions about the time and weather"
                    + " in a city.")
            .tools(
                FunctionTool.create(MultiToolAgent.class, "getCurrentTime"),
                FunctionTool.create(MultiToolAgent.class, "getWeather"))
            .build();
    }

    public static Map<String, String> getCurrentTime(
        @Schema(description = "The name of the city for which to retrieve the current time")
        String city) {
        String normalizedCity =
            Normalizer.normalize(city, Normalizer.Form.NFD)
                .trim()
                .toLowerCase()
                .replaceAll("(\\p{IsM}+|\\p{IsP}+)", "")
                .replaceAll("\\s+", "_");

        return ZoneId.getAvailableZoneIds().stream()
            .filter(zid -> zid.toLowerCase().endsWith("/" + normalizedCity))
            .findFirst()
            .map(
                zid ->
                    Map.of(
                        "status",
                        "success",
                        "report",
                        "The current time in "
                            + city
                            + " is "
                            + ZonedDateTime.now(ZoneId.of(zid))
                            .format(DateTimeFormatter.ofPattern("HH:mm"))
                            + "."))
            .orElse(
                Map.of(
                    "status",
                    "error",
                    "report",
                    "Sorry, I don't have timezone information for " + city + "."));
    }

    public static Map<String, String> getWeather(
        @Schema(description = "The name of the city for which to retrieve the weather report")
        String city) {
        if (city.toLowerCase().equals("new york")) {
            return Map.of(
                "status",
                "success",
                "report",
                "The weather in New York is sunny with a temperature of 25 degrees Celsius (77 degrees"
                    + " Fahrenheit).");

        } else {
            return Map.of(
                "status", "error", "report", "Weather information for " + city + " is not available.");
        }
    }

    public static void main(String[] args) throws Exception {
        InMemoryRunner runner = new InMemoryRunner(ROOT_AGENT);

        Session session =
            runner
                .sessionService()
                .createSession(NAME, USER_ID)
                .blockingGet();

        try (Scanner scanner = new Scanner(System.in, StandardCharsets.UTF_8)) {
            while (true) {
                System.out.print("\nYou > ");
                String userInput = scanner.nextLine();

                if ("quit".equalsIgnoreCase(userInput)) {
                    break;
                }

                Content userMsg = Content.fromParts(Part.fromText(userInput));
                Flowable<Event> events = runner.runAsync(USER_ID, session.id(), userMsg);

                System.out.print("\nAgent > ");
                events.blockingForEach(event -> System.out.println(event.stringifyContent()));
            }
        }
    }
}
3. 设置模型
你的智能体理解用户请求和生成响应的能力由大语言模型(LLM)提供支持。你的智能体需要安全地调用这个外部 LLM 服务,这需要身份验证凭据。如果没有有效的身份验证,LLM 服务将拒绝智能体的请求,智能体将无法运行。
- 从 Google AI Studio 获取 API 密钥。
-
使用 Python 时,打开位于 (
multi_tool_agent/) 内的.env文件并复制粘贴以下代码。使用 Java 时,定义环境变量:
-
用你的实际
API KEY替换PASTE_YOUR_ACTUAL_API_KEY_HERE。
- 你需要一个现有的 Google Cloud 账号和一个项目。
- 设置 Google Cloud 项目
- 设置 gcloud CLI
- 通过运行
gcloud auth login在终端进行 Google Cloud 认证。 - 启用 Vertex AI API。
-
如果你使用 Python,打开位于 (
multi_tool_agent/) 目录下的.env文件。粘贴如下内容并更新项目 ID 和位置。multi_tool_agent/.envGOOGLE_GENAI_USE_VERTEXAI=TRUE GOOGLE_CLOUD_PROJECT=你的项目 ID GOOGLE_CLOUD_LOCATION=位置如果你使用 Java,请设置环境变量:
4. 运行你的智能体
在终端中,切换到你的智能体项目的父目录(例如使用 cd ..):
有多种方式与你的智能体交互:
运行以下命令启动开发 UI。
Note for Windows users
When hitting the _make_subprocess_transport NotImplementedError, consider using adk web --no-reload instead.
步骤 1: 在浏览器中直接打开提供的 URL(通常是 http://localhost:8000 或 http://127.0.0.1:8000)。
步骤 2: 在 UI 的左上角,你可以在下拉菜单中选择你的智能体。选择 "multi_tool_agent"。
故障排除
如果你在下拉菜单中没有看到 "multi_tool_agent",请确保你在智能体文件夹的父文件夹中运行 adk web(即 multi_tool_agent 的父文件夹)。
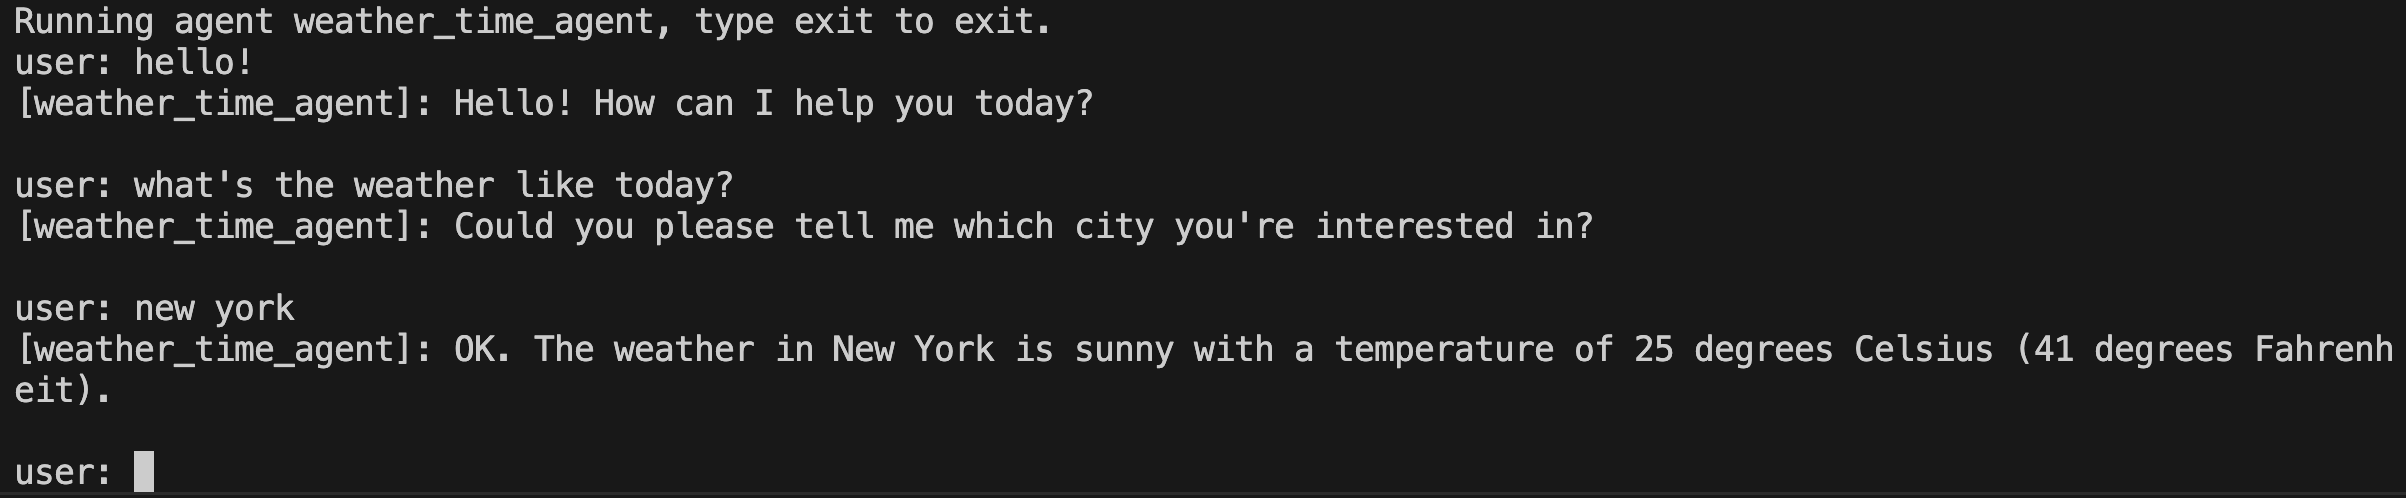
步骤 3: 现在你可以使用文本框与你的智能体聊天:
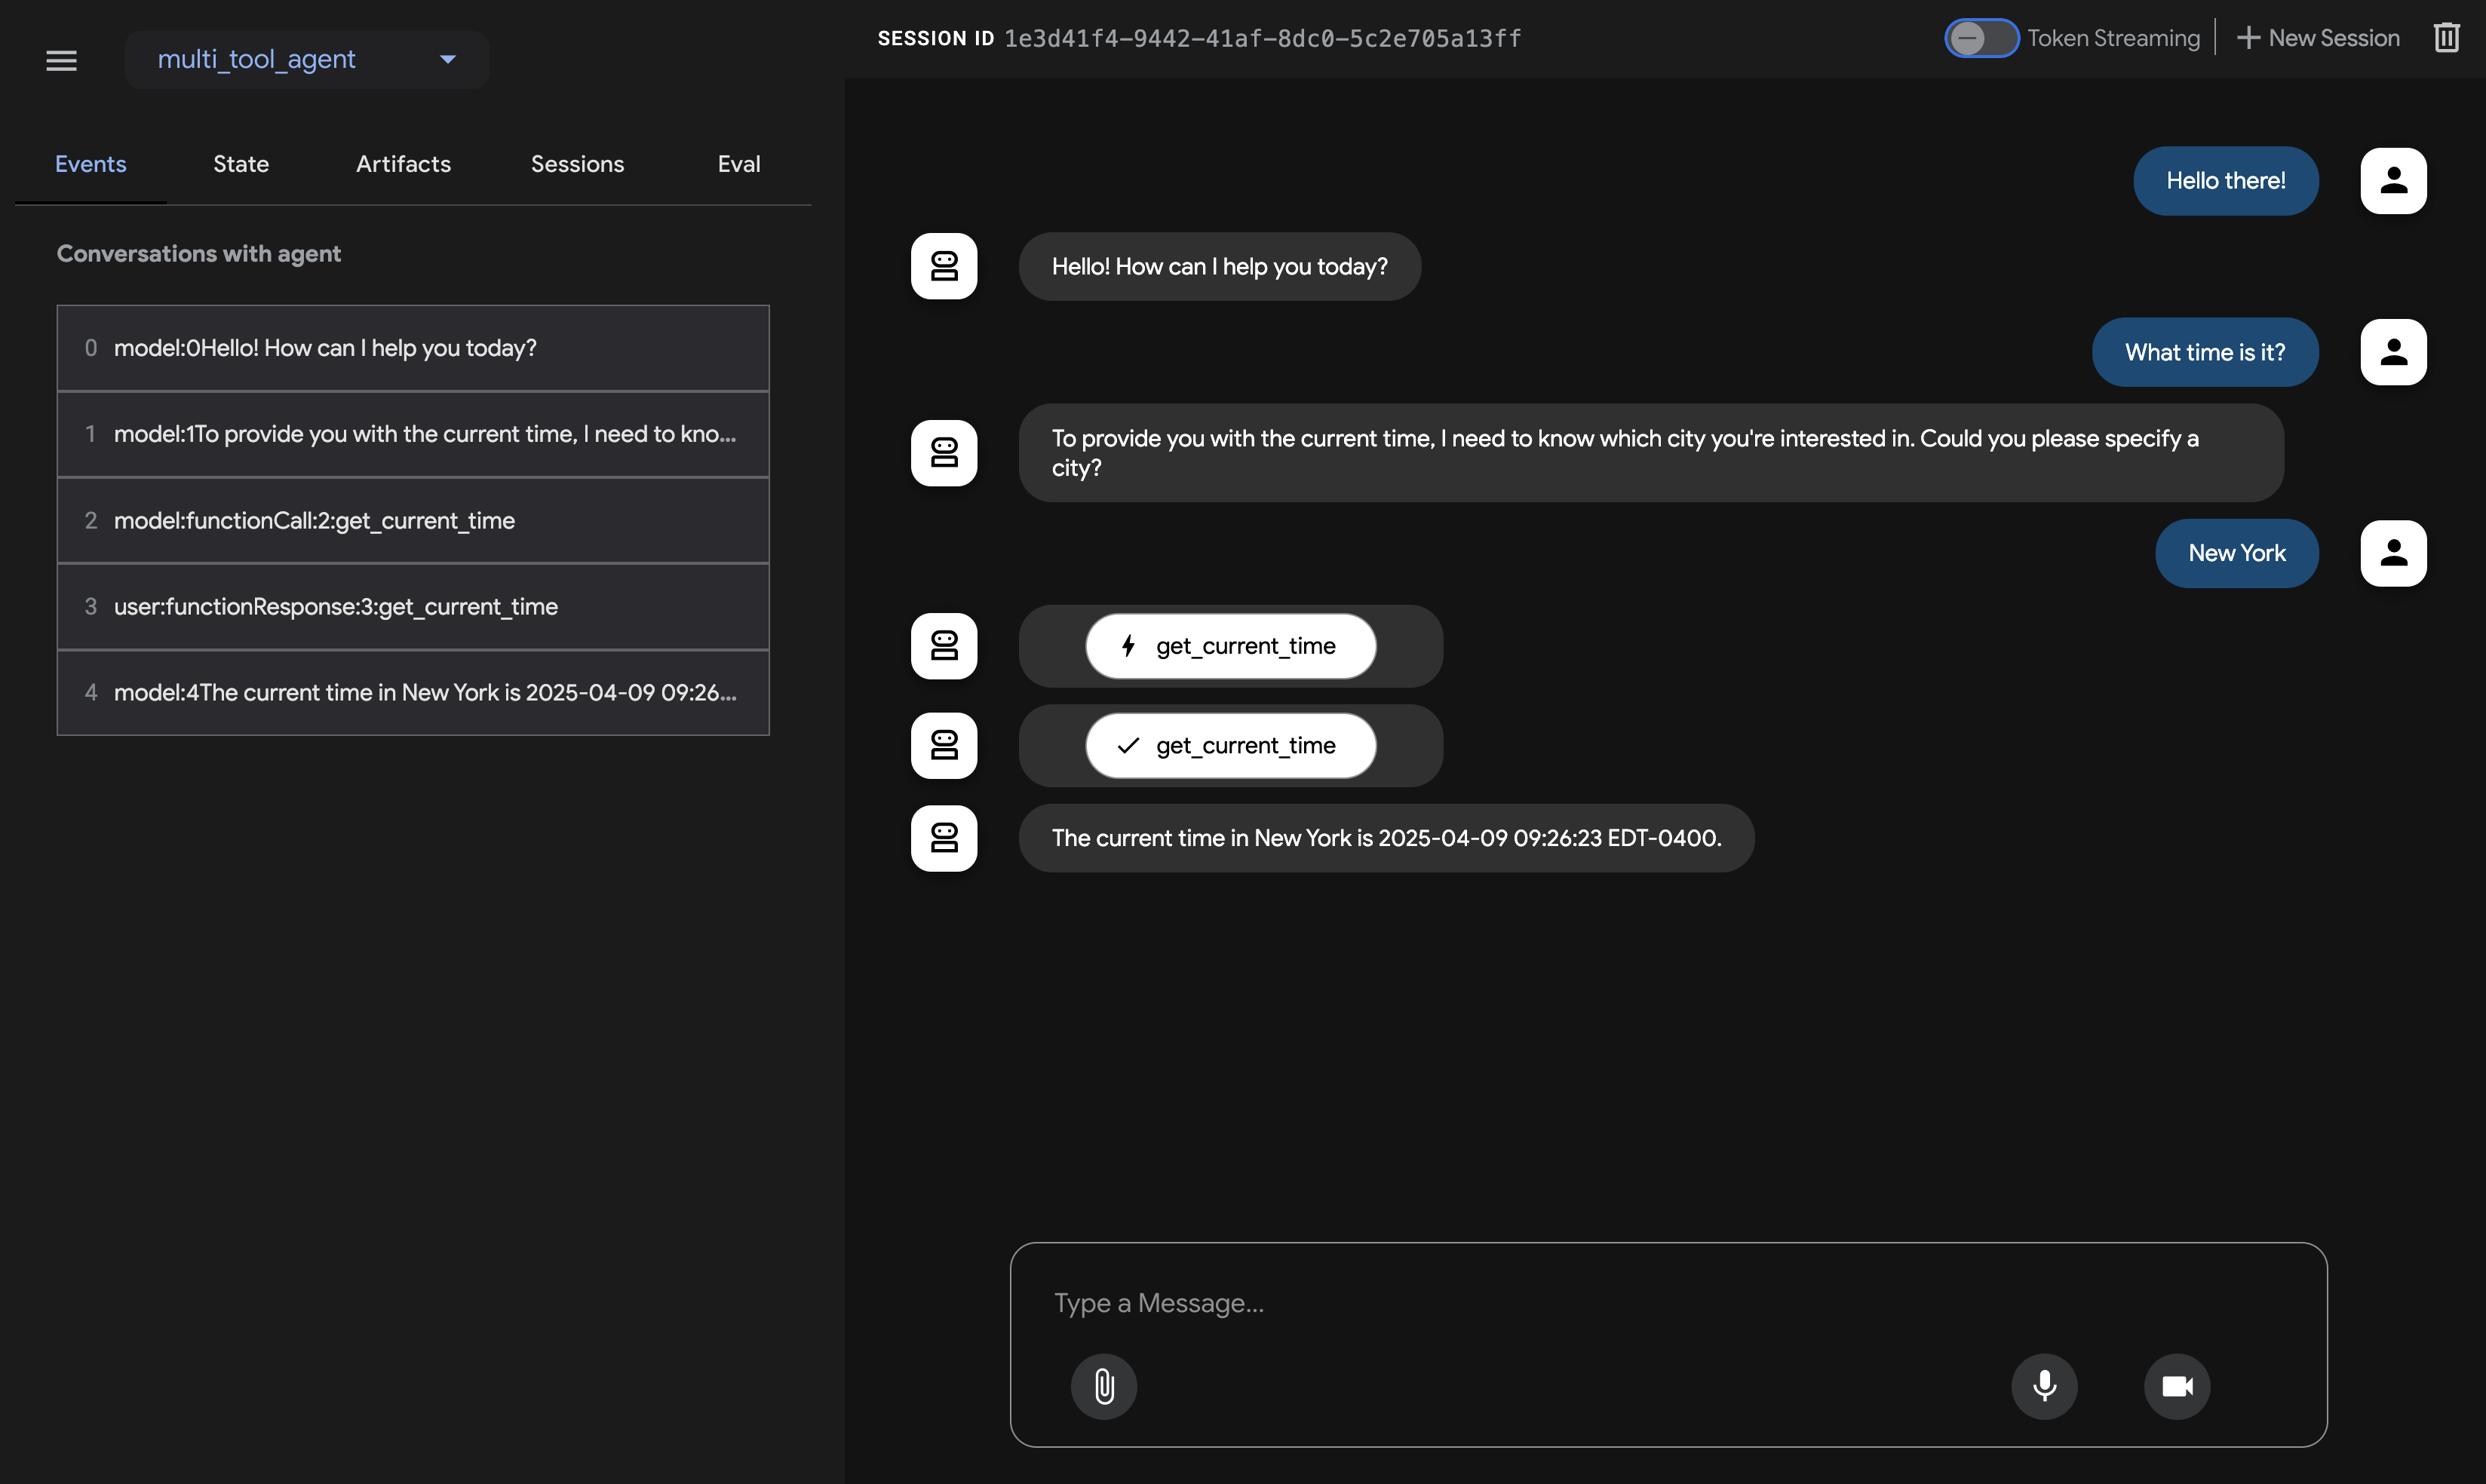
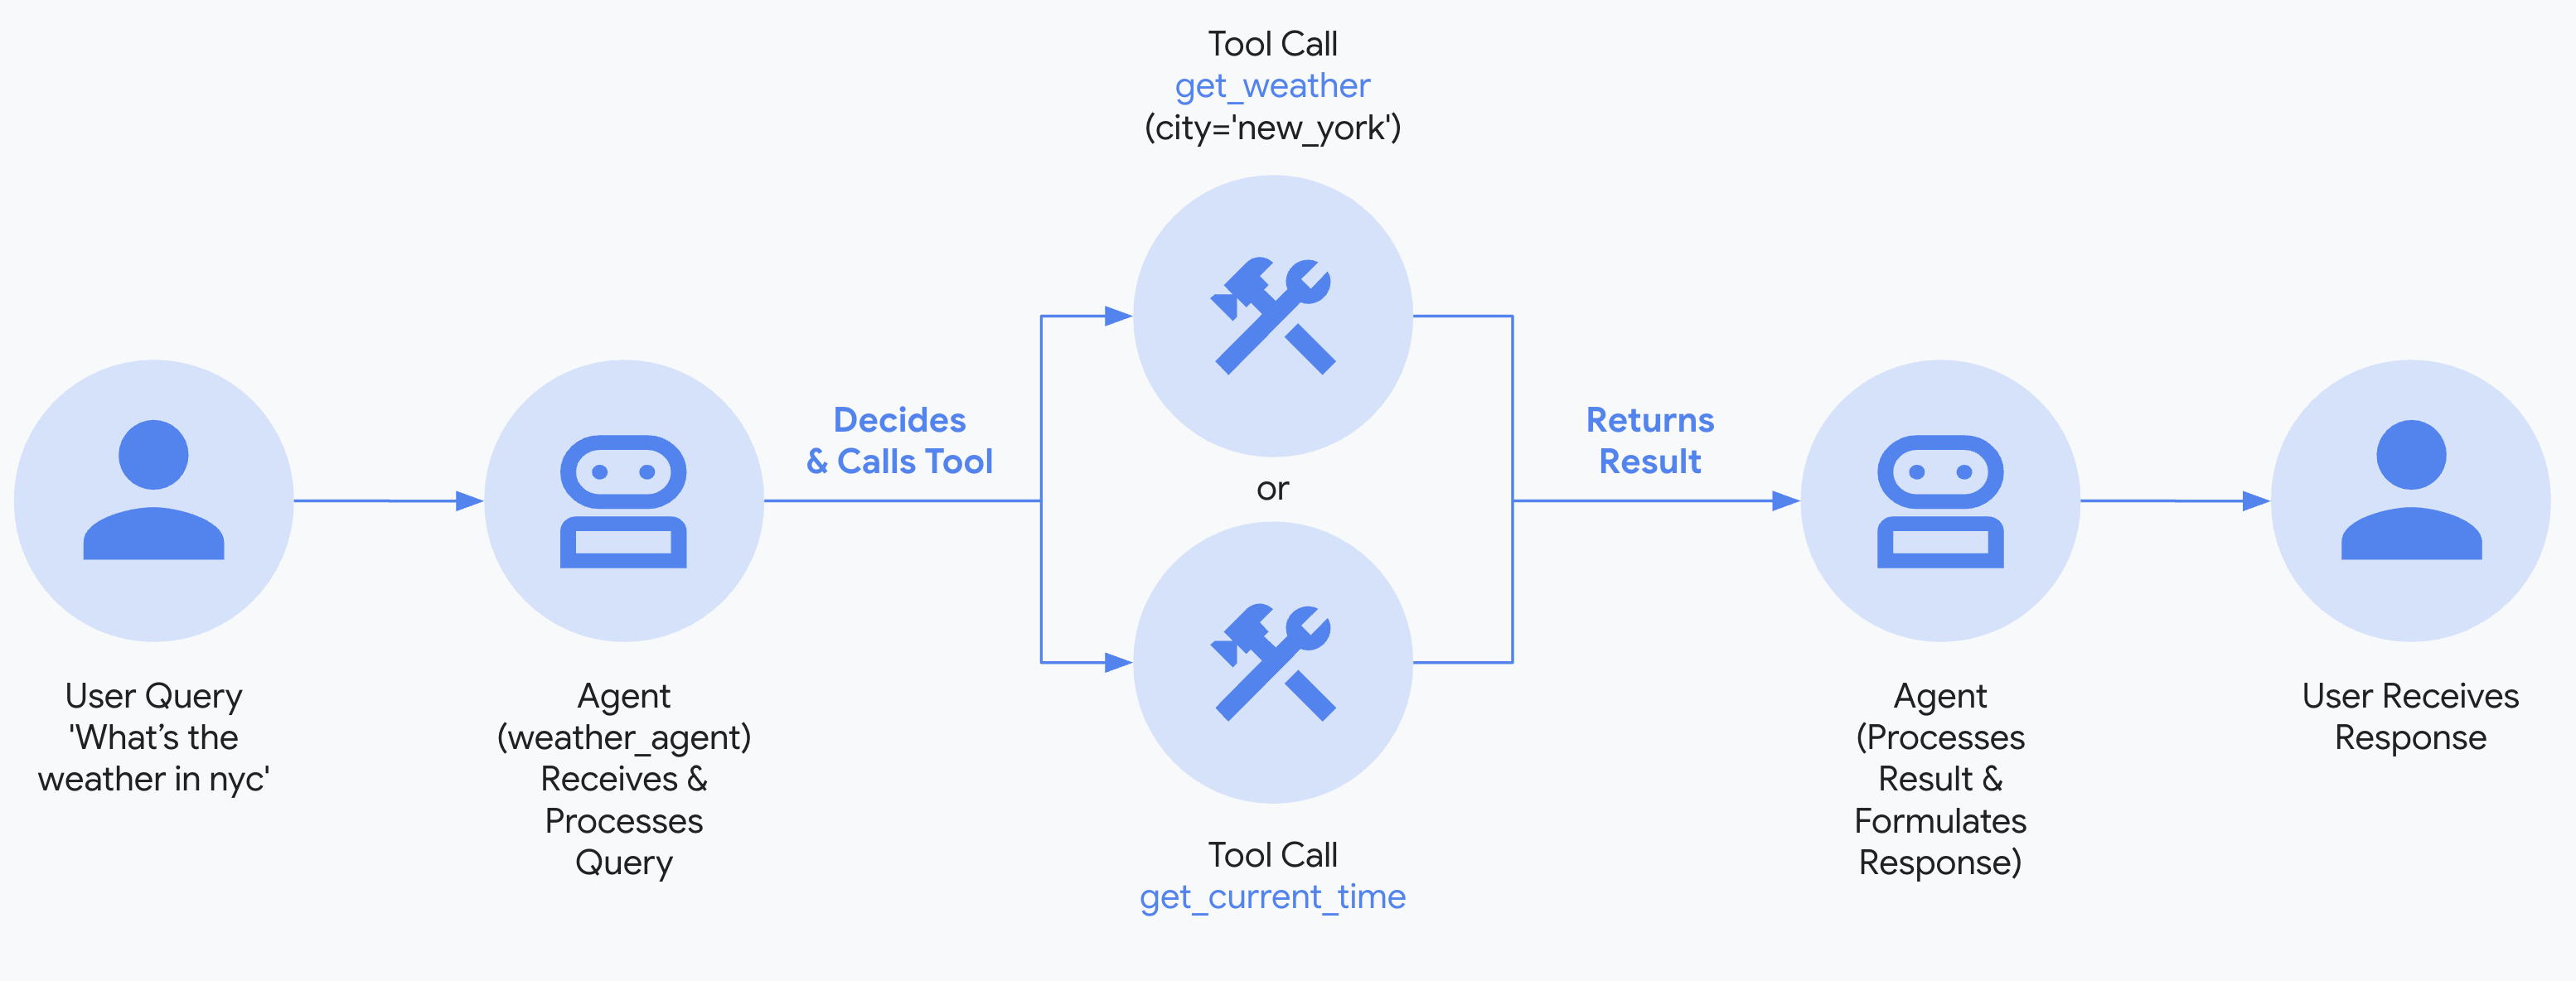
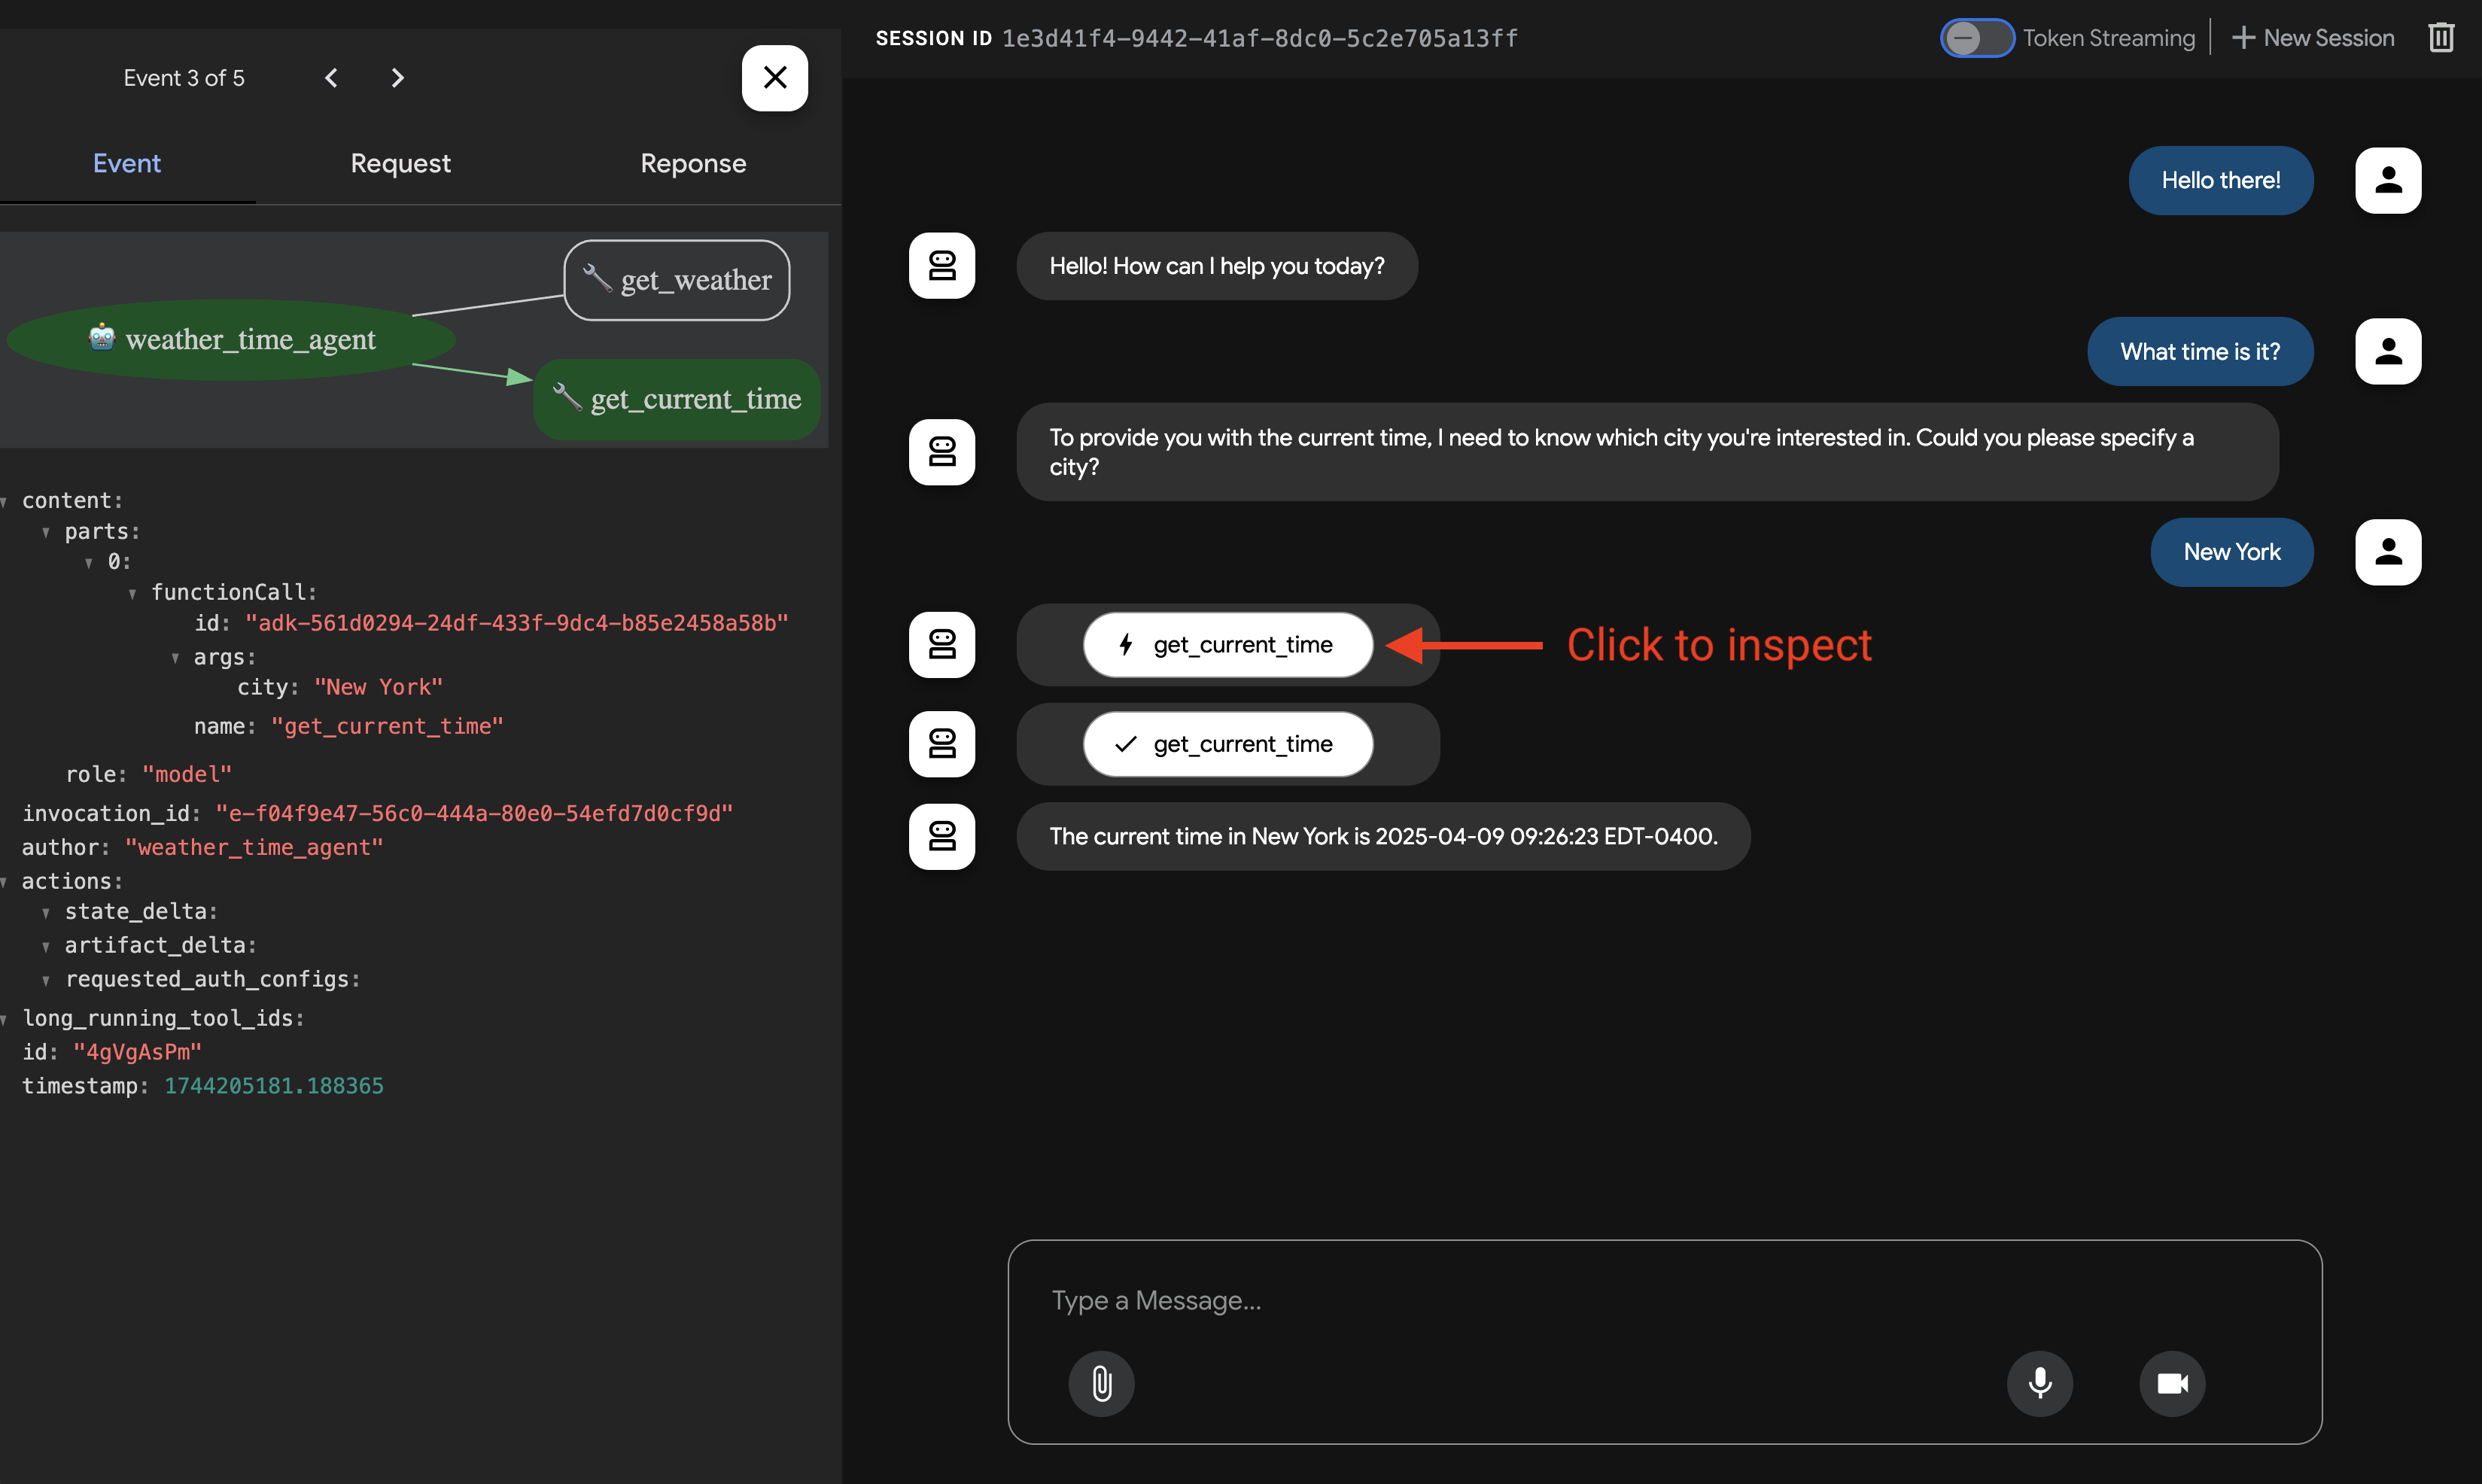
步骤 4: 通过使用左侧的 Events 选项卡,你可以通过点击操作来检查单个函数调用、响应和模型响应:
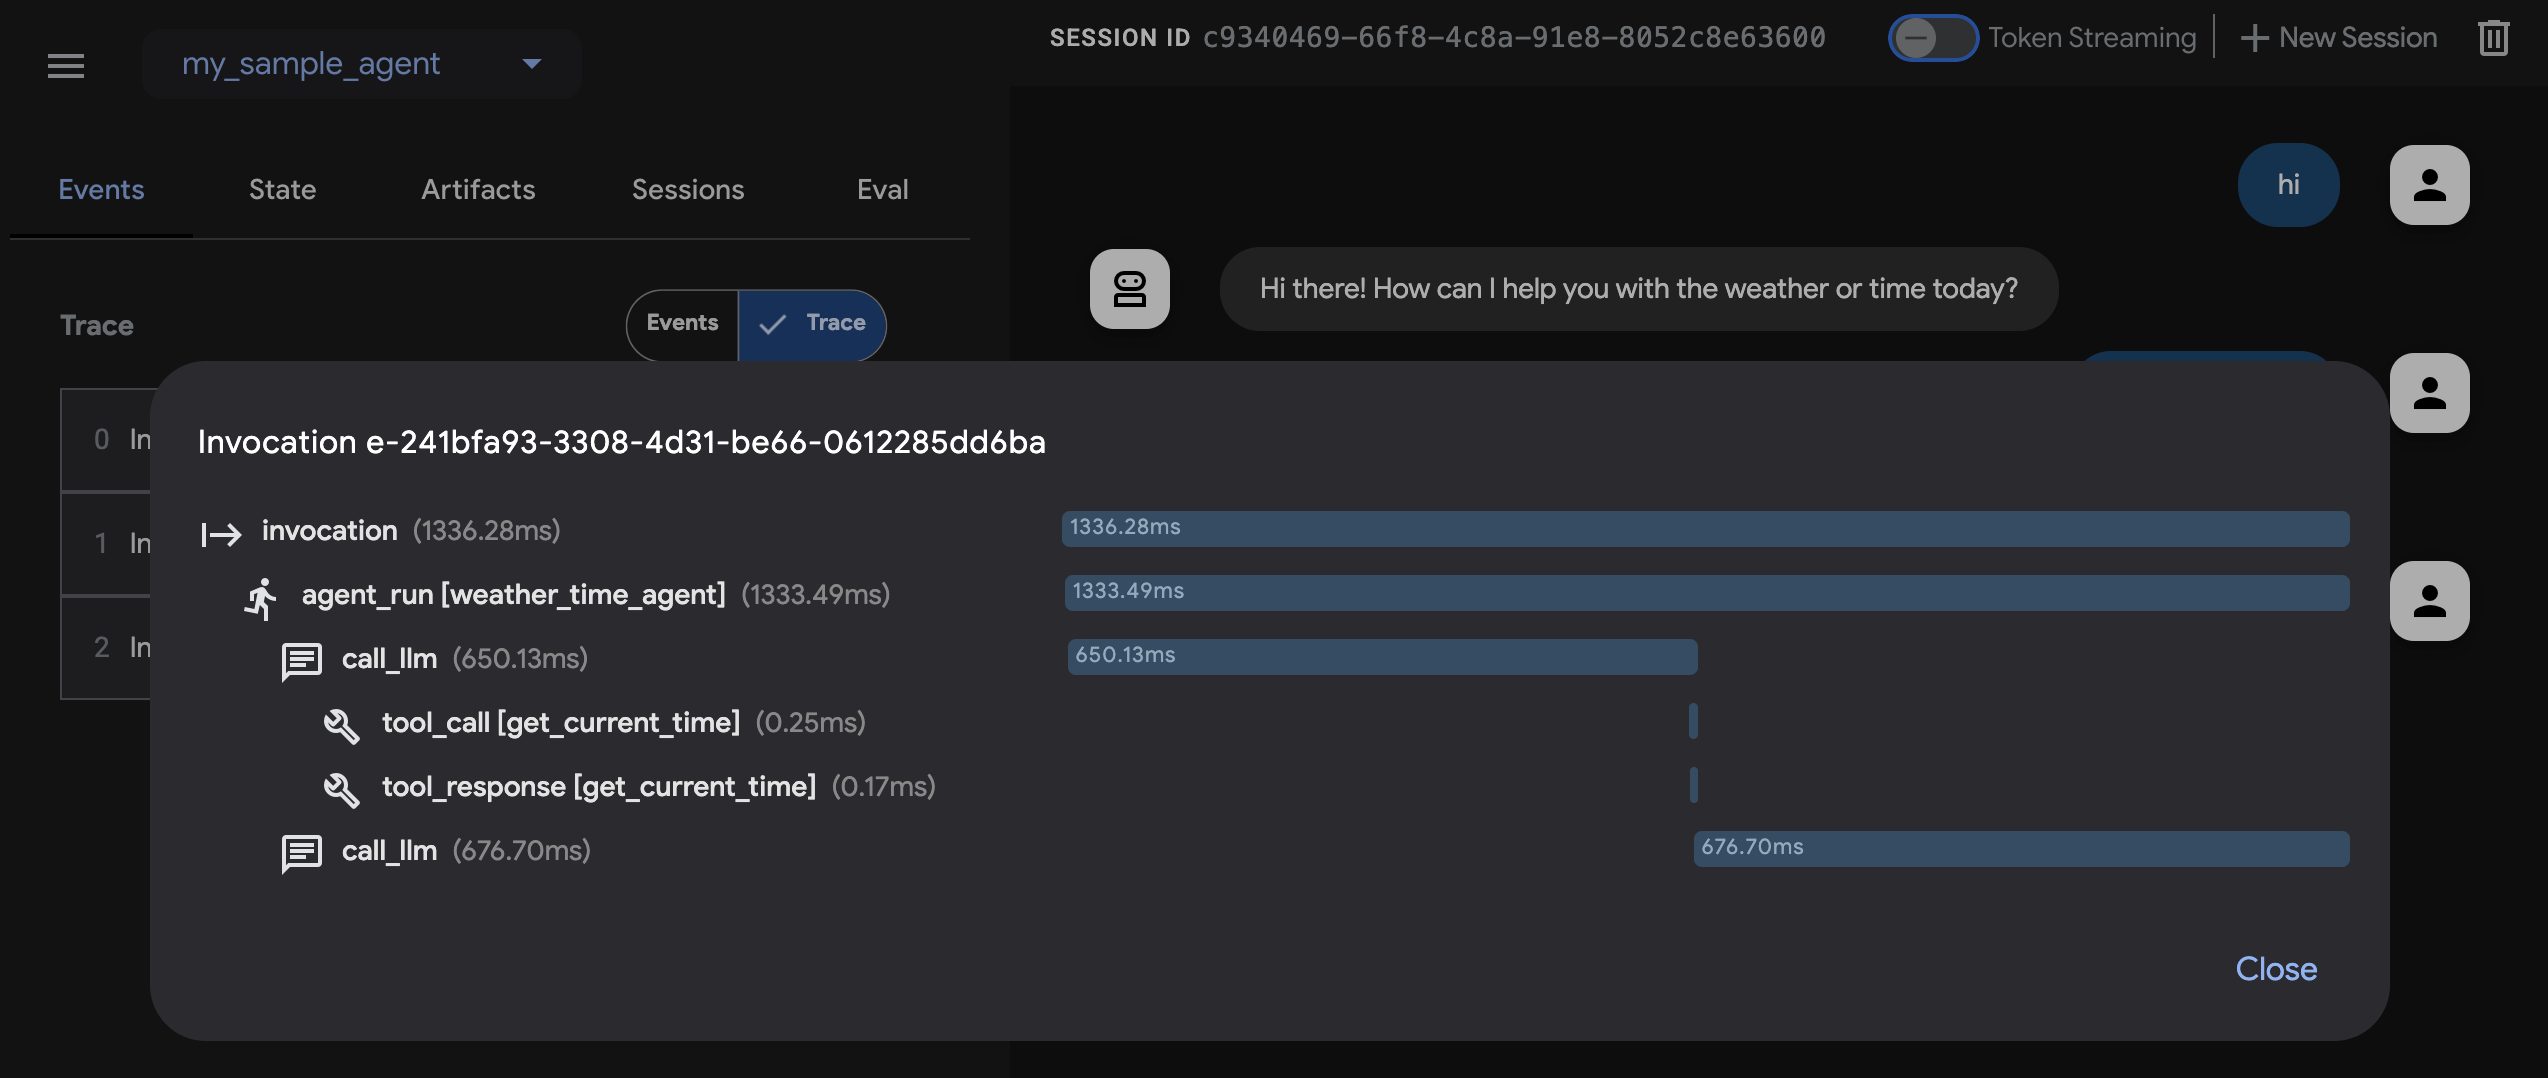
在 Events 选项卡上,你还可以点击 Trace 按钮查看每个事件的跟踪日志,显示每个函数调用的延迟:
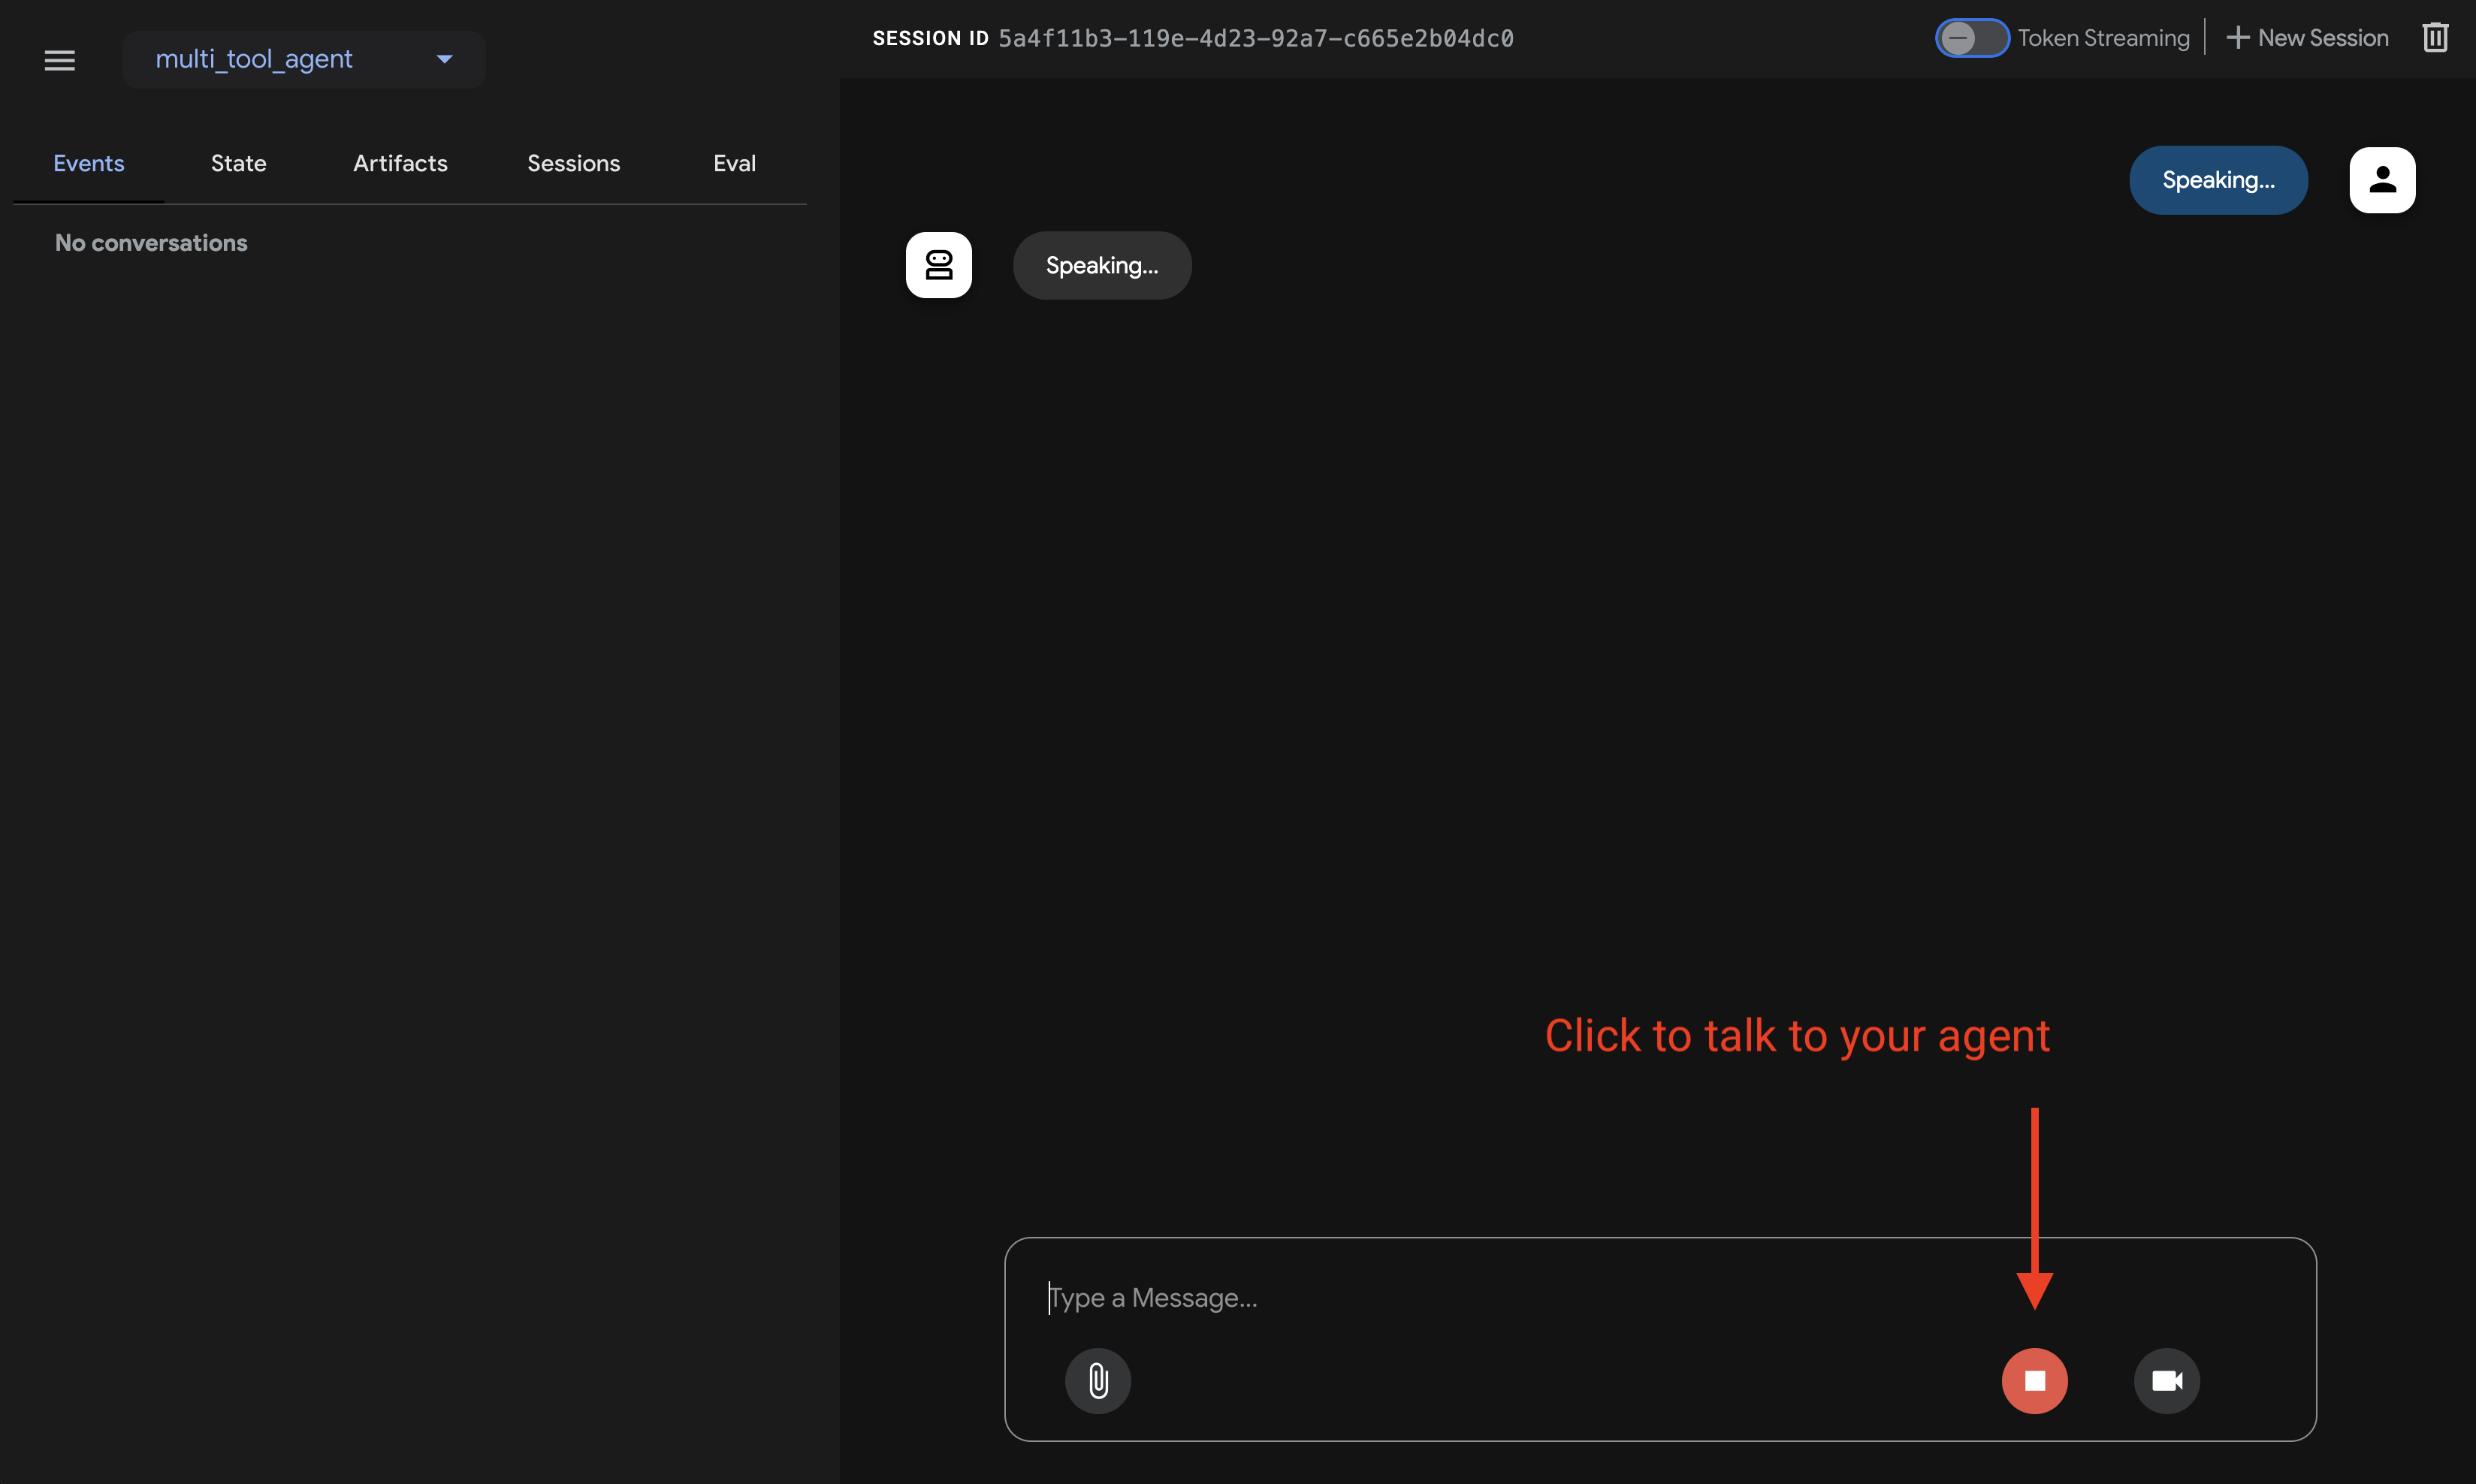
步骤 5: 你还可以启用麦克风并与你的智能体对话:
语音/视频流的模型支持
为了在 ADK 中使用语音/视频流,你需要使用支持 Live API 的 Gemini 模型。你可以在文档中找到支持 Gemini Live API 的模型 ID:
然后你可以替换之前创建的 agent.py 文件中 root_agent 中的 model 字符串(跳转到章节)。你的代码应该类似于:
adk api_server 使你能够通过单个命令创建本地 FastAPI 服务器,让你在部署智能体之前测试本地 cURL 请求。

要了解如何使用 adk api_server 进行测试,请参阅测试文档。
使用终端,导航到你的智能体项目的父目录(例如使用 cd ..):
project_folder/                <-- 切换到此目录
├── pom.xml (或 build.gradle)
├── src/
├── └── main/
│       └── java/
│           └── agents/
│               └── multitool/
│                   └── MultiToolAgent.java
└── test/
在终端中运行以下命令以启动 Dev UI。
不要更改 Dev UI 服务器的主类名。
mvn exec:java \
    -Dexec.mainClass="com.google.adk.web.AdkWebServer" \
    -Dexec.args="--adk.agents.source-dir=src/main/java" \
    -Dexec.classpathScope="compile"
步骤 1: 在浏览器中直接打开提供的 URL(通常是 http://localhost:8080 或 http://127.0.0.1:8080)。
步骤 2: 在 UI 的左上角,你可以在下拉菜单中选择你的智能体。选择 "multi_tool_agent"。
故障排除
如果你在下拉菜单中没有看到 "multi_tool_agent",请确保你在 Java 源代码所在的位置运行 mvn 命令(通常是 src/main/java)。
步骤 3: 现在你可以使用文本框与你的智能体聊天:
步骤 4: 你还可以通过点击操作来检查单个函数调用、响应和模型响应:
使用 Maven,通过以下命令运行你的 Java 类的 main() 方法:
📝 示例提示
- 纽约的天气如何?
- 纽约现在几点?
- 巴黎的天气如何?
- 巴黎现在几点?
🎉 恭喜!
你已经成功创建并与你的第一个使用 ADK 的智能体进行了交互!