Session:跟踪个别对话
在前述介绍之后,让我们深入了解 Session。回想一下"对话线程"的概念。就像你不会每次发短信都从头开始一样,智能体也需要了解当前交互的上下文。Session 是 ADK 专门设计用于跟踪和管理这些单独对话线程的对象。
Session 对象
当用户开始与你的智能体交互时,SessionService 会创建一个 Session 对象(google.adk.sessions.Session)。该对象作为单个对话线程相关所有内容的容器。其主要属性如下:
- 标识 (
id,appName,userId): 对话的唯一标签。id: 此特定对话线程的唯一标识符,对于以后检索至关重要。一个 SessionService 对象可以处理多个Session。此字段标识我们引用的是哪个特定的会话对象。例如,“test_id_modification”。app_name: 标识此对话属于哪个智能体应用程序。例如,“id_modifier_workflow”。userId: 将对话链接到特定用户。
- 历史 (
events): 在此特定线程中发生的所有交互(Event对象——用户消息、智能体响应、工具操作)的时间顺序序列。 - 会话状态 (
state): 一个仅存储与此特定、正在进行的对话相关的临时数据的地方。这在交互期间充当智能体的草稿板。我们将在下一节中详细介绍如何使用和管理state。 - 活动跟踪 (
lastUpdateTime): 一个时间戳,指示此对话线程中最后一次发生事件的时间。
示例:检查 Session 属性
 from google.adk.sessions import InMemorySessionService, Session

 # Create a simple session to examine its properties
 temp_service = InMemorySessionService()
 example_session = await temp_service.create_session(
     app_name="my_app",
     user_id="example_user",
     state={"initial_key": "initial_value"} # 可以初始化 state
 )

 print(f"--- 检查 Session 属性 ---")
 print(f"ID (`id`):                {example_session.id}")
 print(f"应用名 (`app_name`): {example_session.app_name}")
 print(f"用户 ID (`user_id`):         {example_session.user_id}")
 print(f"状态 (`state`):           {example_session.state}") # 这里只显示初始状态
 print(f"事件 (`events`):         {example_session.events}") # 初始为空
 print(f"最后更新时间 (`last_update_time`): {example_session.last_update_time:.2f}")
 print(f"---------------------------------")

 # 清理(本例可选)
 temp_service = await temp_service.delete_session(app_name=example_session.app_name,
                             user_id=example_session.user_id, session_id=example_session.id)
 print("temp_service 的最终状态 - ", temp_service)
 import { InMemorySessionService } from "@google/adk";

 // 创建一个简单会话以检查其属性
 const tempService = new InMemorySessionService();
 const exampleSession = await tempService.createSession({
     appName: "my_app",
     userId: "example_user",
     state: {"initial_key": "initial_value"} // 可以初始化状态
 });

 console.log("--- 检查 Session 属性 ---");
 console.log(`ID ('id'):                ${exampleSession.id}`);
 console.log(`应用名 ('appName'): ${exampleSession.appName}`);
 console.log(`用户 ID ('userId'):         ${exampleSession.userId}`);
 console.log(`状态 ('state'):           ${JSON.stringify(exampleSession.state)}`); // 注意:这里只显示初始状态
 console.log(`事件 ('events'):         ${JSON.stringify(exampleSession.events)}`); // 初始为空
 console.log(`最后更新 ('lastUpdateTime'): ${exampleSession.lastUpdateTime}`);
 console.log("---------------------------------");

 // 清理(本例可选)
 const finalStatus = await tempService.deleteSession({
     appName: exampleSession.appName,
     userId: exampleSession.userId,
     sessionId: exampleSession.id
 });
 console.log("temp_service 的最终状态 - ", finalStatus);
appName := "my_go_app"
userID := "example_go_user"
initialState := map[string]any{"initial_key": "initial_value"}

// Create a session to examine its properties.
createResp, err := inMemoryService.Create(ctx, &session.CreateRequest{
 AppName: appName,
 UserID:  userID,
 State:   initialState,
})
if err != nil {
 log.Fatalf("Failed to create session: %v", err)
}
exampleSession := createResp.Session

fmt.Println("\n--- Examining Session Properties ---")
fmt.Printf("ID (`ID()`): %s\n", exampleSession.ID())
fmt.Printf("Application Name (`AppName()`): %s\n", exampleSession.AppName())
// To access state, you call Get().
val, _ := exampleSession.State().Get("initial_key")
fmt.Printf("State (`State().Get()`):    initial_key = %v\n", val)

// Events are initially empty.
fmt.Printf("Events (`Events().Len()`):  %d\n", exampleSession.Events().Len())
fmt.Printf("Last Update (`LastUpdateTime()`): %s\n", exampleSession.LastUpdateTime().Format("2006-01-02 15:04:05"))
fmt.Println("---------------------------------")

// Clean up the session.
err = inMemoryService.Delete(ctx, &session.DeleteRequest{
 AppName:   exampleSession.AppName(),
 UserID:    exampleSession.UserID(),
 SessionID: exampleSession.ID(),
})
if err != nil {
 log.Fatalf("Failed to delete session: %v", err)
}
fmt.Println("Session deleted successfully.")
 import com.google.adk.sessions.InMemorySessionService;
 import com.google.adk.sessions.Session;
 import java.util.concurrent.ConcurrentMap;
 import java.util.concurrent.ConcurrentHashMap;

 String sessionId = "123";
 String appName = "example-app"; // 示例 app 名称
 String userId = "example-user"; // 示例用户 id
 ConcurrentMap<String, Object> initialState = new ConcurrentHashMap<>(Map.of("newKey", "newValue"));
 InMemorySessionService exampleSessionService = new InMemorySessionService();

 // Create Session
 Session exampleSession = exampleSessionService.createSession(
     appName, userId, initialState, Optional.of(sessionId)).blockingGet();
 System.out.println("会话创建成功。");

 System.out.println("--- 检查 Session 属性 ---");
 System.out.printf("ID (`id`): %s%n", exampleSession.id());
 System.out.printf("应用名 (`appName`): %s%n", exampleSession.appName());
 System.out.printf("用户 ID (`userId`): %s%n", exampleSession.userId());
 System.out.printf("状态 (`state`): %s%n", exampleSession.state());
 System.out.println("------------------------------------");


 // Clean up (optional for this example)
 var unused = exampleSessionService.deleteSession(appName, userId, sessionId);
(注意: 上面显示的状态只是初始状态。状态更新通过事件发生,如状态部分所述。)
使用 SessionService 管理会话
如上所示,你通常不会直接创建或管理 Session 对象,而是通过 SessionService。该服务作为会话生命周期的中央管理者。
其核心职责包括:
- 开启新对话: 当用户开始交互时,创建新的
Session对象。 - 恢复已有对话:: 通过 ID 检索特定
Session,让智能体可以从上次中断处继续。 - 保存进度: 将新的交互(
Event对象)追加到 session 历史。这也是 sessionstate更新的机制(详见State章节)。 - 列出对话: 查找特定用户和应用的活跃会话线程。
- 清理: 当对话结束或不再需要时,删除
Session及其相关数据。
SessionService 实现
ADK 提供了多种 SessionService 实现,你可以选择最适合需求的存储后端:
InMemorySessionService
- 工作原理: 将所有会话数据直接存储在应用程序的内存中。
- 持久性: 无。如果应用程序重启,所有对话数据都将丢失。
- 需求: 无需额外设置。
- 适用于: 快速开发、本地测试、示例以及不需要长期持久性的场景。
VertexAiSessionService
- 工作原理: 通过 API 调用使用 Google Cloud Vertex AI 基础设施进行会话管理。
- 持久性: 是。数据通过 Vertex AI Agent Engine 可靠且可扩展地管理。
- 需求:
- 一个 Google Cloud 项目 (
pip install vertexai) - 一个 Google Cloud 存储桶,可以通过此步骤配置。
- 一个 Reasoning Engine 资源名称/ID,可以按照此教程设置。
- 如果你没有 Google Cloud 项目且想要尝试 VertexAiSessionService,请参阅 Vertex AI Express Mode。
- 一个 Google Cloud 项目 (
- 适用于: 部署在 Google Cloud 上的可扩展生产应用程序,特别是在与其他 Vertex AI 功能集成时。
# Requires: pip install google-adk[vertexai]
# Plus GCP setup and authentication
from google.adk.sessions import VertexAiSessionService

PROJECT_ID = "your-gcp-project-id"
LOCATION = "us-central1"
# The app_name used with this service should be the Reasoning Engine ID or name
REASONING_ENGINE_APP_NAME = "projects/your-gcp-project-id/locations/us-central1/reasoningEngines/your-engine-id"

session_service = VertexAiSessionService(project=PROJECT_ID, location=LOCATION)
# Use REASONING_ENGINE_APP_NAME when calling service methods, e.g.:
# session_service = await session_service.create_session(app_name=REASONING_ENGINE_APP_NAME, ...)
import "google.golang.org/adk/session"

// 2. VertexAIService
// Before running, ensure your environment is authenticated:
// gcloud auth application-default login
// export GOOGLE_CLOUD_PROJECT="your-gcp-project-id"
// export GOOGLE_CLOUD_LOCATION="your-gcp-location"

modelName := "gemini-flash-latest" // Replace with your desired model
vertexService, err := session.VertexAIService(ctx, modelName)
if err != nil {
  log.Printf("Could not initialize VertexAIService (this is expected if the gcloud project is not set): %v", err)
} else {
  fmt.Println("Successfully initialized VertexAIService.")
}
// Please look at the set of requirements above, consequently export the following in your bashrc file:
// export GOOGLE_CLOUD_PROJECT=my_gcp_project
// export GOOGLE_CLOUD_LOCATION=us-central1
// export GOOGLE_API_KEY=my_api_key

import com.google.adk.sessions.VertexAiSessionService;
import java.util.UUID;

String sessionId = UUID.randomUUID().toString();
String reasoningEngineAppName = "123456789";
String userId = "u_123"; // Example user id
ConcurrentMap<String, Object> initialState = new
    ConcurrentHashMap<>(); // No initial state needed for this example

VertexAiSessionService sessionService = new VertexAiSessionService();
Session mySession =
    sessionService
        .createSession(reasoningEngineAppName, userId, initialState, Optional.of(sessionId))
        .blockingGet();
DatabaseSessionService
- 工作原理: 连接到关系型数据库 (例如 PostgreSQL、MySQL、SQLite) 以将会话数据持久地存储在表中。
- 持久性: 是。数据在应用程序重启后仍然存在。
- 需求: 一个已配置的数据库。
- 适用于: 需要可靠、持久存储且由你自己管理的应用程序。
from google.adk.sessions import DatabaseSessionService
# Example using a local SQLite file:
# Note: The implementation requires an async database driver.
# For SQLite, use 'sqlite+aiosqlite' instead of 'sqlite' to ensure async compatibility.
db_url = "sqlite+aiosqlite:///./my_agent_data.db"
session_service = DatabaseSessionService(db_url=db_url)
异步驱动程序需求
DatabaseSessionService 需要异步数据库驱动程序。使用 SQLite 时,你必须在连接字符串中使用 sqlite+aiosqlite 而不是 sqlite。对于其他数据库(PostgreSQL、MySQL),请确保你使用的是异步兼容的驱动程序,例如 PostgreSQL 的 asyncpg、MySQL 的 aiomysql。
ADK Python v1.22.0 中的会话数据库模式更改
ADK Python v1.22.0 中的会话数据库模式发生了更改,需要迁移 Session Database。有关更多信息,请参阅会话数据库模式迁移。
Session 生命周期
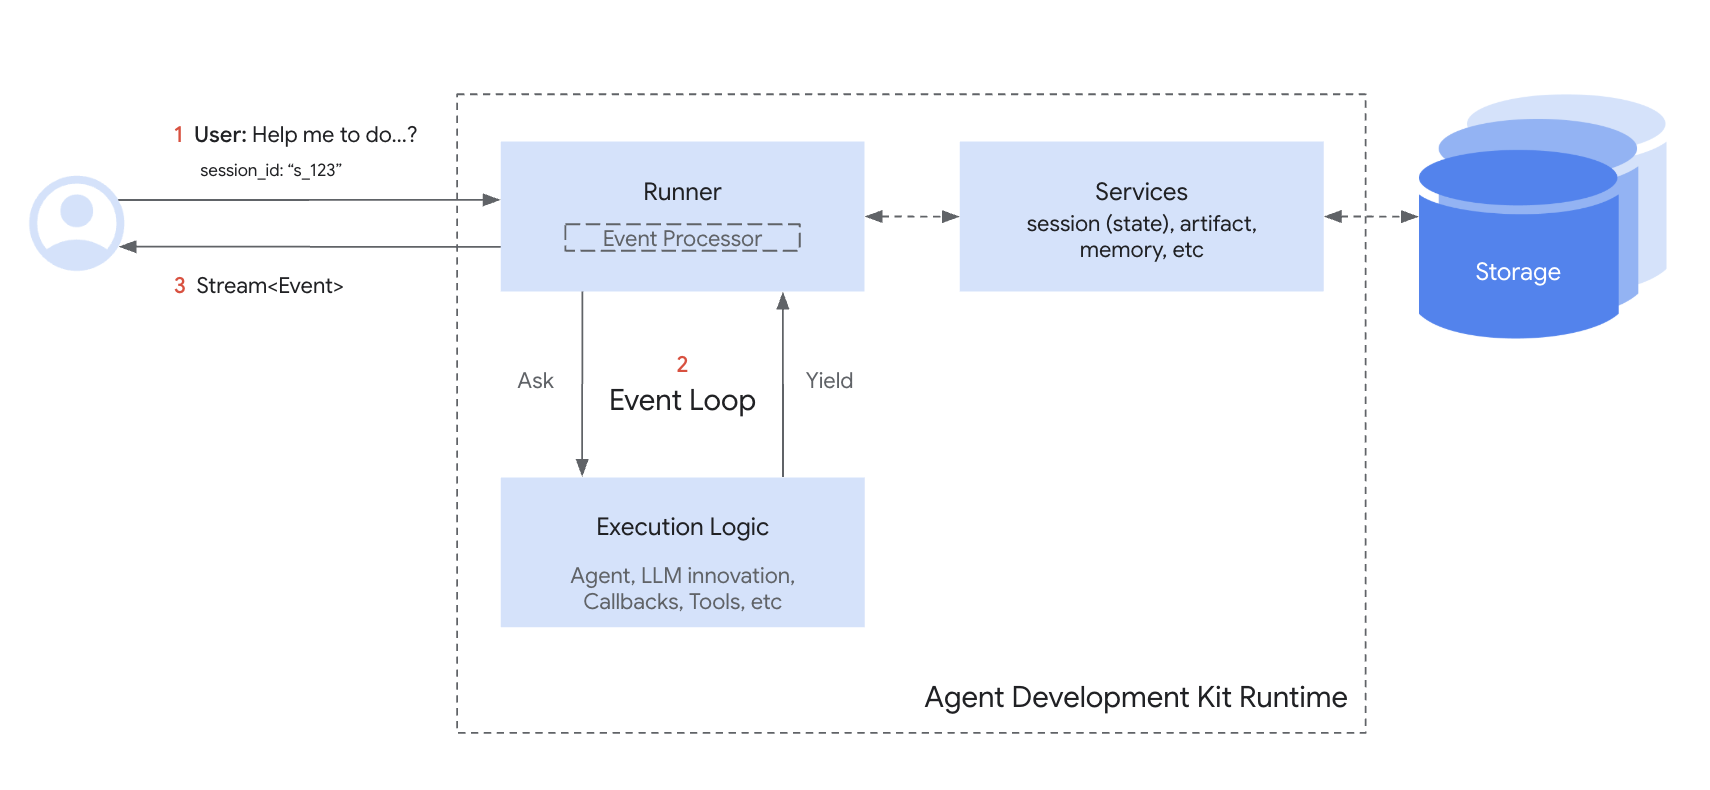
以下是 Session 与 SessionService 在一次对话轮次中协作的简化流程:
- 开始或恢复: 你的应用程序需要使用
SessionService来要么create_session(用于新聊天),要么使用现有的 session id。 - 提供上下文:
Runner从适当的服务方法获取相应的Session对象,为智能体提供对相应 Session 的state和events的访问权限。 - 智能体处理: 用户用查询提示智能体。智能体分析查询以及可能的 session
state和events历史来确定响应。 - 响应和状态更新: 智能体生成响应(并可能标记要在
state中更新的数据)。Runner将其打包为Event。 - 保存交互:
Runner调用sessionService.append_event(session, event),将session和新的event作为参数。服务将Event添加到历史记录中,并根据事件中的信息更新存储中的 sessionstate。session 的last_update_time也会得到更新。 - 准备下一次: 智能体的响应发送给用户。更新后的
Session现在由SessionService存储,准备进行下一轮(这通常会在当前会话中继续对话,从步骤 1 重新开始循环)。 - 结束对话: 当对话结束时,你的应用程序调用
sessionService.delete_session(...)来清理存储的会话数据(如果不再需要的话)。
此循环突出显示了 SessionService 如何通过管理与每个 Session 对象相关的历史和状态来确保对话的连续性。