用于 ADK 的 Google Cloud Application Integration 工具
使用 ApplicationIntegrationToolset,你可以无缝地让你的智能体通过集成连接器的 100 多个预构建连接器,安全且受管理地访问企业应用程序,如 Salesforce、ServiceNow、JIRA、SAP 等系统。
它支持本地和 SaaS 应用程序。此外,你可以通过将应用集成工作流作为工具提供给你的 ADK 智能体,将你现有的应用集成自动化过程转变为智能体工作流。
应用集成中的联合搜索让你可以使用 ADK 智能体同时查询多个企业应用程序和数据源。
前置条件
1. 安装 ADK
按照 安装指南 中的步骤安装 Agent Development Kit。
2. 安装 CLI
安装 Google Cloud CLI。要使用默认凭据运行该工具,请运行以下命令:
# 设置项目 ID
gcloud config set project <project-id>
# 登录应用默认凭据
gcloud auth application-default login
# 设置配额项目
gcloud auth application-default set-quota-project <project-id>
将 <project-id> 替换为你的 Google Cloud 项目的唯一 ID。
3. 配置应用集成工作流并发布连接工具
使用现有的应用集成工作流或集成连接器连接你想要与智能体一起使用的服务。你也可以创建一个新的应用集成工作流或一个连接。
从模板库中导入并发布连接工具模板。
注意: 要使用集成连接器中的连接器,你需要在与连接相同的区域中配置应用集成。
4. 创建项目结构
5. 设置角色和权限
要获得设置 ApplicationIntegrationToolset 所需的权限,你必须在项目上拥有以下 IAM 角色(集成连接器和应用集成工作流通用):
roles/integrations.integrationEditorroles/connectors.invokerroles/secretmanager.secretAccessor
注意: 使用 Agent Runtime 进行部署时,请不要使用 roles/integrations.integrationInvoker,因为它会导致 403 错误。请改用 roles/integrations.integrationEditor。
使用集成连接器
使用 集成连接器 将你的智能体连接到企业应用程序。
开始之前
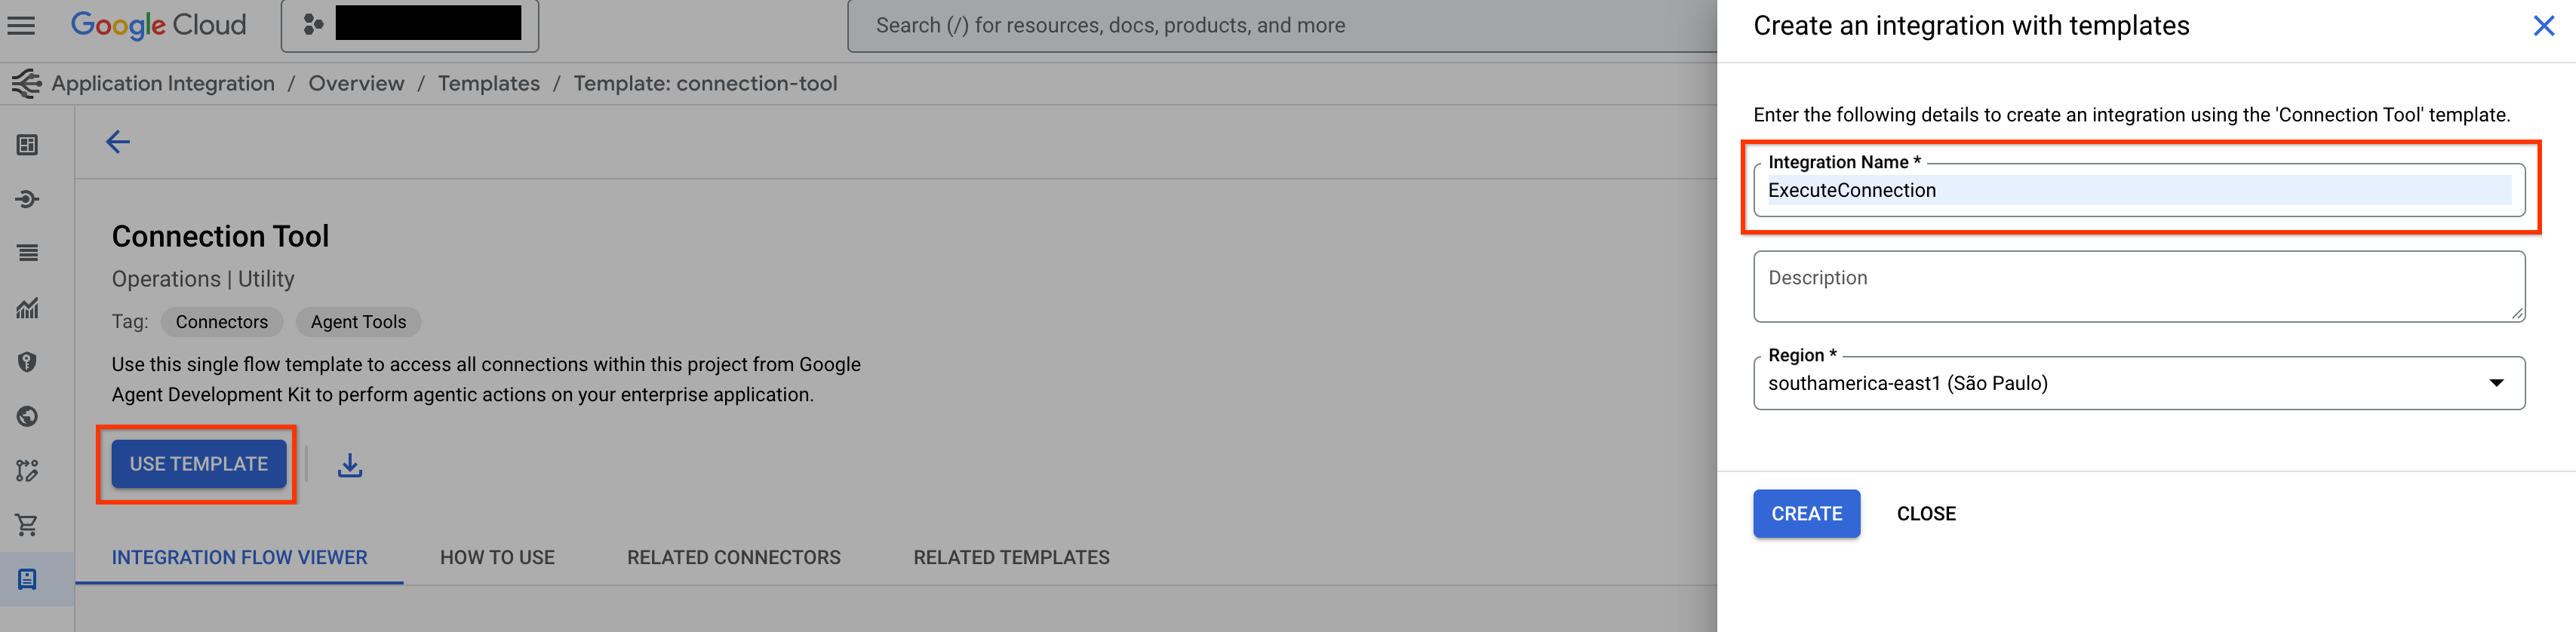
注意: ExecuteConnection 集成通常在你在给定区域中配置应用集成时自动创建。如果 ExecuteConnection 在集成列表中不存在,你必须按照以下步骤创建它:
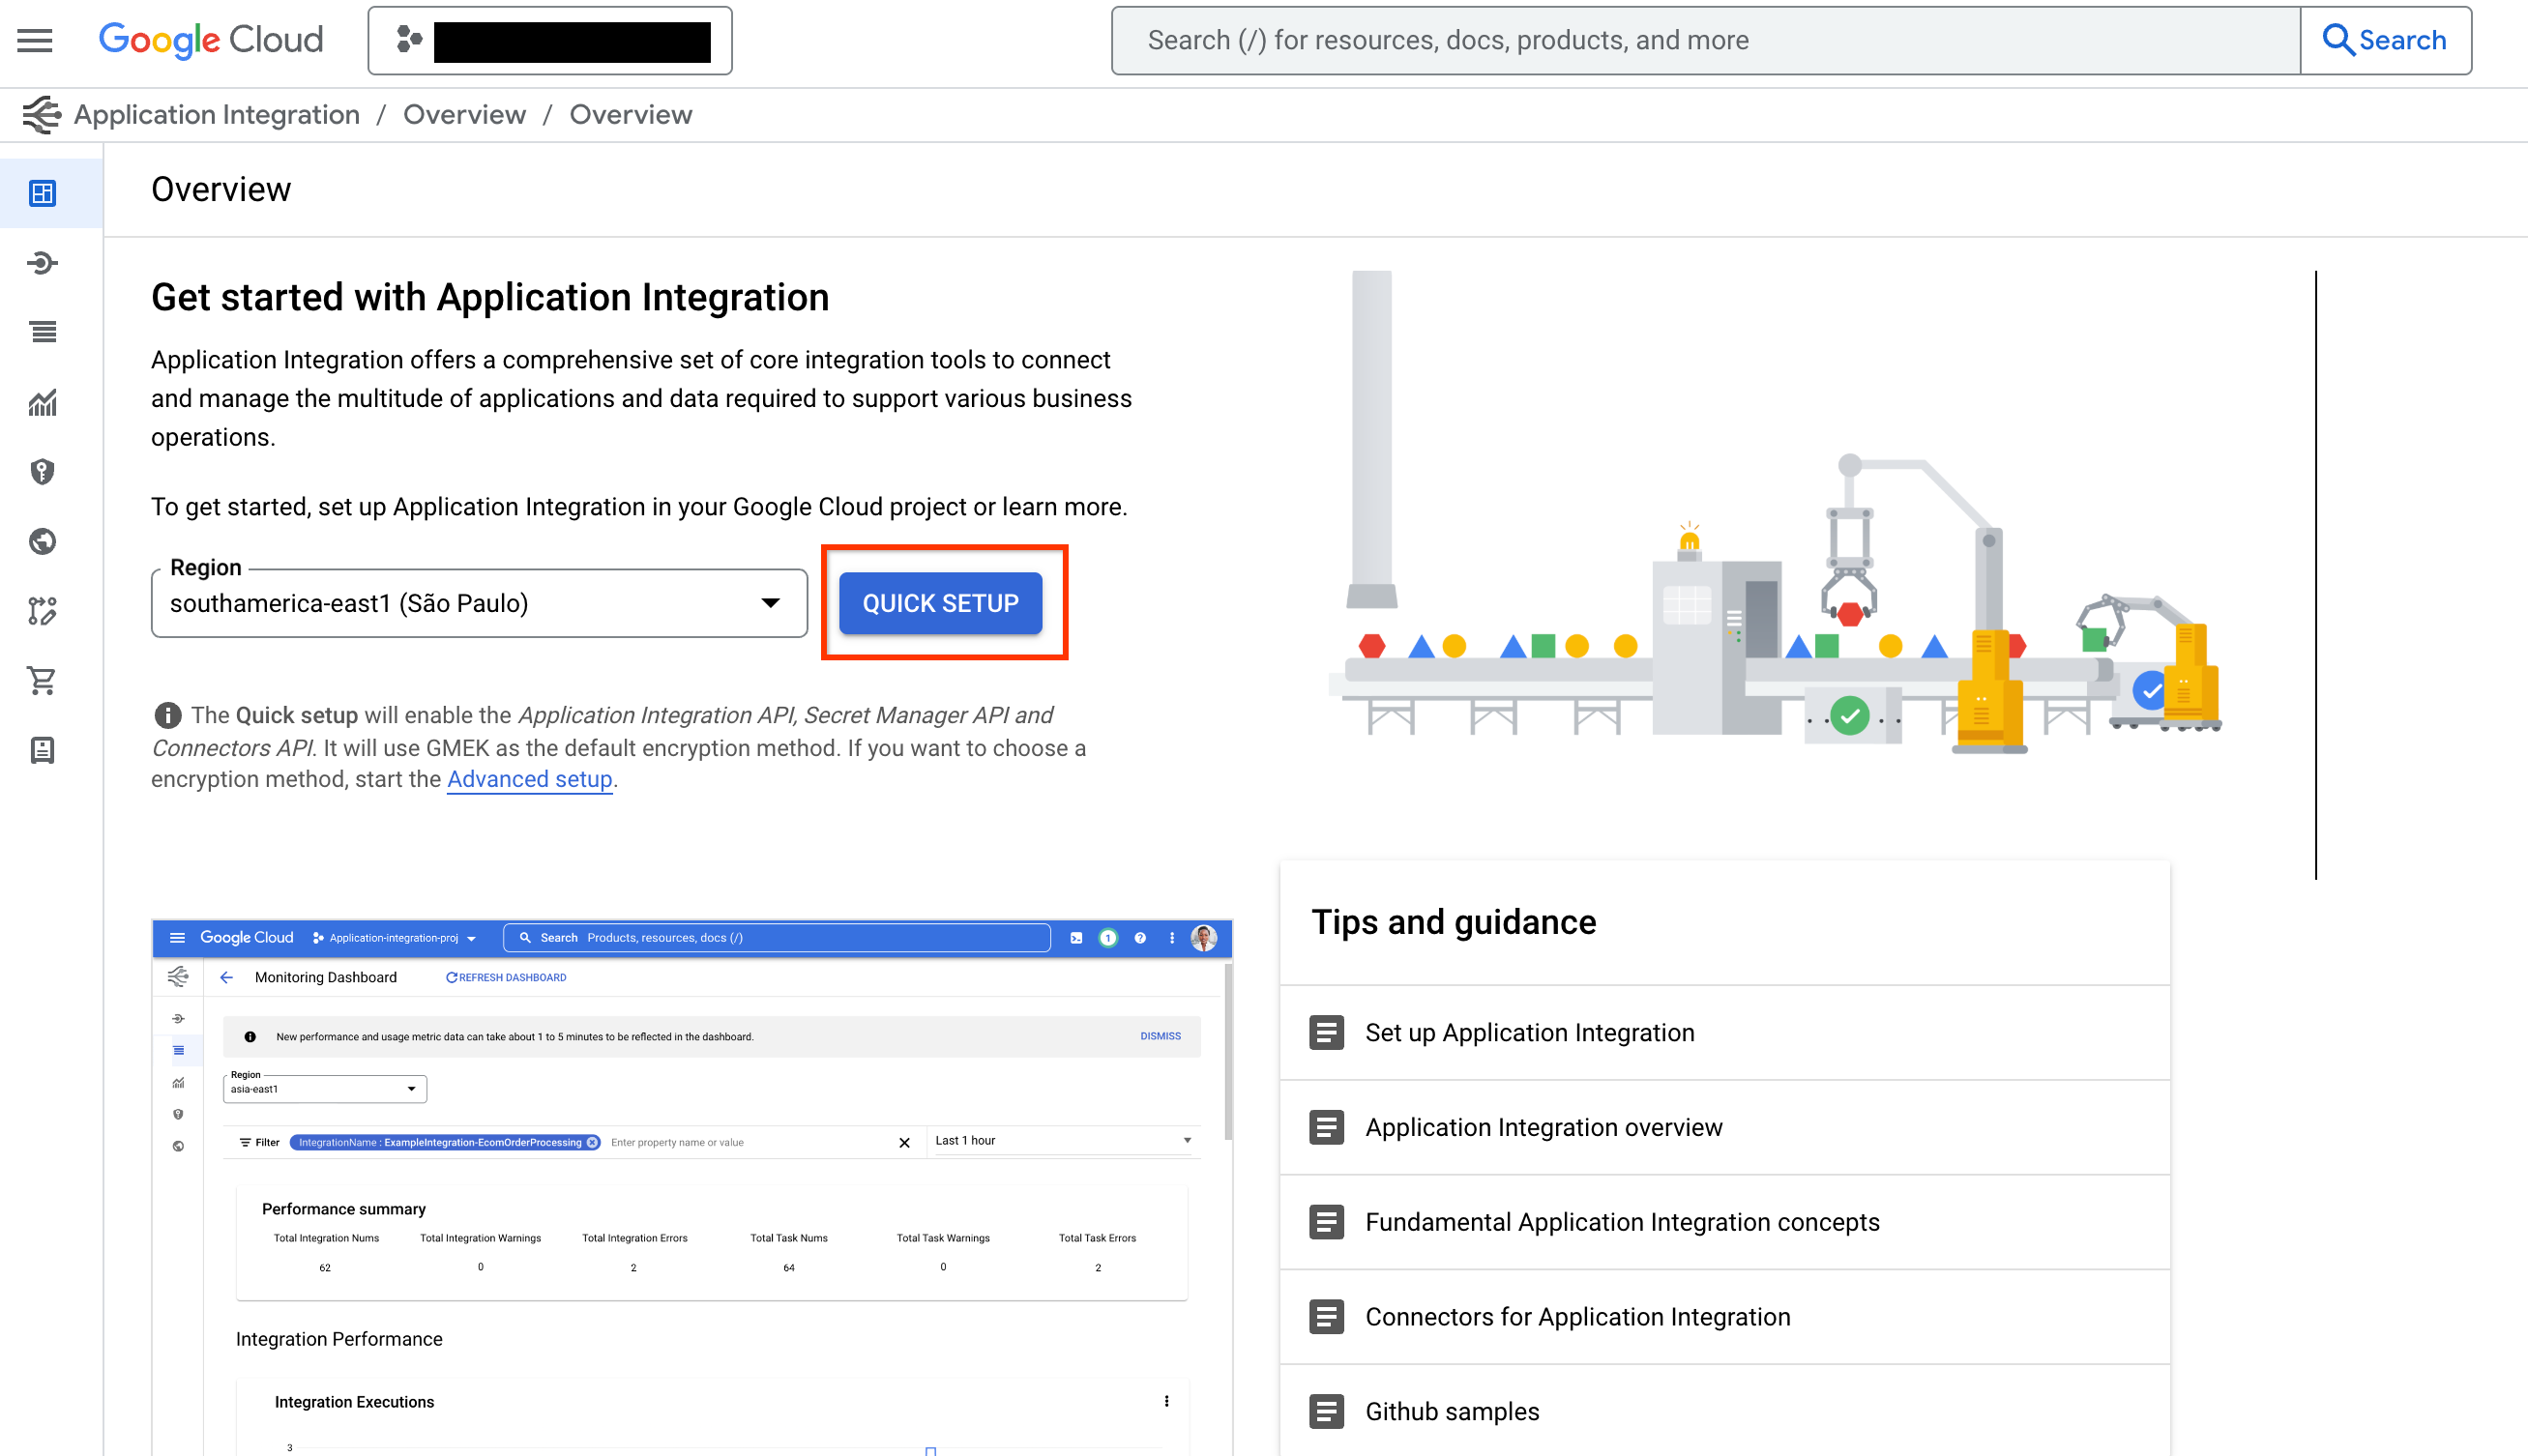
- 要使用集成连接器中的连接器,点击 QUICK SETUP 并在与连接相同的区域中配置应用集成。
-
前往模板库中的 连接工具 模板并点击 USE TEMPLATE。
-
填写集成名称为 ExecuteConnection(必须使用此特定名称)并选择与连接区域相同的区域。点击“创建 (CREATE)”。
-
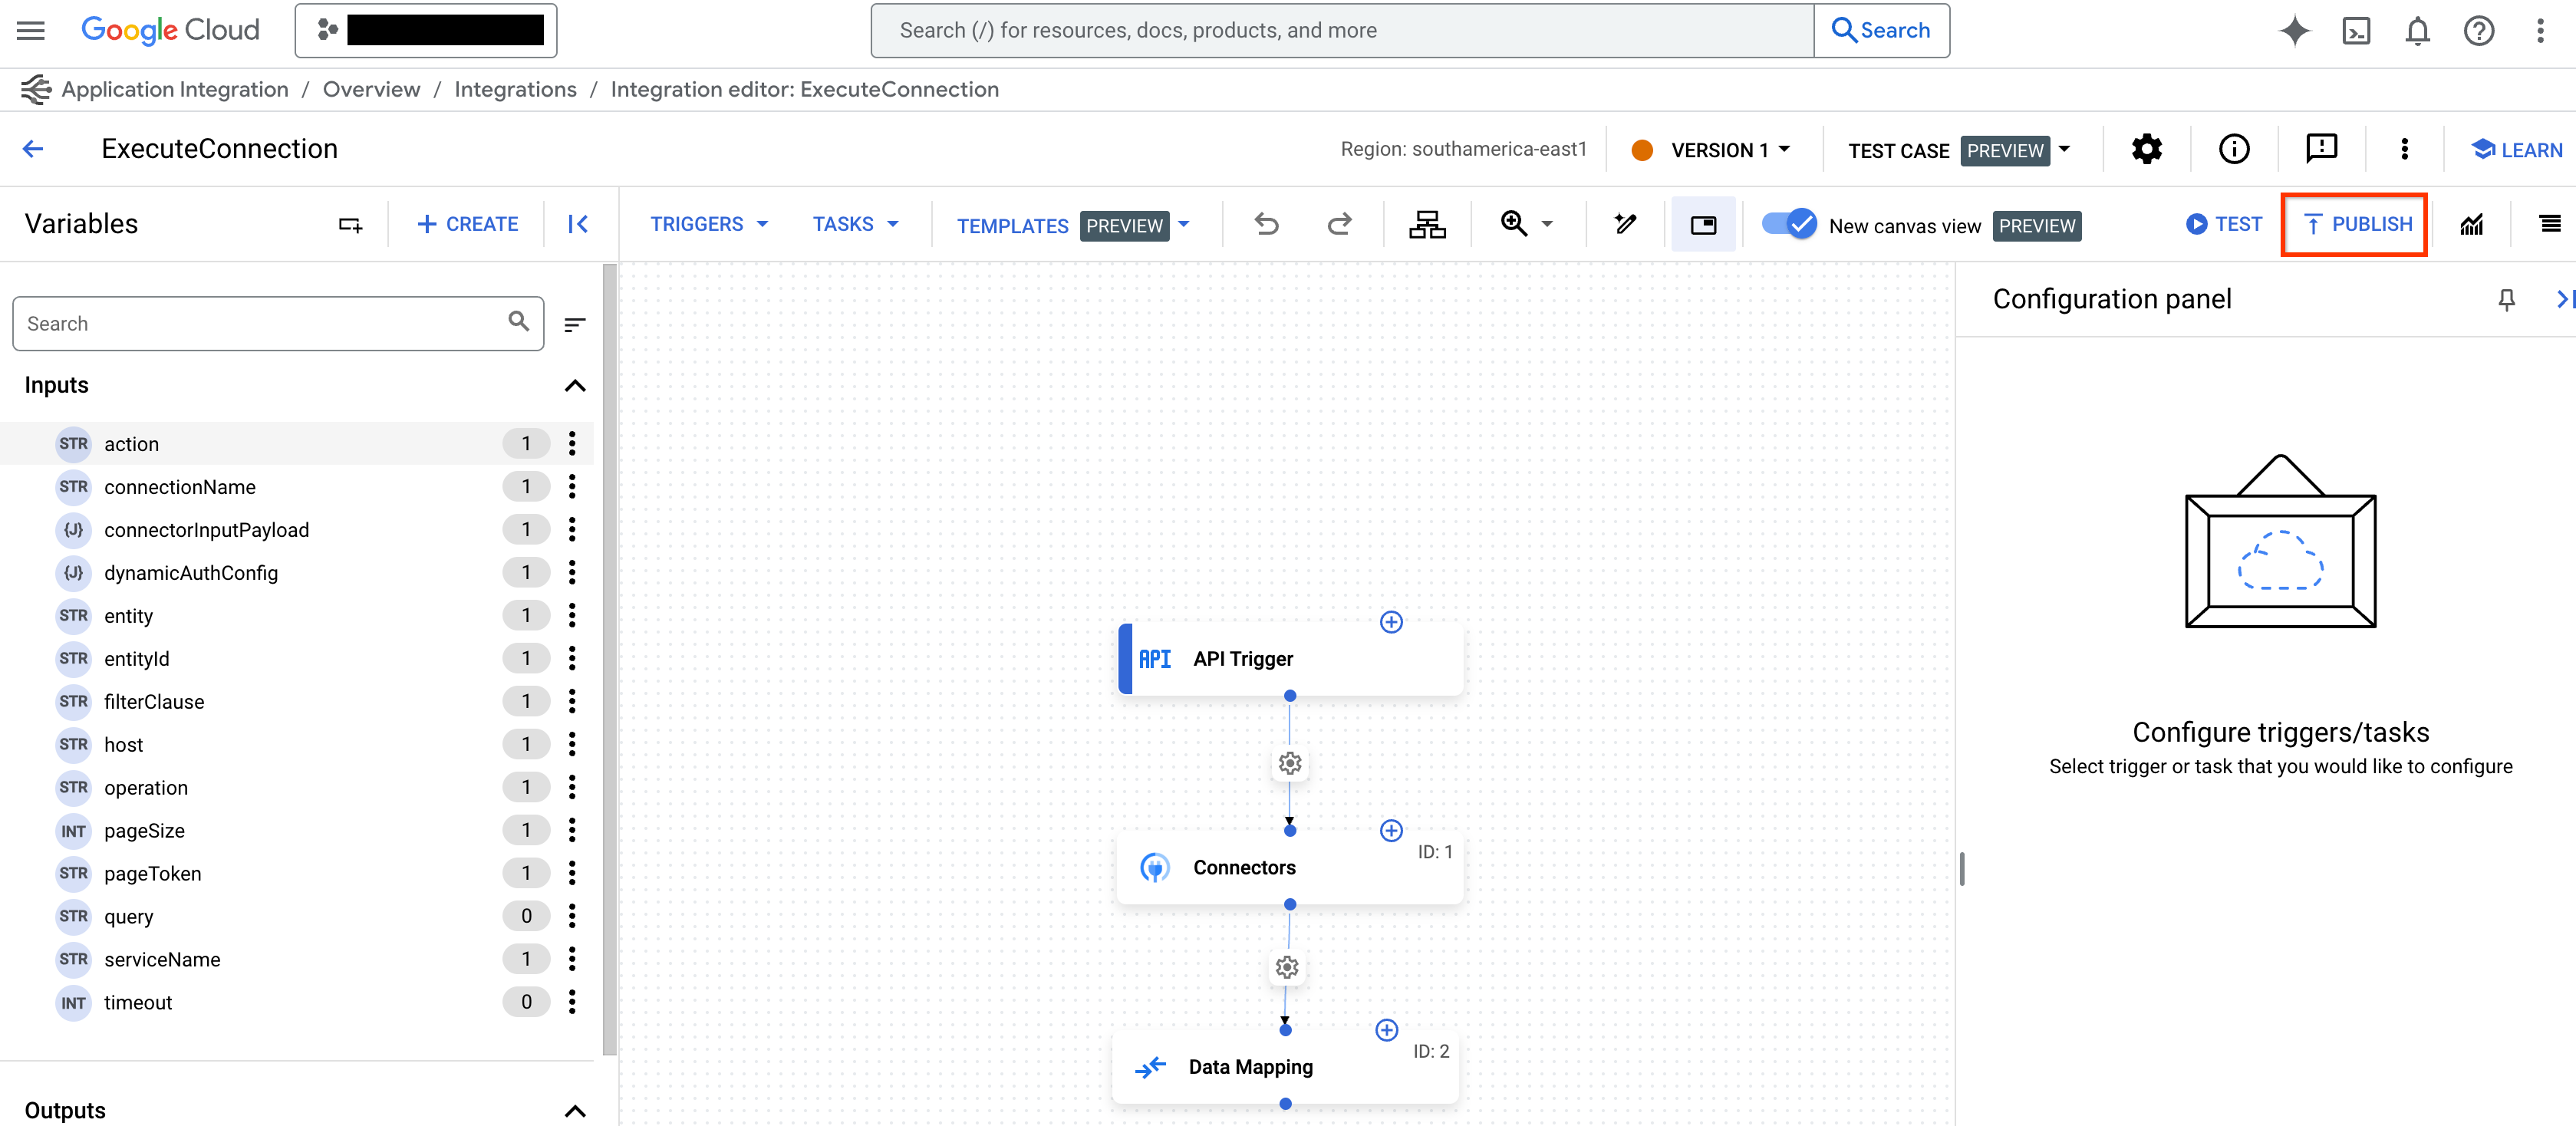
点击 PUBLISH 在 应用集成 编辑器中发布集成。
创建应用集成工具集
要为集成连接器创建应用集成工具集,请按照以下步骤操作:
步骤:

要为集成连接器创建应用集成工具集,请按照以下步骤操作:
-
在
tools.py文件中使用ApplicationIntegrationToolset创建工具:from google.adk.tools.application_integration_tool.application_integration_toolset import ApplicationIntegrationToolset connector_tool = ApplicationIntegrationToolset( project="test-project", # TODO: 替换为你的 GCP 项目 ID location="us-central1", # TODO: 替换为你的连接所在位置 connection="test-connection", # TODO: 替换为你的连接名称 # entity_operations 定义要包含的实体及其操作 # 空列表表示支持该实体的所有操作 (如 LIST, CREATE, GET, UPDATE, DELETE) entity_operations={"Entity_One": ["LIST","CREATE"], "Entity_Two": []}, actions=["action1"], # TODO: 替换为你需要的操作名称 service_account_json='{...}', # 可选:服务账号凭据的 JSON 字符串 tool_name_prefix="tool_prefix2", tool_instructions="关于如何使用此连接器的说明..." )注意:
- 你可以提供服务账号用于身份验证,而不是使用默认凭据。只需生成服务账号密钥并为该服务账号分配正确的应用集成和集成连接器 IAM 角色。
- 要查找连接器支持的实体和操作列表,请参考连接器 API:listActions 或 listEntityTypes。
ApplicationIntegrationToolset还支持auth_scheme和auth_credential,用于集成连接器的 动态 OAuth2 身份验证。要使用它,可以在tools.py文件中创建一个类似这样的工具:from google.adk.tools.application_integration_tool.application_integration_toolset import ApplicationIntegrationToolset from google.adk.tools.openapi_tool.auth.auth_helpers import dict_to_auth_scheme from google.adk.auth import AuthCredential from google.adk.auth import AuthCredentialTypes from google.adk.auth import OAuth2Auth oauth2_data_google_cloud = { "type": "oauth2", "flows": { "authorizationCode": { "authorizationUrl": "https://accounts.google.com/o/oauth2/auth", "tokenUrl": "https://oauth2.googleapis.com/token", "scopes": { "https://www.googleapis.com/auth/cloud-platform": ( "查看和管理你在 Google Cloud Platform 服务中的数据" ), "https://www.googleapis.com/auth/calendar.readonly": "查看你的日历" }, } }, } oauth_scheme = dict_to_auth_scheme(oauth2_data_google_cloud) auth_credential = AuthCredential( auth_type=AuthCredentialTypes.OAUTH2, oauth2=OAuth2Auth( client_id="...", # TODO: 替换为你的 client_id client_secret="...", # TODO: 替换为你的 client_secret ), ) connector_tool = ApplicationIntegrationToolset( project="test-project", # TODO: 替换为你的 GCP 项目 ID location="us-central1", # TODO: 替换为你的连接所在位置 connection="test-connection", # TODO: 替换为你的连接名称 entity_operations={"Entity_One": ["LIST","CREATE"], "Entity_Two": []}, actions=["GET_calendars/%7BcalendarId%7D/events"], # TODO: 示例操作:列出日历事件 service_account_json='{...}', # 可选 tool_name_prefix="tool_prefix2", tool_instructions="说明...", auth_scheme=oauth_scheme, auth_credential=auth_credential ) -
更新
agent.py文件并将工具添加到你的智能体: -
配置
__init__.py以公开你的智能体: -
启动 Google ADK Web UI 并开始与你的智能体互动:
访问 http://localhost:8000,并选择你的智能体进行测试。
使用应用集成工作流
你可以将现有的应用集成工作流作为工具提供给智能体。
1. 创建工具
要在 tools.py 文件中使用 ApplicationIntegrationToolset 创建工具,示例代码如下:
integration_tool = ApplicationIntegrationToolset(
    project="test-project", # TODO: 替换为你的 GCP 项目 ID
    location="us-central1", # TODO: 替换为你的集成所在位置
    integration="test-integration", # TODO: 替换为集成工作流名称
    triggers=["api_trigger/test_trigger"], # TODO: 替换为触发器 ID。空列表表示包含所有 API 触发器。
    service_account_json='{...}', # 可选:服务账号凭据 JSON
    tool_name_prefix="tool_prefix1",
    tool_instructions="说明..."
)
要在 Tools.java 文件中创建工具,示例代码如下:
import com.google.adk.tools.applicationintegrationtoolset.ApplicationIntegrationToolset;
import com.google.common.collect.ImmutableList;
import com.google.common.collect.ImmutableMap;

public class Tools {
    public static ApplicationIntegrationToolset integrationTool;
    public static ApplicationIntegrationToolset connectionsTool;

    static {
        // 示例:引用应用集成工作流作为工具
        integrationTool = new ApplicationIntegrationToolset(
                "test-project",
                "us-central1",
                "test-integration",
                ImmutableList.of("api_trigger/test-api"),
                null,
                null,
                null,
                "{...}",
                "tool_prefix1",
                "工具说明...");

        // 示例:引用集成连接器作为工具
        connectionsTool = new ApplicationIntegrationToolset(
                "test-project",
                "us-central1",
                null,
                null,
                "test-connection",
                ImmutableMap.of("Issue", ImmutableList.of("GET")),
                ImmutableList.of("ExecuteCustomQuery"),
                "{...}",
                "tool_prefix",
                "工具说明...");
    }
}
2. 将工具添加到你的智能体
更新 agent.py 文件:
```python from google.adk.agents.llm_agent import LlmAgent from .tools import integration_tool, connector_tool
  root_agent = LlmAgent(
      model='gemini-flash-latest',
      name='integration_agent',
      instruction="帮助用户,利用你可以访问的工具",
      tools=[integration_tool],
  )
```
更新 MyAgent.java 文件:
import com.google.adk.agent.LlmAgent;
import com.google.adk.tools.BaseTool;
import com.google.common.collect.ImmutableList;

public class MyAgent {
    public static void main(String[] args) {
        // 组合工具
        ImmutableList<BaseTool> tools = ImmutableList.<BaseTool>builder()
                .add(Tools.integrationTool)
                .add(Tools.connectionsTool)
                .build();

                // 最后,使用自动生成的工具创建你的智能体。
                LlmAgent rootAgent = LlmAgent.builder()
                        .name("science-teacher")
                        .description("科学老师智能体")
                        .model("gemini-flash-latest")
                        .instruction(
                                "帮助用户,利用你可以访问的工具。"
                        )
                        .tools(tools)
                        .build();

        // 之后即可使用 rootAgent 与 LLM 交互
    }
}
3. 公开你的智能体
4. 运行你的智能体
完成上述步骤后,访问 http://localhost:8000(Python)或 http://localhost:8080(Java),选择你的智能体进行测试。